Create Data Products Using YAML
Alation Cloud Service Applies to Alation Cloud Service instances of Alation
At an advanced level, you can create a data product by defining it in YAML. This topic describes the structure and properties of the YAML specification used for data products.
Note
You can create data products only after setting up a Marketplace. See Set Up Data Products Marketplace if you haven’t done this yet.
You must have the access level of Marketplace Admin to create data products. For more on the Marketplace permissions, refer to Configure Access in the Data Product App.
In this topic:
Step 1: Open the Data Products Editor
To create a data product:
Select the Data Products App in the left-hand navigation panel.
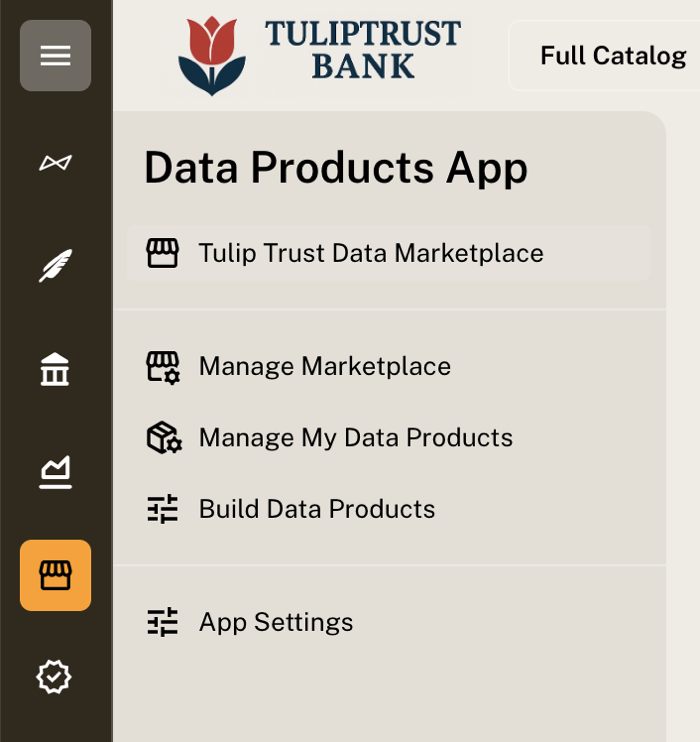
Expand the left-side navigation.
In the App’s menu, click Manage My Data Products.
Click Add Data Product (top right). The new data product editor opens.
Click Edit YAML to open the YAML specification.
Step 2: Add Required Properties
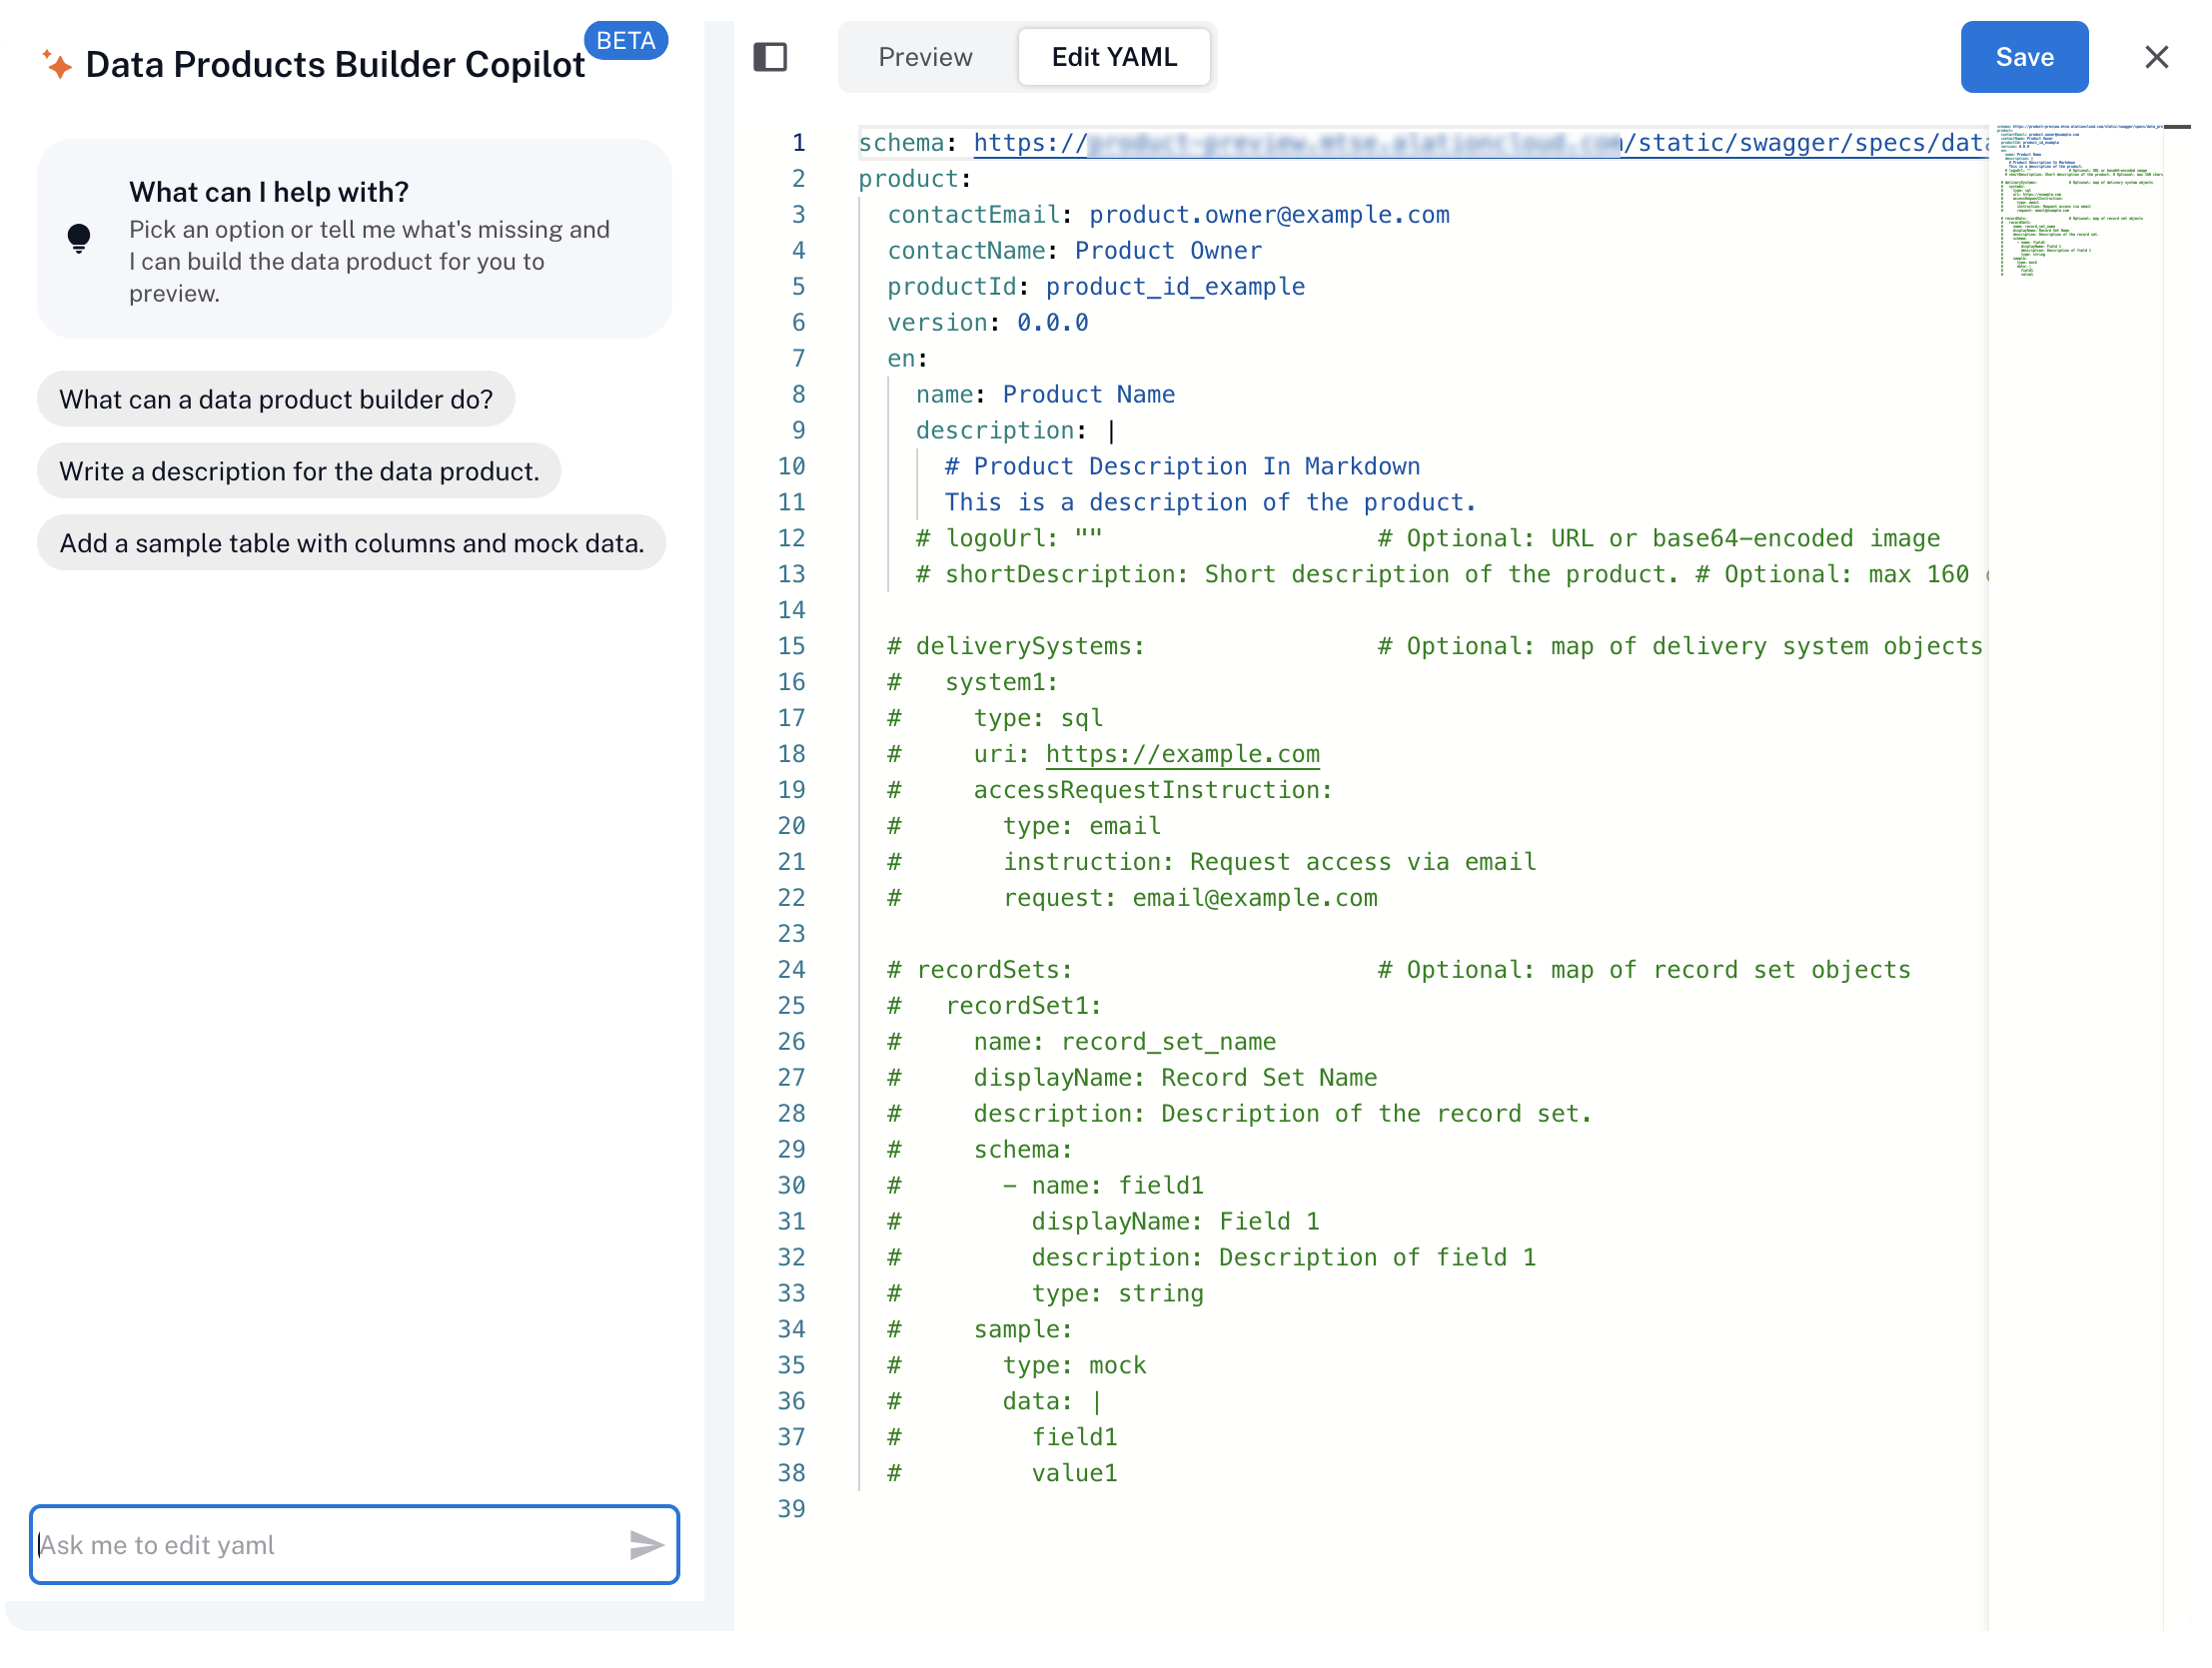
When you open the editor, you see an initial default data product definition. You can edit this YAML directly and preview the changes in real time. The minimal required properties are un-commented. Additional optional properties are commented out.
Note
On the left side of the editor, you see the Data Products Builder Copilot: an AI-powered assistant that helps generate and refine your data product definition. In this guide, we focus on manually editing the data product definition, without using the Builder Copilot.
Click the Preview toggle in the top-left corner of the editor. The preview panel opens, displaying the page layout based on the current YAML content. As you make changes to the YAML, the preview will update in real time to reflect your edits.
Click Edit YAML to go back to the editor.
You can also expand the editor to full screen and hide the Builder Copilot panel for a more focused view. To use the full-page editor, click the layout icon to the left of the Preview toggle.

We’ll edit the YAML block by block and preview the changes, starting with the required properties nested under the
productproperty:schema: https://<base_URL>/static/swagger/specs/data_products/product_schema.yaml product: contactEmail: product.owner@example.com contactName: Product Owner productId: product_id_example version: 0.0.0 en: name: Product Name description: | # Product Description In Markdown This is a description of the product.
Leave the
schemaproperty as is. It contains the URL for the schema of the data product object on your instance.Fill in the following with your own values:
contactEmail: Email of the product owner. This will be visible to all users on the catalog page and used for access requests.contactName: Name of the product owner who manages access and maintains data quality.productId: A unique identifier, for example:product_1.version: Semantic version, for example:1.0.0. Alation doesn’t currently support version history tracking. Manage versions externally for now.
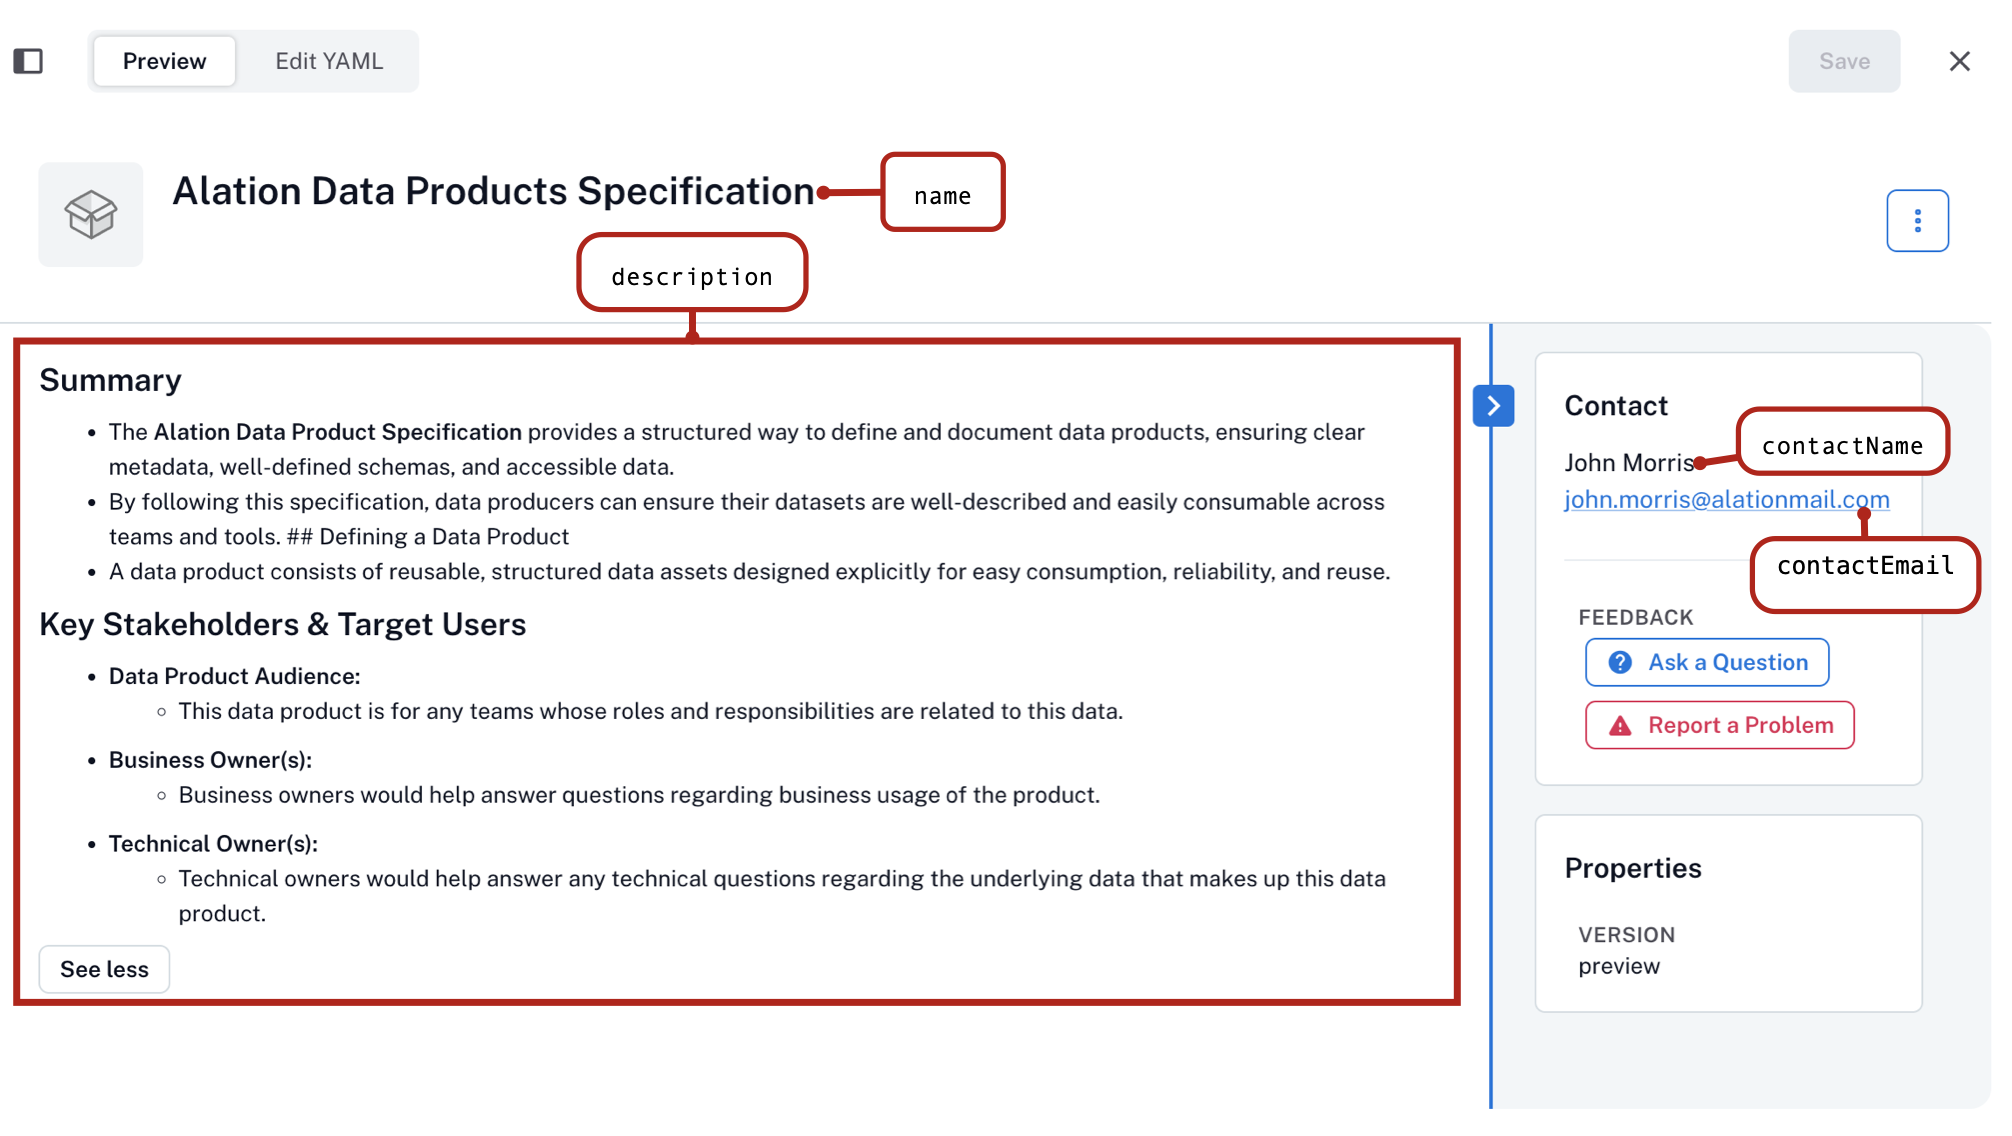
Fill the required English properties under the en property:
name: A clear, descriptive title (for example, Customer 360 View).description: Markdown-supported content that describes purpose, business context, related definitions, and key usage information.
Example YAML:
product:
  contactEmail: john.morris@alationmail.com
  contactName: John Morris
  productId: product_1
  version: 1.0.0
  en:
    name: Alation Data Products Specification
    description: |
      ## Summary
      * The **Data Product Spec** provides a structured way to define data products.
      * Ensures clear metadata, schema, and easy access across teams.
      ## Defining a Data Product
      * Reusable, structured, reliable datasets.
      ## Stakeholders
      * **Business Owners**: Answer questions about usage.
      * **Technical Owners**: Support questions about underlying data.
Toggle on Preview to see how this information displays on the catalog page.
Uncomment and add optional general properties:
logoUrl: A logo to visually distinguish your product. The logo appears next to the data product’s name. Images must be accessible from within your network.shortDescription: A short summary (max 160 characters). The short description will be displayed on the data product’s tile in the Marketplace.
Example YAML:
product:
  contactEmail: john.morris@alationmail.com
  contactName: John Morris
  productId: product_1
  version: 1.0.0
  en:
    name: Alation Data Products Specification
    description: |
        # Product Description In Markdown
        This is a description of the product.
    logoUrl: https://www.example.com/logo.png
    shortDescription: Short description of the product.
Step 3: Add Delivery Systems
The deliverySystems property specifies how data consumers can access the data in your product. Each defined delivery system creates an access configuration and makes the data more discoverable and usable through the catalog.
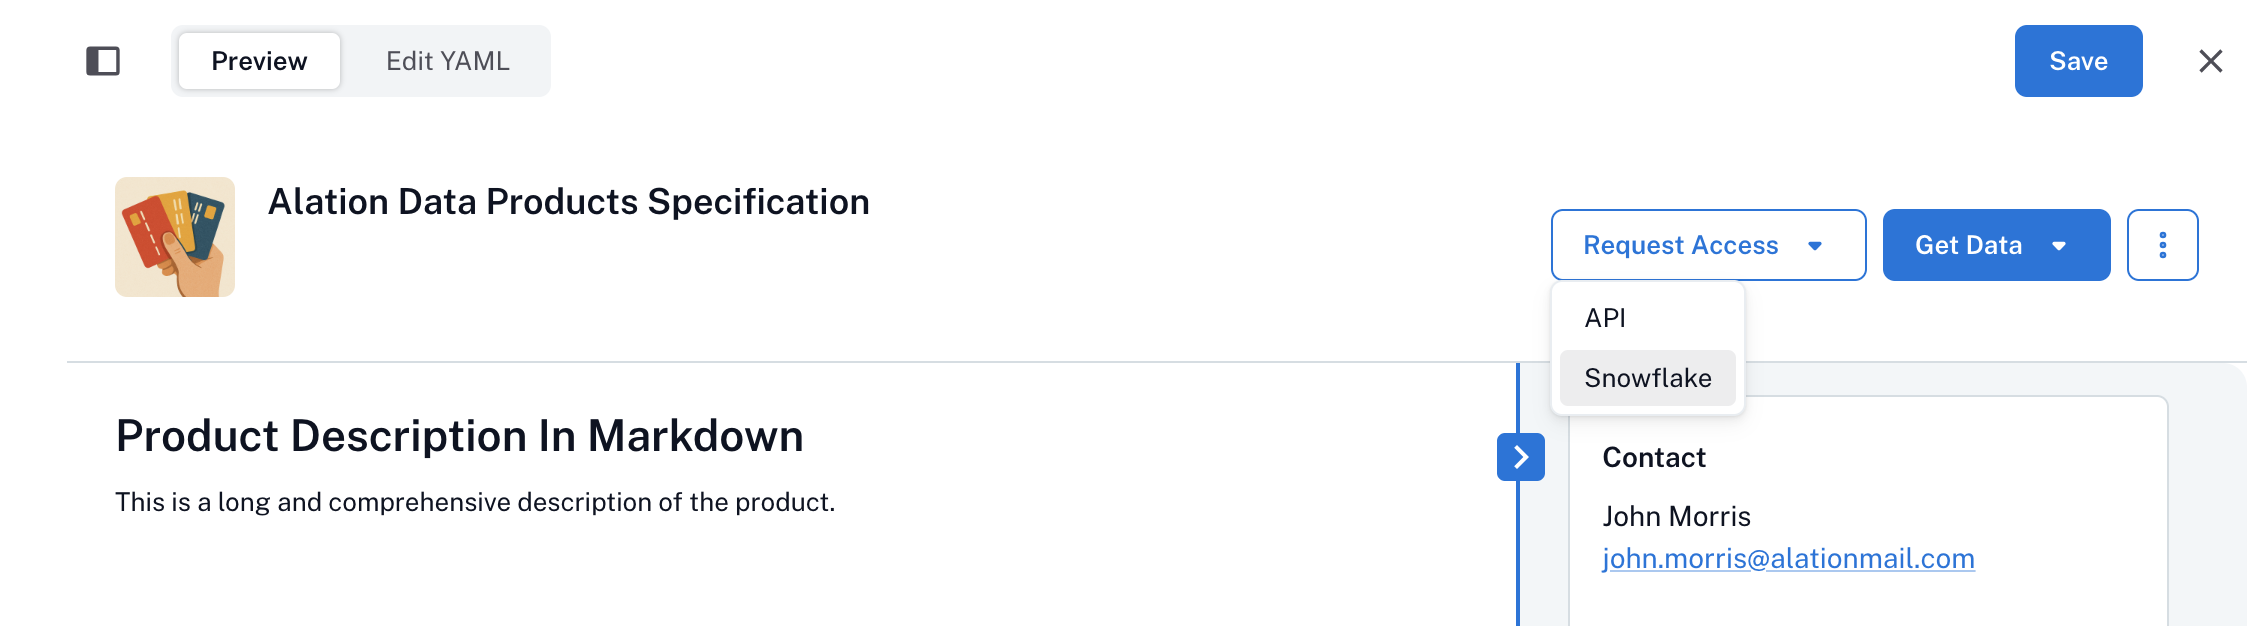
By adding the deliverySystems block, you enable two buttons on your data product’s catalog page:
Request Access: Opens a form based on the access instructions you provide.
Get Data: Directs users to the data endpoint, such as a SQL workspace, BI dashboard, or an API URL.
To add delivery systems:
Uncomment the
deliverySystemsblock in the YAML code.Define at least one named delivery system (for example, Snowflake, API, Tableau) as a property under
deliverySystems. This property will appear in the UI.For each system, specify:
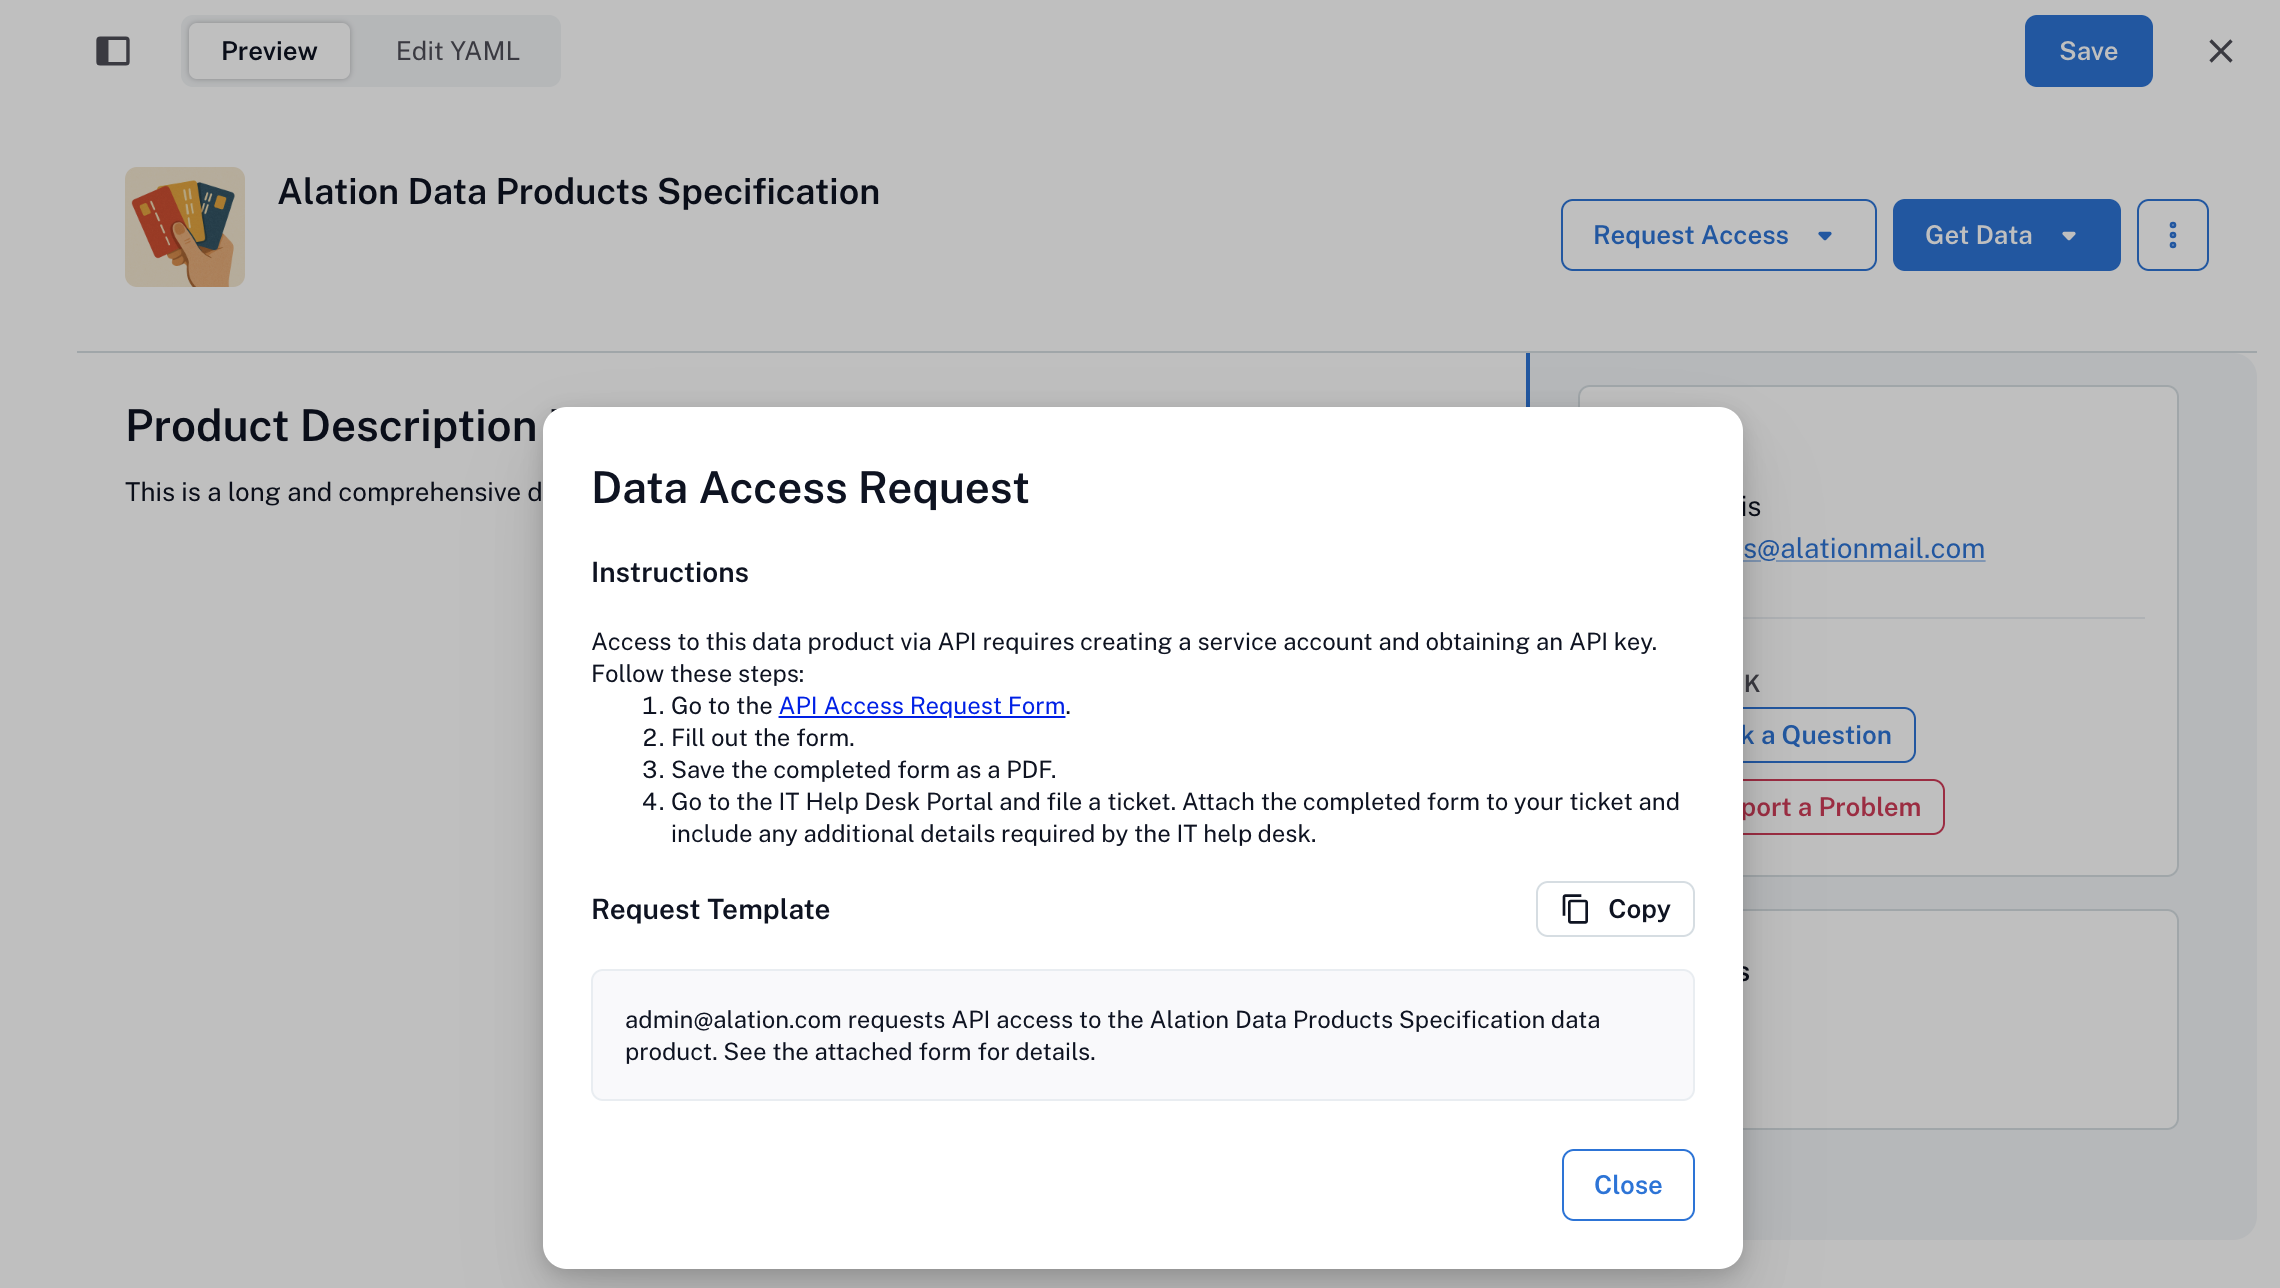
type: Required. One ofsql,sqlgui,api,bi,spreadsheet,app, orother.uri: Required. A link to the delivery system for users to use.accessRequestInstruction(optional): Shows up in the UI to guide users on how to request access. Supports Markdown. Includes properties:type: Currently onlytextis supported.instruction: Required. Markdown-supported steps.request: Optional. Templated message that users can copy.
Example YAML:
deliverySystems:
  API:
    type: api
    uri: "https://developer.alation.com/dev/reference/list_data_products"
    accessRequestInstruction:
        instruction: "Access to this data product requires a service account and an API key.
           Follow these steps:
           \n1. Go to the [API Access Request Form](https://editor.swagger.io/).
           \n2. Fill out the form.
           \n3. Save the form as PDF.
           \n4. Submit a help desk ticket with the attached form."
        request: "{{user.username}} requests API access to the {{ product.en.name }}."
        type: text
  snowflake:
    type: sql
    uri: "https://app.snowflake.com/alation/alation_analytics/..."
    accessRequestInstruction:
        instruction: "Go to the IT helpdesk and copy/paste the request template below."
        request: "{{user.username}} is requests access to the {{ product.en.name }}.
            Business Justification: _________ (fill this out)"
        type: text
Use Preview to see how each delivery system appears on the catalog page. Note that the Get Data button won’t work until you’ve defined record sets.
The delivery systems you’ve specified will appear as a list when you click the Request Access button:
The access request configuration appears when you select a delivery system from the list:
Step 4: Define Record Sets
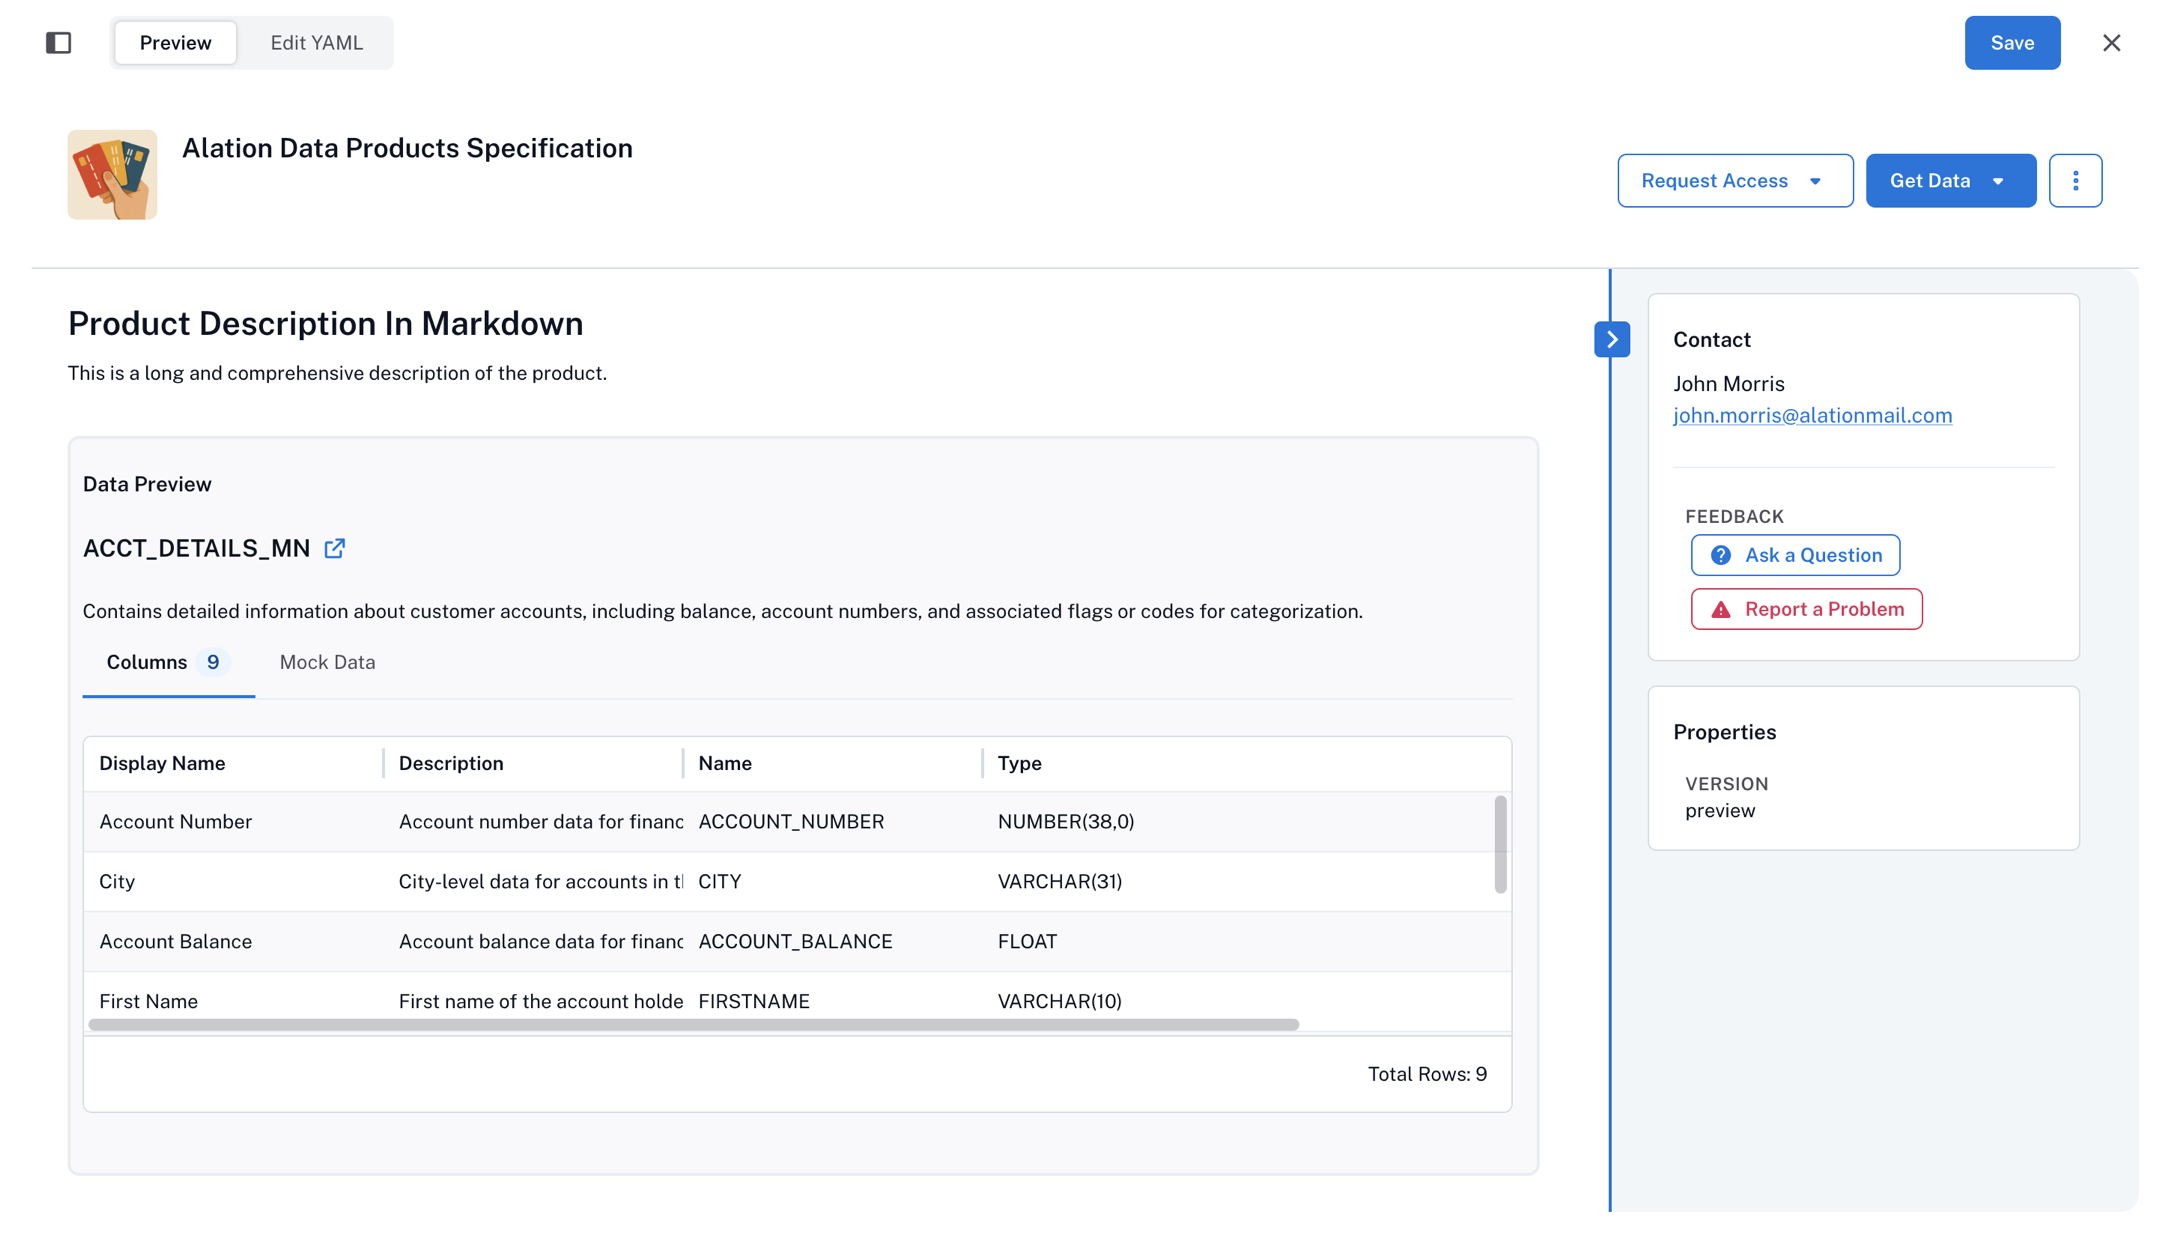
Each record set (recordSets) represents a tabular data set with metadata, schema, and sample data. Multiple record sets can be defined for one data product. On the catalog page of the data product, data consumers will see an example of the data in the record sets that the data product offers in the Data Preview area.
To define record sets:
Uncomment the
recordSetsblock in the YAML code.Fill out the record set properties:
name: Required. Technical name.displayName: Required. Human-readable name.description: Short summary of the data set.schema: List of fields, includingname,displayName,description,type.sample: Optional. Must includetype: mockand sample comma-separated data.dataAccess: Optional. Defines how to access the data.
Example YAML:
recordSets:
  account_details_main:
      name: ACCT_DETAILS_MN
      displayName: Account Details Main
      description: |
          Contains detailed information about customer accounts,
          including balances and account identifiers.
      sample:
          type: mock
          data:
            ACCOUNT_NUMBER,CITY,ACCOUNT_BALANCE,FIRSTNAME,LASTNAME
            1234567890,New York,5000.50,John,Doe
            2345678901,Los Angeles,7500.75,Alice,Johnson
      schema:
          - name: ACCOUNT_NUMBER
            displayName: Account Number
            description: Account number.
            type: NUMBER(38,0)
          - name: CITY
            displayName: City
            description: City where the account is held.
            type: VARCHAR(31)
          - name: ACCOUNT_BALANCE
            displayName: Account Balance
            description: Current balance of the account.
            type: FLOAT
          - name: FIRSTNAME
            displayName: First Name
            description: First name of the account holder in the "acct_details_mn" table.
            type: VARCHAR(10)
          - name: LASTNAME
            displayName: Last Name
            description: Last name of the account holder in the "acct_details_mn" table.
            type: VARCHAR(12)
Toggle Preview to see how record sets appear on the catalog page. The next screenshot shows the Data Preview area generated by the example configuration above:
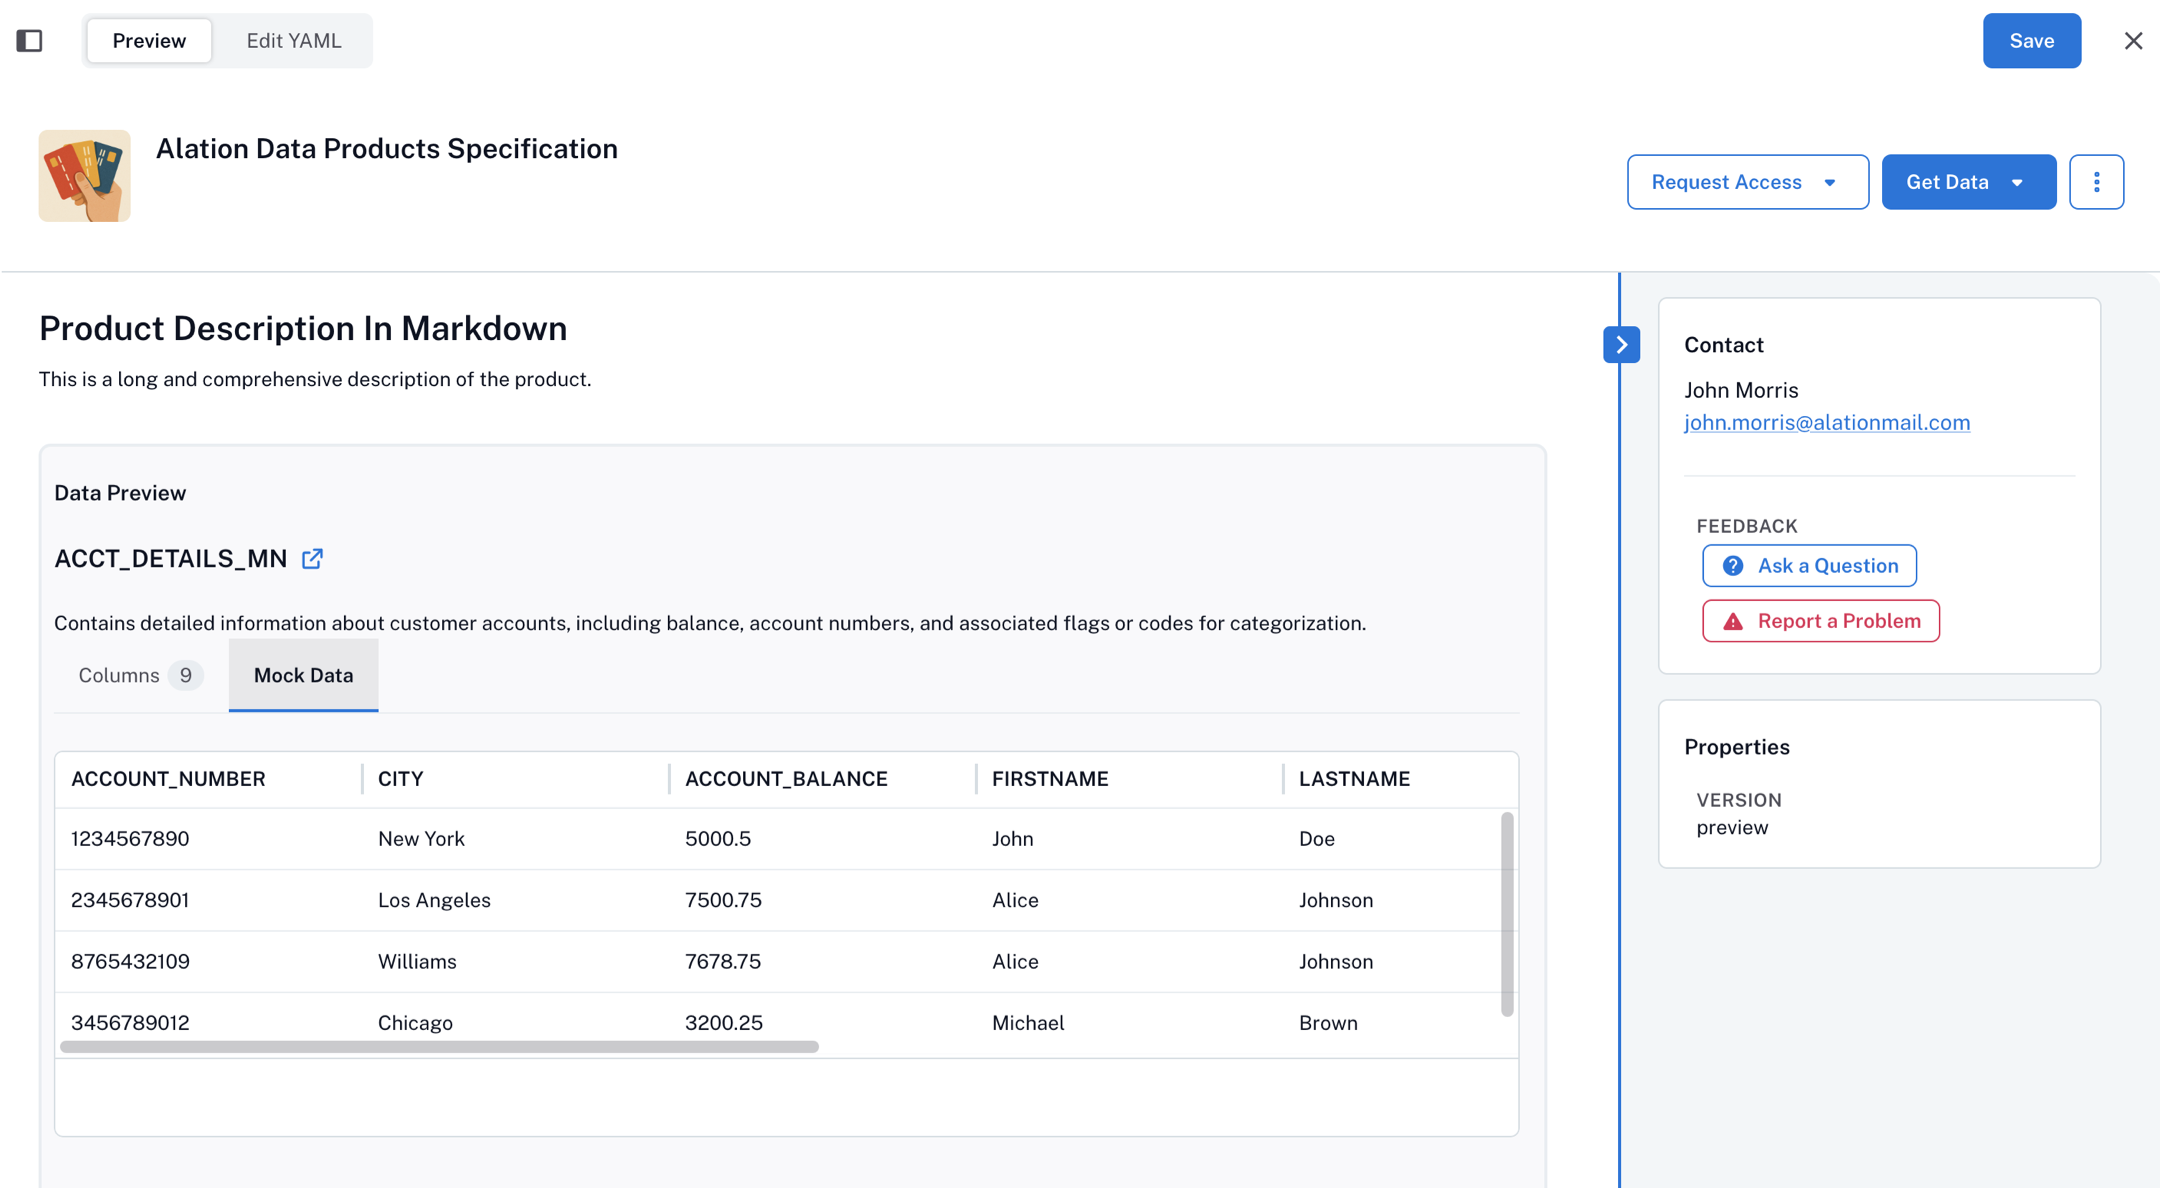
When you include a data sample into your record set, data consumers will be able to see it under the Mock Data tab. The next screenshot illustrates the Mock Data section generated by the configuration example above.
Step 5: Extend Your Data Product with Custom Metadata
Alation’s data product specification supports custom metadata properties using the x- prefix. This allows you to extend the standard schema with organization-specific attributes, making data products more adaptable to unique business and governance needs.
Custom properties are defined under the product section in the YAML definition and prefixed with x-. These properties are optional: they’re not required to define a valid data product, but they can be used in marketplace validation checks, CI/CD pipelines, and governance enforcement.
Custom properties can be referenced in:
Marketplace standards (for validation and compliance checks)
CI/CD pipelines
Access request configurations
Here are a few examples of custom properties:
Business Metadata:
x-department: MarketingRegulatory Compliance:
x-gdpr-category: PIIOperational Context:
x-data-refresh-rate: DailyAccess Control Tags:
x-security-tier: Restricted
Custom Properties in the Marketplace
Custom properties can be used to support validation, automation, and access control in the Marketplace.
Using Custom Properties in Marketplace Standards
Custom properties can be included in Marketplace validation rules, enabling automation in CI/CD pipelines and enforcement of governance policies. This approach allows organizations to enforce internal requirements without hardcoding every rule into the user interface.
For example, a Marketplace might require all data products to define a value for x-compliance-tier:
minimumStandard:
  - key: "product.x-compliance-tier"
    type: static
    check: "not null"
Using Custom Properties in Access Requests
Custom properties can also be referenced in access request configurations.
If your access process requires additional metadata, for example, classification level, region, or owner contact, you can reference a custom property and pass its value to the access request handling system.
Step 6: Save Your Data Product Definition
Once you’ve reviewed and finalized your YAML definition, click Save.
Saving lists your new product on the Marketplace. A snapshot of your data product appears on the Marketplace landing page accessible from the Data Products App menu. Now, data consumers can find your data product by searching the Marketplace. By default, new data products are Public, which means everyone with a link to the product can view it. Only the creator and those with explicit permissions can edit.
Learn more about managing your data products in Manage Data Products.
Data Products YAML Example
product:
  productId: finance:arr_sales_churn
  version: 1.0.0
  contactEmail: data-products@company.com
  contactName: Jane Doe
  x-customProperty:
      description: |
        This is a custom property for demonstration purposes.
        You can add your own properties that aren't defined in the schema.
        The only requirement is that the name must start with "x-".
        It can be of any type, such as string, number, boolean, etc.
  en:
      name: ARR, Sales, and Churn
      shortDescription: Tracks ARR, new sales, renewals, and churn monthly
      description: |
        This data product provides visibility into financial metrics such as
        Annual Recurring Revenue (ARR), new sales, renewals, and churn. It is
        designed to help finance, sales, and executive teams monitor growth and
        retention performance across customer segments and time periods. Data is
        updated monthly and includes current and historical trends.
      logoUrl: https://example.com/logos/arr-sales-churn.png
  deliverySystems:
      snowflake:
      type: SQL
      uri: snowflake://acme.analytics/FINANCE/ARR_METRICS
      accessRequestInstruction:
          type: text
          instruction: Request access from data-products@company.com
          request: https://company.com/access-request-form
  recordSets:
      arr_metrics_monthly:
          name: Monthly ARR Metrics
          description: |
              Each row represents monthly ARR metrics, including new sales, expansions,
              renewals, and churn, by customer segment.
          schema:
              - name: month
                description: The month the metric applies to.
                type: date
              - name: segment
                description: Customer segment (e.g., Enterprise, SMB).
                type: string
              - name: new_sales_arr
                description: ARR from new customer sales in the month.
                type: number
              - name: expansion_arr
                description: ARR from existing customer expansions.
                type: number
              - name: renewal_arr
                description: ARR retained from renewals.
                type: number
              - name: churn_arr
                description: ARR lost due to customer churn.
                type: number
              - name: net_new_arr
                description: Net ARR change (sales + expansion + renewal - churn).
                type: number
          sample:
              type: mock
              data: |
                month,segment,new_sales_arr,expansion_arr,renewal_arr,churn_arr,net_new_arr
                2024-01-01,Enterprise,120000,30000,100000,20000,230000
                2024-01-01,SMB,50000,10000,40000,10000,90000
          dataAccess:
              - type: SQL
                documentationUrl: https://company.com/docs/arr-metrics
                qualifiedName:
                  database: FINANCE
                  schema: ARR_METRICS
                  table: MONTHLY
      customer_churn_details:
          name: Customer Churn Details
          description: |
              Each row represents a customer that churned in a given month,
              including associated ARR, churn reason, and segment. Useful for
              analyzing churn patterns at the customer level.
          schema:
              - name: customer_id
                description: Unique customer identifier.
                type: string
              - name: customer_name
                description: The name of the customer.
                type: string
              - name: churn_month
                description: The month the customer churned.
                type: date
              - name: churn_arr
                description: ARR lost from this customer churn.
                type: number
              - name: churn_reason
                description: Reason for churn as captured by sales/support.
                type: string
              - name: segment
                description: Customer segment (e.g., Enterprise, SMB).
                type: string
          sample:
              type: mock
              data: |
                customer_id,customer_name,churn_month,churn_arr,churn_reason,segment
                CUST123,Acme Corp,2024-01-01,50000,Budget cut,Enterprise
                CUST456,Startify Inc,2024-01-01,10000,Switched to competitor,SMB
          dataAccess:
              - type: SQL
                documentationUrl: https://company.com/docs/customer-churn
                qualifiedName:
                   database: FINANCE
                   schema: ARR_METRICS
                   table: CUSTOMER_CHURN
Data Product YAML Field Reference
Your Alation instance includes the data product object specification at https://<base_URL>/static/swagger/specs/data_products/product_schema.yaml (substitute <base_URL> with the base URL of your instance).
Here’s a short reference listing the main properties:
Field |
Required |
Description |
|---|---|---|
|
Yes |
Unique identifier for the product. Ensure that the product ID is unique
across all data products in the marketplace. It should not contain any
spaces or special characters other except |
|
Yes |
Semantic version string
Example: |
|
Yes |
Contact email of the product owner for support or questions |
|
Yes |
Human-readable name of the product owner |
|
Yes |
Display name for the product |
|
Optional |
List of systems where the data is accessible. A delivery system is a system that provides access to the data product. It includes the type of delivery system, the URI to access it, and any additional instructions for requesting access. |
|
Optional |
One or more tabular datasets included in the product. A record set is a tabular dataset of rows and columns of structured data that can be stored in any system, such as a database, API, spreadsheet, or file. It includes a schema, optional sample data, and access instructions so others can understand and use it. |