Prerequisites
Alation Cloud Service Applies to Alation Cloud Service instances of Alation
This section helps you prepare to configure the connector properties in Alation, including obtaining authentication details and ensuring your project contains the necessary files. The prerequisites depend on your dbt product and vary between dbt Cloud and Core.
dbt Cloud
Before using the connector for extraction in dbt Cloud, you must complete the following steps:
Set Up a dbt Project
Create a project with required models or use an exisiting one.
For more information on setting up a project see dbt Project. Also, you must execute required jobs and tests for the connector to extract. For information about models, jobs, and test status see dbt models and Test status.
Generate a Service Account Token
A service token is a unique access token linked to an account, used to assign a specific set of permissions for managing access. Service tokens are the preferred method to enable access on behalf of the dbt Cloud account.
To generate a service account token, see Generate Service Account Tokens.
Important
In the New service token window, you must select Read-Only and All projects in the Permission set and Project fields, respectively.
Note
Optionally, instead of a service token you can obtain a Personal Access Token (PAT). A PAT specifies a unique access token of an account. For more details, refer to Personal Access Tokens. However, dbt recommends using service tokens over PATs. For details, see Authentication tokens.
Enable ELT Source in Alation
To enable an ELT source in Alation, contact Alation Support.
Enable Support for Databricks Unity Catalog Lineage
When configuring Databricks with Unity Catalog in dbt Cloud, you must include the catalog name in the connection settings.
Alation identifies the database type as Databricks Unity Catalog only if the catalog name is specified. Without it, lineage capture may be incomplete.
When using multiple Unity Catalog databases, perform these steps:
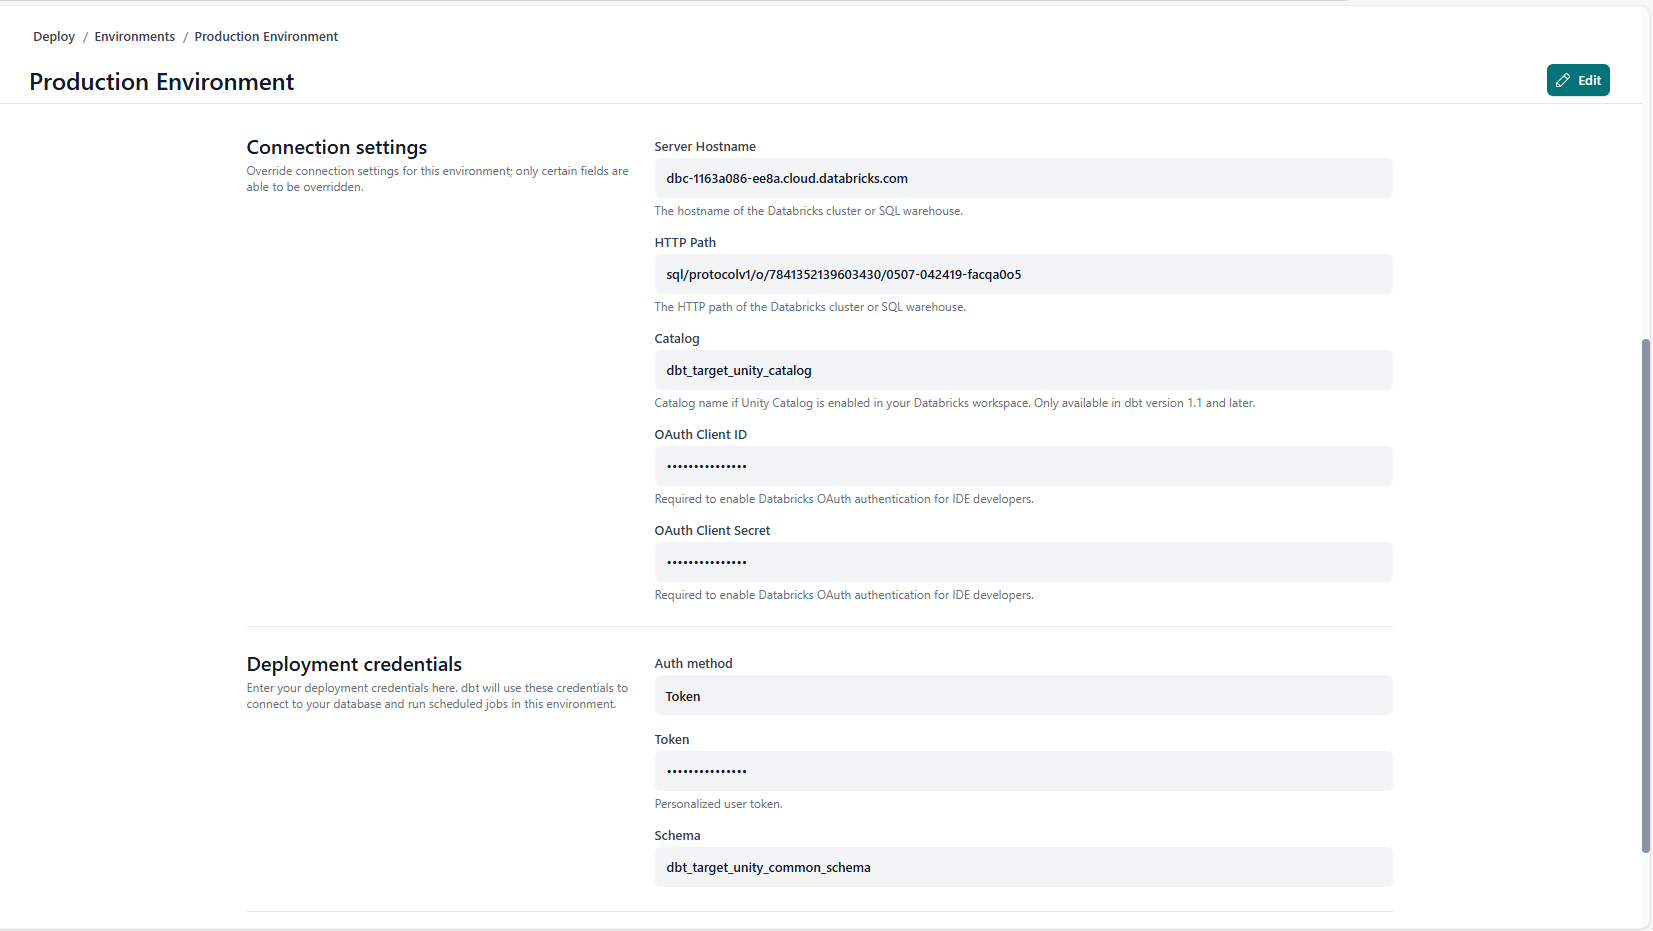
In your dbt Cloud instance, go to the Deploy > Environments > <environment> page.
In the Catalog field under the Connection Settings section, specify the target catalog name. dbt Cloud uses the target catalog name specified in the Catalog field to enable support for Databricks Unity Catalog, and the dbt job uses it as the target catalog.
Specify the target schema name in the Schema field under the Deployment credentials section.
Locate the
schema.ymlin with your dbt project and specify the source catalog names in theschema.ymlfile.Example of
schema.ymlsource configuration:sources: - name: <Name_1> database: <source_catalog_1> schema: <source_schema_1> tables: - name: <table_name_1> - name: <Name_2> database: <source_catalog_2> schema: <source_schema_2> tables: - name: <table_name_2>
Create models in your dbt project to use, if not created already. Open the model file, and create an sql query to fetch the required informtion from the database for which you specified the source catalog name in the step 4.
Example of model creation for source_catalog_1 source catalog:
-- models/base/<filename_1>.sql
SELECT
    <Columns>
FROM
 {{ source('<source_catalog_1>', 'table_name_1') }}
Example of model creation for source_catalog_2 source catalog:
-- models/base/<filename_2>.sql
SELECT
    <Columns>
FROM
 {{ source('<source_catalog_2>', 'table_name_2') }}
Run the build in dbt Cloud instance.
The model tables will be created within the target catalog, as specified in the Connection Settings section.
dbt Core
Before using the connector for extraction in dbt Core, you must complete the following steps:
Prepare the Artifacts for dbt Projects
To set up dbt projects, you must have the artificats listed in this table in your project structure. These artifacts are JSON files essential for the connector to extract metadata and lineage. If you already have a project, verify if these files are present in the project structure. If not, create the files and place them in the project structure.
Note
Alation doesn’t support the ODBC project type.
File |
Description |
How to Generate |
|---|---|---|
|
Fetches the dbt model information and also builds table level lineage |
Using the
|
|
Fetches the host and port information to build source system information and table or column level lineage. You only need to update it if the host or port mapping to the dta source changes. Otherwise, it can remain static. |
manual |
|
Fetches the dbt model column information and also builds column-level lineage |
Using the
|
|
Fetches the job run and test run information to build data health |
Using the
|
Generate Files for dbt Project
You can generate the required files using the following methods:
Generate the Manifest and Run Files
To generate the manifest.json and run_results.json, Alation recommends using the dbt build command. However, if you choose to use the dbt run or dbt test commands to create these files (manifest.json using dbt run and run_results.json using dbt run or dbt test) and place the files in the project folder structure. Additionally, if there are multiple run_results.json files (one each from dbt run and dbt test), rename them and place them in your project as shown below:
Generate the Environment File
Alation displays database table information on the catalog pages of dbt objects under the Source System Information field. To enable this, Alation requires a custom file called env_details.json, which should be included alongside the other required files. This file contains the host and port details for the database resources in the extracted project.
You can create the env_details.json file manually or using a custom build.
To manually create the file:
Identify the required resources in your project and collect the host and port information for each.
Create a JSON file using a text editor of your choice, following this format:
{
"host": "<host1>",
"port": <port_for_host1>
}
Here’s an example of the
env_details.jsonfile created manually for Databricks Unity Catalog.{ "host":"dbc-25e69bfd-44ed.cloud.databricks.com", "port": 443 }
Note
If you are using Databricks without Unity Catalog, after creating the
env_details.jsonfile, you must setunityCatalogas false in theenv_details.json file.{ "host":"dbc-25e69bfd-44ed.cloud.databricks.com", "port": 443, "unityCatalog": false }
The host and port information is available in the profiles.yml file under the ~/.dbt folder within your dbt Core environment.
The infromation below explains how to extract host and port details for each type of data source:
File |
Example from profiles.yml File |
What to look for? |
|---|---|---|
Snowflake |
snowflake_dbt_project:
 outputs:
   prod:
    account: alation_partner.us-east-1
     database: IM_SNOWFLAKE_CLL_1
     password: <password>
     role: ACCOUNTADMIN
     schema: prod_schema_dbt_core_gen2
     threads: 1
     type: snowflake
     user: <user>
     warehouse: TEST
  target: prod
|
host: Look for the value in the Example:
port: The value is always the default port
|
PostgreSQL |
postgres_dbt:
 outputs:
   prod:
    dbname: test_alation_adbc_database_01
     host: 10.13.34.128
     pass: <password>
     port: 5432
     schema: target_schema
     threads: 1
     type: postgres
     user: <user>
  target: prod
|
host: Look for the value in the Example:
|
Redshift |
redshift_dbt:
 outputs:
   prod:
    dbname: test_alation_adbc_database_01
     host: test.chby8zuitgrf.us-east-1.redshift
            .amazonaws.com
     pass: <password>
     port: 5439
     schema: target_schema
     threads: 1
     type: redshift
     user: <user>
  target: prod
|
host: Look for the value in the Example:
port: Look for the value in the Example:
|
Google BigQuery |
Not applicable |
host: The value is always port: The value is always |
Unity Databricks |
unitydatabricks_dbt:
 outputs:
   prod:
    catalog: ap_test_catalog
     host: dbc-xxxx.cloud.databricks.com
     http_path: sql/protocolv1/o/7841352139603430
     /0205-054336-bjxhu84o
     schema: databricks_dbt_target_schema
     threads: 1
     token: <token>
     type: databricks
  target: prod
|
host: Look for the value in the Example:
port: The value is always the default port
|
Non-unity Databricks |
unitydatabricks_dbt:
 outputs:
   prod:
     catalog: null
     host: dbc-xxxx.cloud.databricks.com
     http_path: sql/protocolv1/o/7841352139603430
     /0317-045430-puca15i6
     schema: dbt_core_gen2_aws_databricks_target_schema
     threads: 1
     token: <token>
     type: databricks
  target: prod
|
host: Look for the value in the Example:
|
Oracle |
oracle_dbt:
 outputs:
   prod:
     host: 10.13.50.18
     port: 1521
     user :<username>
     password :<password>
     schema: dbt_oracle_schema
     database:alation
     threads: 1
     service: alation
     type: oracle
     protocol :tcp
|
host: Look for the value in the Example:
port: Look for the value in the Example:
|
Generate the Catalog File
To generate the catalog.json file, use the dbt docs generate command. This command generates the documentation for the dbt project and creates the catalog.json file. Place the file in the project folder structure.
Important
The catalog.json file is optional; however, if it is not included, Alation will not display column-level lineage information.
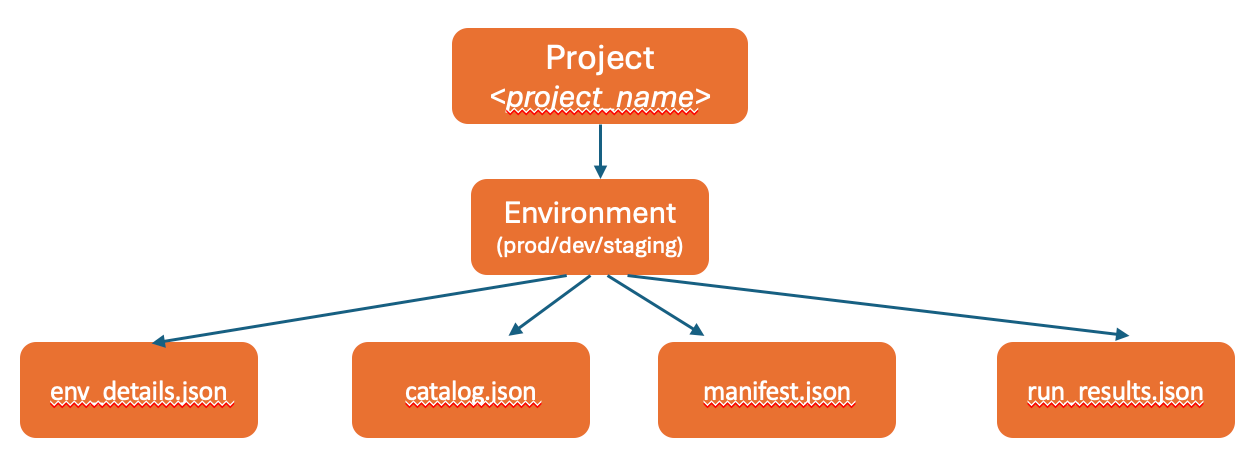
Create the File Structure for dbt Projects
We recommend the artifacts to be placed, if not already present, in a designated storage location, following a specific directory structure. Depending on your setup, your project may include a single environment or multiple environments to support different use cases.
Place the files as immediate children under the project or environment folder as mentioned in Project Structure for a Single Environment and Project Structure for Multiple Environments (recommended).
However, in case you don’t follow the recommended structure, from version 1.7.0, the connector supports repositories with non-standard or unstructured folder organization. For more information on how the connector handles repositories that don’t follow the recommended dbt project structure, see Working with Unstructured Repositories.
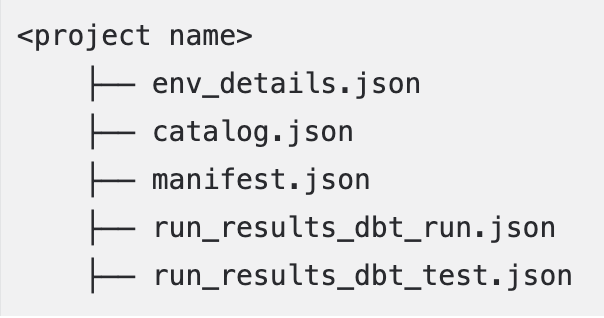
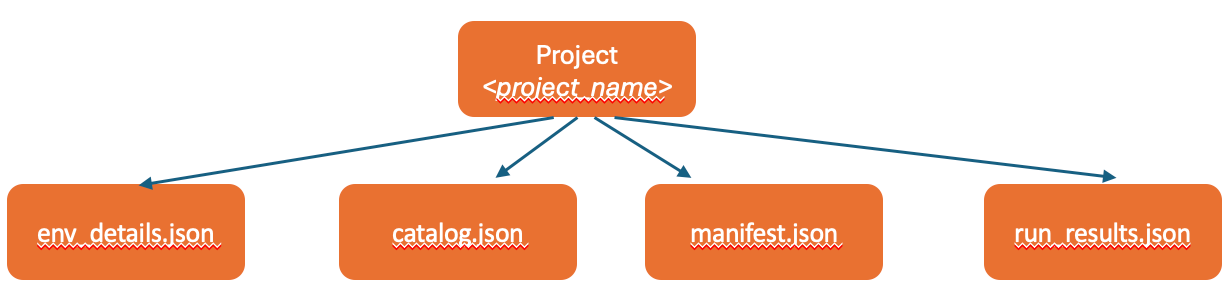
Project Structure for a Single Environment
The <project_name> is a placeholder that represents a specific dbt project.
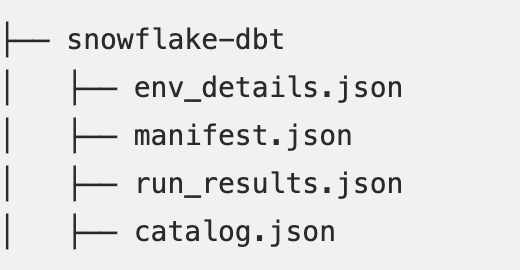
Example
Alation extracts from the production environment by default if you don’t specify an environment.
Example
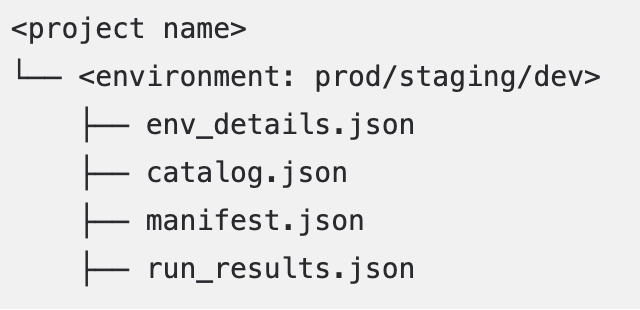
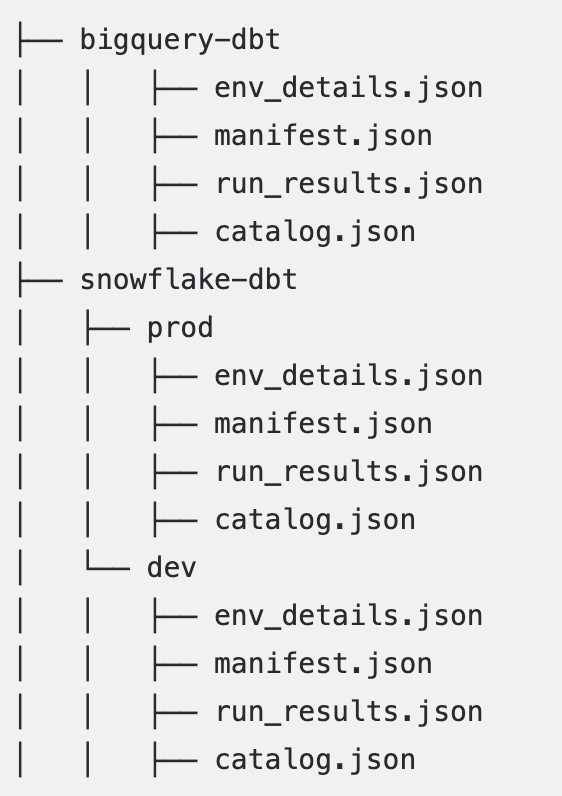
Project Structure for Multiple Environments
Project structure with multiple environments allows you to catalog development or staging sources or targets in Alation.
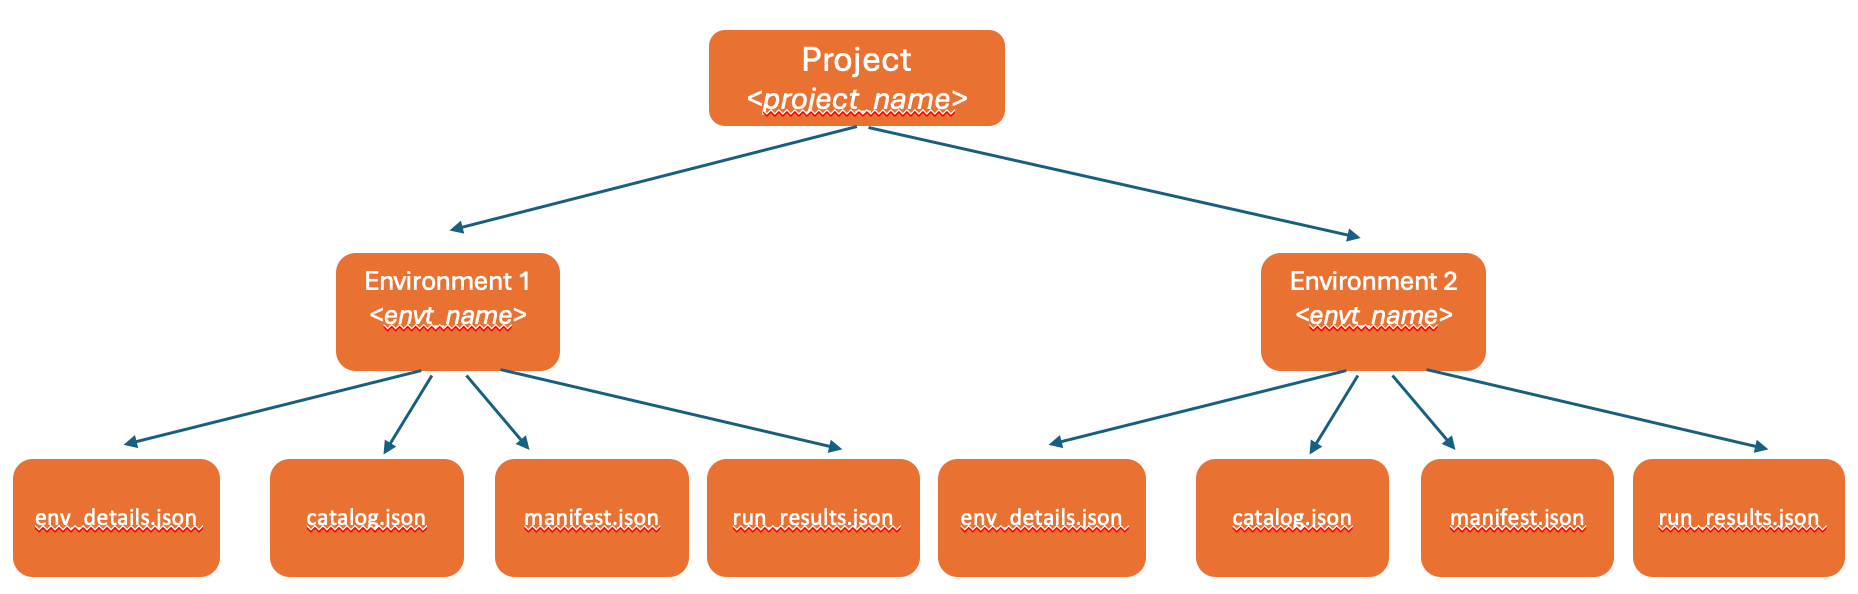
Example
Important
Many dbt environments store files in a
target/folder by default. For optimal performance, move the required files directly under the project or environment folder. For example: if themanifest.jsonfile is in thetarget/folder, such asproject/prod/target/manifest.json, move it to the parent folderproject/prod/manifest.jsonFor non-standard or unstructured folder organization, ensure
env_details.jsonfiles contain proper environment names to aid in project detection
Working with Unstructured Repositories
Available from dbt gen2 OCF Connector version 1.7.0.
The connector supports repositories with non-standard or unstructured folder organization. Such folder organizations are mostly seen in following cases:
Legacy repositories with non-standard or unstructured folder organization
Repositories where dbt projects are mixed with other types of projects
Mono-repositories with complex folder hierarchies
Important
We recommend you to structure your files in the repository as specified in Project Structure for a Single Environment and Project Structure for Multiple Environments .
Here are some examples of repository structures that don’t follow the recommended dbt project structure:
Example 1: Mixed Repository Structure
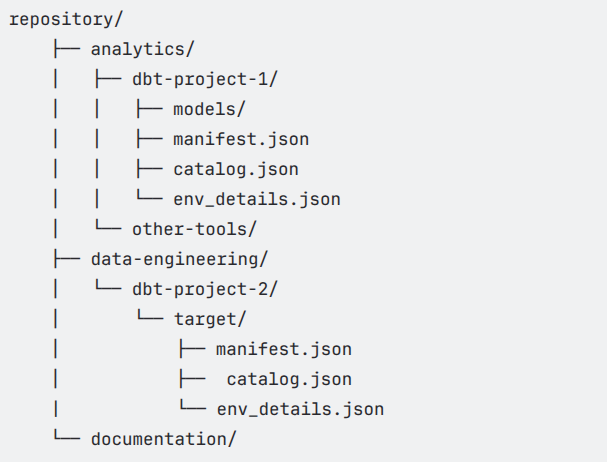
Example 2: Deeply Nested Structure

For such repositories, the connector scans the repository structure to identify dbt projects and their associated files. The scanning process involves the following steps:
Scans up to a maximum depth of 10 levels from the specified base location
Processes up to 10,000 files for better performance
Detects projects automatically by locating JSON files and analyzing
env_details.jsonandmanifest.jsonfiles
Note
Place dbt artifacts closer to the base location for faster discovery. Additionally, ensure that all the four JSON files for a given project and environment are within a single folder.
When using folder structures other than the recommended ones, ensure your env_details.json files include:
{
    "name": "<environment_name>",
    "host": "<database_host>",
    "port": <port_number>
}
The name field is important for such unstructured repositories as it helps the connector distinguish between different environments and projects.
Grant Access to Storage Location
Alation supports the following storage locations to store your files:
GitHub
Amazon S3
Azure Blob Storage
Based on your preferred storage location, you must allow Alation to access the projects in the respective storage location.
Note
You can use a single repository or bucket to store multiple dbt projects. Each dbt project must reside in its own folder. Do not merge files across projects. For example:
<repo>/project-a/dev/manifest.json
<repo>/project-b/prod/manifest.json
Grant Access to Projects on Amazon S3
Create an S3 bucket in your AWS account or use an existing one.
Create an AWS IAM user with the following permissions. Replace BUCKET_NAME with the actual name of your S3 bucket.
{
    "Version": "2012-10-17",
    "Statement": [
        {
            "Sid": "VisualEditor0",
            "Effect": "Allow",
            "Action": [
                "s3:GetObject",
                "s3:ListBucket"
            ],
            "Resource": [
                "arn:aws:s3:::BUCKET_NAME/*",
                "arn:aws:s3:::BUCKET_NAME"
            ]
         }
    ]
}
For more information on creating an IAM user with the required permissions, see Create an IAM User in Your AWS Account.
Grant Access to Projects on GitHub
Classic PAT
Create a GitHub repository or use an existing one.
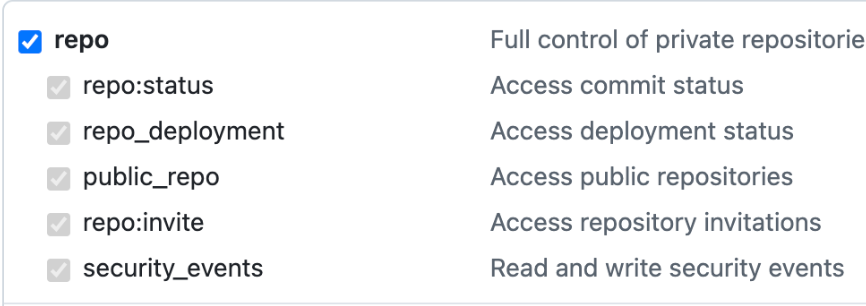
Create a GitHub access token. For details on how to create a Personal Access Token, see Managing your personal access tokens.
In your GitHub repository page, go to Settings > Developer Settings > Personal Access tokens > Tokens(classic) and add the repo access to the token.
Fine-grained PAT
You can also connect Alation to GitHub repositories using fine-grained personal access tokens. Fine-grained tokens provide more granular permissions and can be restricted to specific repositories.
Open Generate a fine-grained personal access token. This link takes you directly to the GitHub page to create the token (Settings > Developer settings > Personal access tokens > Fine-grained tokens > Generate new token).
For more information about using personal access tokens (PATs) in GitHub, see: Managing your personal access tokens.
Complete the token creation form as follows:
Token Name: Enter a descriptive name for the token, such as Alation-dbt-Integration-ServiceAccount. This helps you easily identify the token later.
Description (optional): Provide a brief explanation of the token’s purpose, for example, Token used by Alation service account to read metadata from dbt repositories.
Resource Owner: Select the appropriate user account or organization that owns the repositories you want to access.
Expiration: Choose an expiration period for the token. Options include 7, 30, or 60 days, or you can specify a custom expiration date.
Note
Fine-grained tokens have enforced expiration dates. When a token expires, you must generate a new one and update it in Alation to ensure uninterrupted access to GitHub repositories.
Under Repository access, select the following:
Only select repositories (recommended for restricting access to specific dbt projects or repos)
Under Permissions, grant at minimum:
Contents → Read
Metadata → Read
Generate token and copy it. Store it securely since you will not be able to view it again later.
Use this token when configuring your dbt Core project connection in Alation.
Note
There is no limit to the number of GitHub repositories you can connect, however, ensure each project follows the expected folder structure. You can extract dbt metadata from:
Multiple folders within a single repo
Multiple separate repos
Allow Required Domains for GitHub Access
If your organization uses a proxy server or firewall, ensure the following domains are allowed so Alation can connect to GitHub:
github.comraw.githubusercontent.comapi.github.com
These domains are required for the connector to access GitHub repositories, fetch repository contents, and interact with the GitHub API.
Grant Access to Projects on Azure Blob Storage
Create an Azure Blob Storage account in your Azure account or use an existing one.
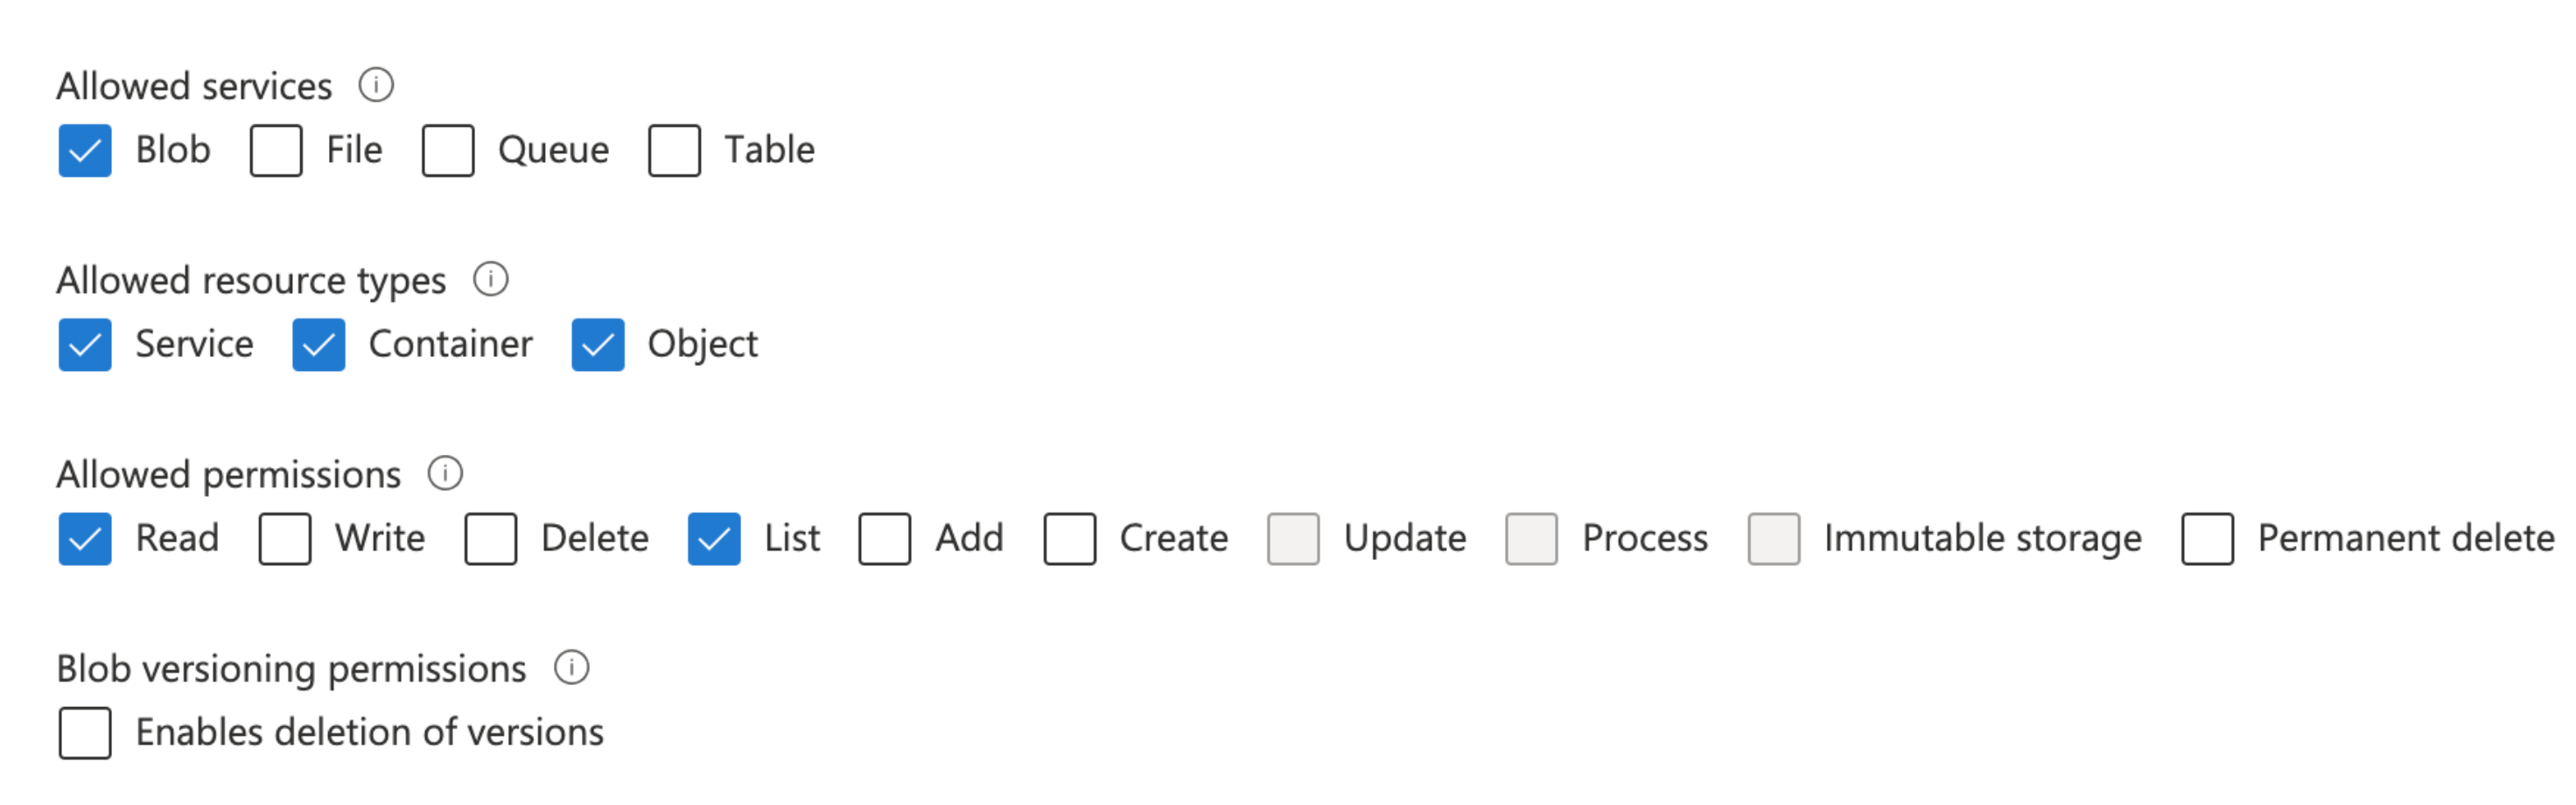
Create a storage access key or Shared Access Signature. For details on how to create a storage access key, see Use the account access key and for Shared Access Signature, see Create a storage SAS.
The storage access key must have full access to the storage account. Similarly, the Shared Access Signature must have the following permissions:
Allowed services - Blob
Allowed resource types - Service, Container, and Object
Allowed permissions - Read
Upload the Projects
After you set up the project structure, upload the projects with the prepared files to GitHub, Amazon S3, or Azure Blob Storage based on your preferred storage location.
Note
If you already have projects with required files in GitHub, Amazon S3, or Azure Blob Storage, you can use the connector to extract metadata and lineage, provided the projects are in the required structure.
Enable ELT Source
To enable an ELT source in Alation, contact Alation Support.