Manage Inbound Access to Alation Cloud Service
Alation Cloud Service Applies to Alation Cloud Service instances of Alation
Available from version 2025.3.1
You can configure ALLOW/DENY access rules for inbound traffic to your Alation Cloud Service (ACS) tenant by specifying IP addresses or IPv4 CIDR blocks.
Note
IPv6 isn’t supported.
This configuration is available in New User Experience only and requires the role of Server Admin.
In this topic:
Overview
IP Access Management lets you define which source IPs can reach your ACS user interface and public APIs. Rules are evaluated at the edge of Alation’s cloud environment and enforced before a request is handed to the application. The rules apply to all inbound traffic to your ACS tenant. By default, no access rules exist, and all traffic is allowed.
Private Connectivity
If you access your ACS instance via PrivateLink, IP Access Management is not supported for that instance. The IP Access Management user interface doesn’t appear on PrivateLink-enabled instances. For details on connecting via PrivateLink, see Access to Alation: Connect to Alation with PrivateLink.
How IP Management Works
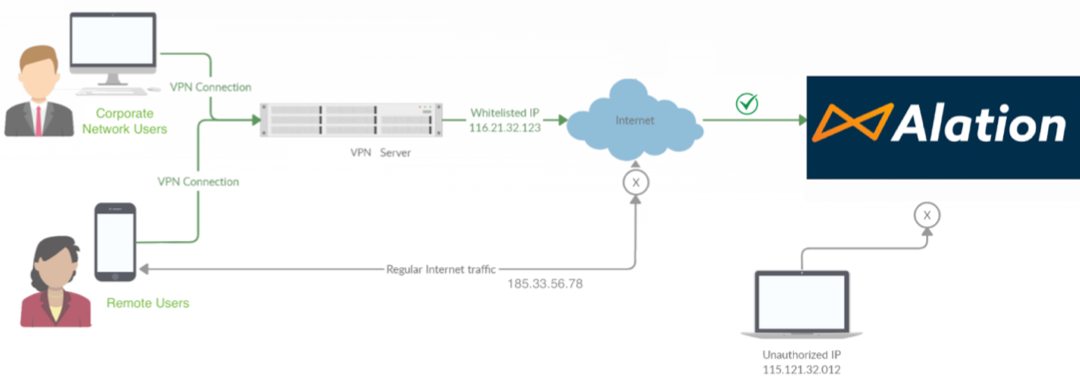
Alation enforces access rules at the service perimeter using authorization policies. The effective client IP is taken from the incoming connection’s public egress point (for example, your VPN or corporate proxy) as conveyed by standard headers such as X-Forwarded-For. The end-user’s ISP-assigned address is not evaluated if traffic traverses your corporate egress.
The high-level request path is:
Client resolves your ACS endpoint via Route 53.
Traffic reaches Alation’s Application Load Balancer (ALB) and then the Kubernetes ingress.
The ingress enforces the configured rules.
Allowed traffic proceeds to the tenant for authentication.
Note
Calls from Alation to Alation Agent are unaffected. Traffic from Alation Agent doesn’t require an explicit ALLOW rule for ACS connectivity.
What IP does ACS See?
ACS evaluates the nearest public egress that connects to ACS: your VPN, proxy, or Network Address Translation (NAT) gateway.
If you are on a corporate VPN, your home ISP address is irrelevant. Your VPN’s public egress IP is what matters. Your network team needs to understand the final public IP address that represents the entire corporate network.
When a user connects through a corporate VPN and accesses the ACS endpoint, the request traverses multiple layers of NAT and proxying:
End User (Internal IP): The device used by the user to access the ACS endpoint.
Corporate VPN Gateway/Proxy: The device that performs Source NAT (SNAT), replacing the user’s internal IP with the corporate public IP. Admins must use the public IP address of the device that performs the final NAT before traffic enters the public internet.
Alation Cloud Load Balancer: The cloud ingress point receives traffic from the Corporate VPN Gateway (not directly from user devices) and applies the configured rules to that traffic.
Create an IP Rule
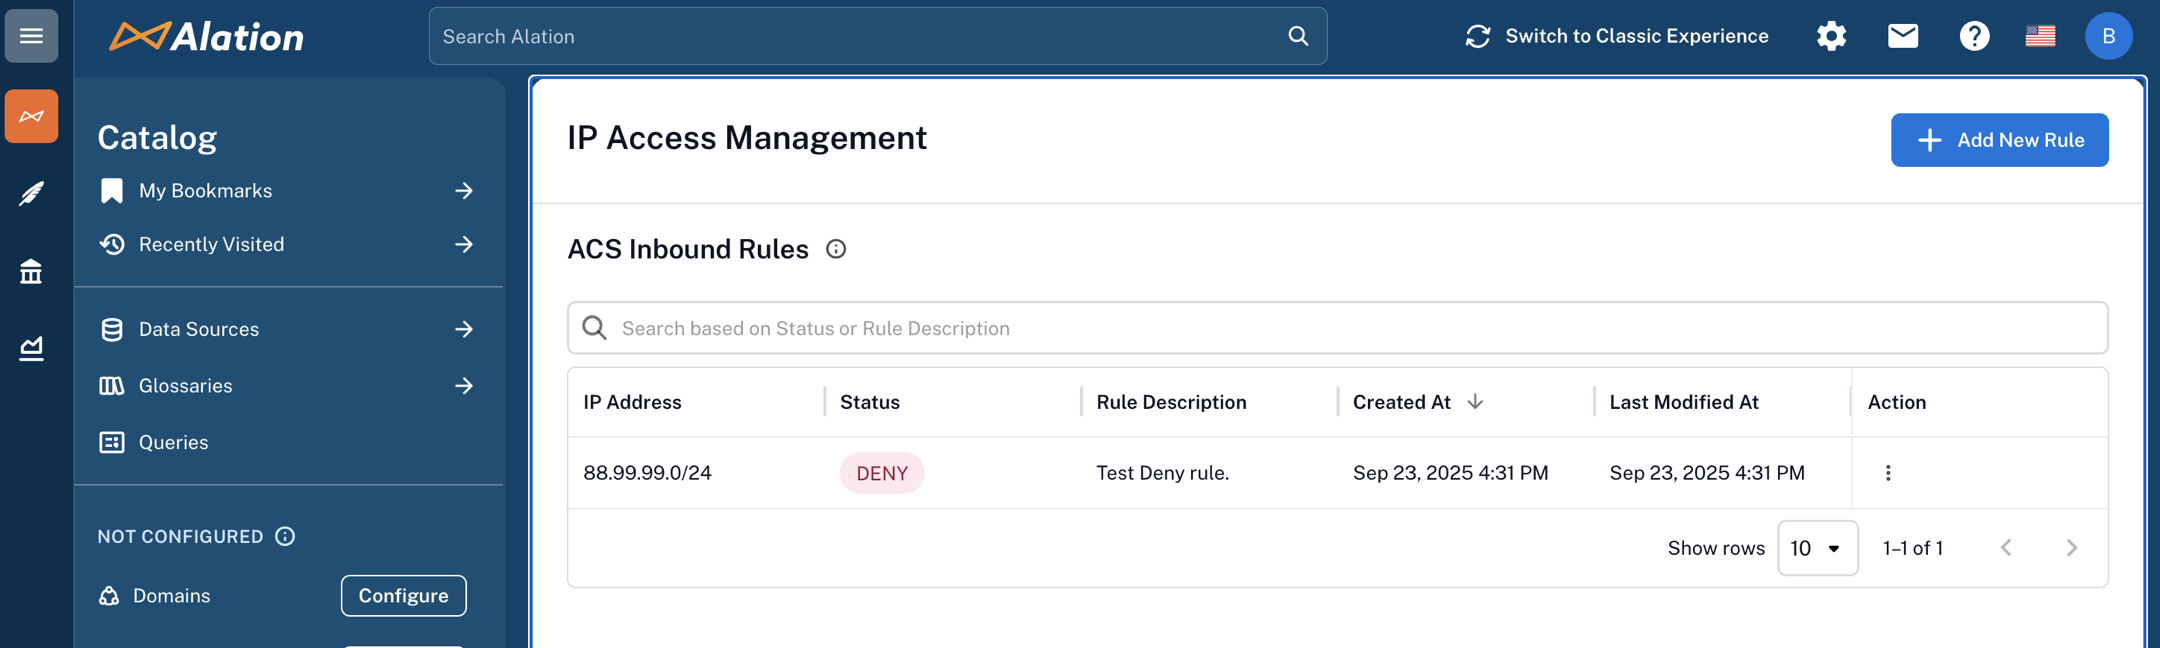
Sign in to Alation as a Server Admin and click the Admin Settings icon (gear) on the upper-right to open the Admin Settings page.
Under System Administration, select IP Access Management. Alternatively, use search on this page to find the IP Access Management page and open it.
Click + Add New Rule on the upper-right. The Add New Rule dialog opens.
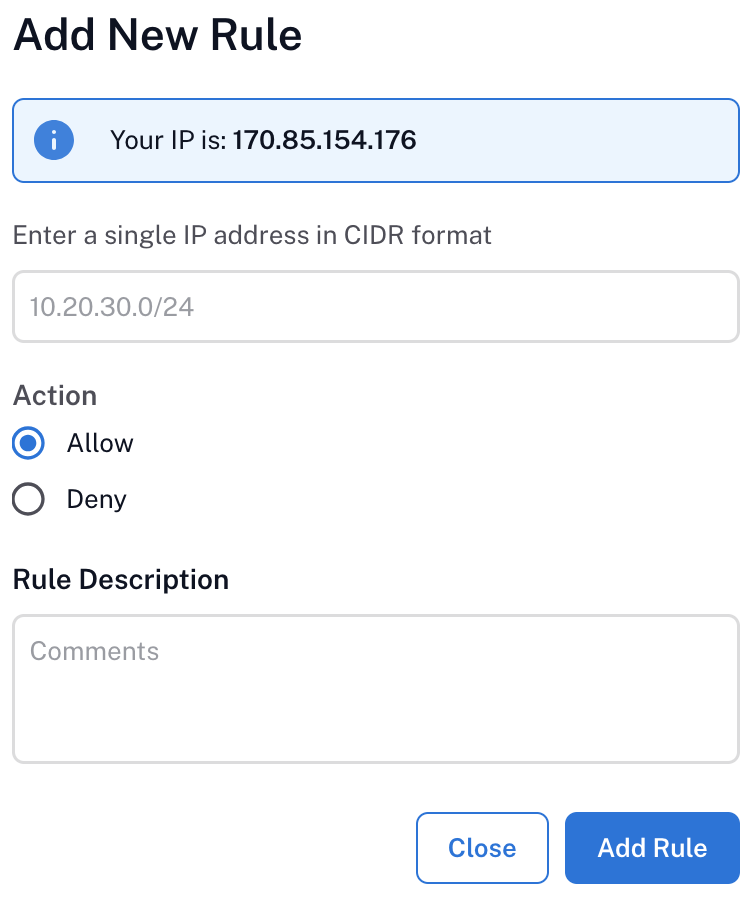
Review the info banner Your IP is x.x.x.x. This is the public egress IP as seen by Alation Cloud Service (for example, your VPN proxy), not your workstation’s private address.
Important
Avoid locking yourself out: ensure that your current IP (or its CIDR range) will remain allowed if you are adding restrictive ALLOW rules.
In the Enter a single IP address in CIDR format field, type one IPv4 CIDR. Find more information in Rule Semantics below.
Examples:
10.20.30.0/24180.33.44.55/3210.20.0.0/16
Important
One rule accepts one CIDR. For multiple ranges, you’ll have to add multiple rules. There is no hard cap on the number of rules today. Internal testing shows good performance at approximately
100rules. We recommend staying under150rules to avoid latency impact.If you need significantly more rules, file an enhancement request with Alation so we can assess impact and plan scaling.
Under Action, choose:
Allow: Traffic from that CIDR will be permitted, but is also subject to any DENY overrides.
Deny: Traffic from that CIDR will be blocked.
In Rule Description, add an operational note describing the rule. Use meaningful descriptions to simplify audits.
Click Add Rule to save (or Cancel to discard).
Confirm the rule appears in the ACS Inbound Rules table on the IP Access Management page.
From an IP inside the ALLOW range (or outside for DENY), verify the UI and API access. Use a terminal from the target network to confirm reachability.
Edit an IP Rule
Open Admin Settings > System Administration > IP Access Management.
In the ACS Inbound Rules table, locate the rule or use the search bar at the top of the table to filter by Status or Rule Description and find the rule.
In the Action column, click the three dots icon and choose Edit Rule. The Edit Rule dialog opens.
Update the CIDR or Rule Description as needed. You can’t update the Action (Allow/Deny).
Click Update Rule at the bottom right to apply your changes. Changes take approximately
10minutes to apply.
Delete an IP Rule
Open Admin Settings > System Administration > IP Access Management.
Find the rule in the ACS Inbound Rules table or use the search bar if needed.
In the Action column, click the three dots icon and choose Delete Rule and confirm. Changes take approximately
10minutes to apply.If this is your only ALLOW rule, deleting it will open access for all unless other ALLOW or DENY rules remain.
If you delete a DENY rule, addresses in that CIDR become allowed unless restricted by ALLOW logic.
Rule Semantics
Supported Input Formats and Examples
One rule = one CIDR block. You can’t put multiple CIDRs into a single rule, and you cannot mix formats. Create multiple rules for multiple blocks.
CIDR Refresher (IPv4)
/32= single IP (203.0.113.7/32)
/31= two IPs (point-to-point)
/30= four IPs
/29= eight IPs
/28= 16 IPs
/24= 256 IPs (10.20.30.0/24)
The prefix length after the slash (/) is the count of network bits. The remaining bits determine the host range.
Allow/Deny Logic
DENY rules have priority over ALLOW rules: If a request matches any DENY rule CIDR, it is blocked.
If one or more ALLOW rules exist:
A request is allowed only if it matches at least one ALLOW rule and is not denied by a DENY rule.
Anything outside all ALLOW ranges is blocked.
If no ALLOW rules exist:
Requests not matching any DENY rule are allowed.
Requests matching a DENY rule are blocked.
ALLOW rules constrain access to the union of their CIDRs. You can still use DENY to carve out subranges. Currently, the service doesn’t allow for configuring rules with overlapping ranges. For scenarios where the admin has a wide range with ALLOW and then needs to carve out a subrange with a DENY action, they would need to split the wider range into three, such that the middle can be specifically DENY and the remaining two ALLOW rules. Let’s say a range like
10.1.0.0/16has an ALLOW but needs the sub-range10.1.128.0/24in between to be denied, so there would be3rules for:ALLOW:
10.1.0.0/17DENY:
10.1.128.0/24ALLOW:
10.1.129.0/17
With only DENY rules, you block just those CIDRs; everything else remains open.
With no rules, everything is open.
Third-party Integrations and Services
Rules apply to all inbound traffic. Remember to explicitly ALLOW the egress IPs of external services that initiate inbound calls to ACS (for example, IdPs and SCIM providers like Okta).
Vendors usually publish IP ranges. Keep these up-to-date as vendors change ranges periodically.
Auditing
All create, edit, and delete operations on IP rules are audited in the alation-events.log file. You can download the logs from the Logging page in Admin Settings.
Troubleshoot IP Rules
Try from a network that’s inside an ALLOW CIDR. Review your corporate policy for obtaining a static IP or a floating IP from a defined range, and configure your IP allowlist to include that range to prevent lockouts.
If nobody can access, contact Alation Support for help with adjusting the rules or temporarily disabling the feature.
The vendor likely changed IP ranges. Update your ALLOW rules with the current ranges from the vendor’s documentation.
Verify your Public IP address to make sure it hasn’t changed from when you were configuring the rule.
Rules may take some time to be applied. Wait for a max of
15minutes and try again.
If the ACS encounters infrastructure issues while deploying an authorization policy, you may see an error like Failed to create AuthorizationPolicy <name>. Wait a few minutes and retry. If the error persists, contact Alation Support.