Bulk Curate Documents Using Bulk Management
Alation Cloud Service Applies to Alation Cloud Service instances of Alation
Available from version 2025.3
In this topic:
Overview
Bulk Management is a content management solution designed to simplify the creation, update, and deletion of multiple documents within Document Hubs.
Bulk Management is available on Alation Cloud Service instances and New User Experience.
Organizations manage a wide range of logical assets in Alation, such as glossaries, policies, reports, and data documentation. Much of this content originates from external tools like spreadsheets, document repositories in SharePoint, Confluence, or legacy systems. Bulk Management offers a scalable, in-catalog method for working with this content at scale.
What You Can Do
With Bulk Management, you can:
Add new documents to folders in a Document Hub
Create documents as subdocuments under existing parent documents
Update built-in and custom fields on documents
You perform these operations using a CSV source file that defines the changes to apply.
What You Can’t Do
Bulk Management doesn’t support:
Creating or deleting custom fields
Creating or deleting custom document templates
Moving documents between folders
Changing a document’s parent folder or parent document through bulk update
For those changes, use the catalog’s customization tools or the Move feature in Document Hubs.
How Bulk Management Differs from Data Dictionary
Although Bulk Management and data dictionary both use CSV source files for curating custom fields, they serve different purposes:
Bulk Management applies only to Document Hubs and focuses on creating and updating documents.
Data Dictionary is a consolidated summary file for a large number of catalog object types. It doesn’t allow for creating new objects.
Use the option that best matches your use case.
Important
You can’t download a data dictionary, modify it, and then upload it using the Bulk Management features. The source CSV files are not interchangeable, and each uses its own structure.
Enable or Disable Bulk Management Features
The Bulk Management features aren’t enabled by default.
Users with the Server Admin role can enable Bulk Management in Feature Configuration in Admin Settings by toggling the Document Hubs Bulk Management feature flag to On. This makes the Bulk Management link visible on the Document Hub and folder catalog pages to users with appropriate roles and permissions.
For information on how to enable feature flags in Alation, see Feature Configuration.
Configure the Format for Built-In and Custom Field Headers
Starting in version 2025.3.2, you can configure how headers for built-in and custom fields appear in downloaded Bulk Management templates: either with field IDs or without them.
By default, Alation includes only the field name.
To include the field ID in the header, set the alation_conf feature flag alation.feature_flags.DEV_include_field_ids_in_bulk_management_file_headers to True.
When set to
True, headers use the field format<ID>|<field name>(ID and name separated by a pipe). This helps disambiguate fields that share the same name.
Setting the flag to False reverts the headers to names-only.
Note
Alation Cloud Service customers can request server configuration changes through Alation Support.
Enabling IDs also helps prevent upload failures caused by non-unique field names (see Duplicate Field Names Cause Upload Failures).
Who Can Use Bulk Management
To use Bulk Management features, you must meet one of the following conditions:
Role-Based Access
The following roles can access Bulk Management:
Server Admin
Catalog Admin
Source Admin
Composer
Steward
All roles listed above can use Bulk Management on public folders. Server Admins and Catalog Admins can use Bulk Management on both the Document Hub and folder catalog pages. Source Admins, Composers, and Stewards can use Bulk Management on folder catalog pages only.
Users with Explorer and Viewer roles can download Bulk Management CSV templates for folders they have access to. However, they cannot upload or apply changes using Bulk Management.
Object-Based Access
For private folders and documents, Bulk Management requires appropriate permissions at both folder and document levels:
For private folders, Bulk Management is available only if users have Can Edit permission on that folder.
Private documents can be bulk updated only by their owners or by users who have Can Edit permission on those documents.
Use the tables below for reference on what users can use Bulk Management.
Role |
Can use Bulk Management? |
|---|---|
Server Admin Catalog Admin |
Yes, from Document Hub and folder catalog pages |
Source Admin Composer Steward |
Yes, from folder catalog pages |
Viewer Explorer |
Can download Bulk Management CSV templates for public folders. Cannot upload changes. |
Role |
Can use Bulk Management? |
|---|---|
Server Admin |
Can update only the folders and documents where they have Can Edit permissions. |
Catalog Admin Source Admin Composer Steward |
Can update only the folders and documents where they have Can Edit permissions. |
Viewer Explorer |
Users with at least Can View permissions on a folder can download Bulk Management CSV templates for that folder. Cannot upload changes. |
Best Practices for Bulk Management of Documents
Bulk Management operations are driven by a CSV source file that defines the changes to apply. The system requires a properly formatted CSV, but you don’t need to build it from scratch. Alation provides downloadable templates to help you get started.
Before editing the CSV template, it’s helpful to plan your work and prepare your content to make the process smoother and more accurate. The following best practices can help:
Define Type of Bulk Action
Start by identifying what kind of action you want to perform:
Choose the corresponding CSV template based on the action.
Portion Your Work Logically
For large-scale updates or creations, consider breaking the work into smaller, manageable segments. This helps you avoid confusion while editing and improves accuracy during upload.
Examples of how to portion your work:
By folder: If a parent folder contains multiple subfolders, it may be helpful to process bulk changes one subfolder at a time, especially if the templates you need to update vary across subfolders.
By field or value type: Update related documents together. Batch updates with similar values for efficiency.
Organizing your changes logically upfront will reduce rework and make it easier to validate your updates before applying them in Alation.
Bulk Create Documents
Bulk Management allows you to create documents in bulk using existing document templates.
Document templates cannot be created through the Bulk Management process.
Document templates must already exist in the catalog before you can use them for bulk creation.
You can bulk create documents using one template at a time.
Starting in version 2026.5.1.0, you can create documents as subdocuments under an existing parent document. See Specify a Parent Document for details.
To create documents in bulk:
Open the catalog page of the Document Hub or the folder where you want to create documents.
Server Admins and Catalog Admins can access Bulk Management directly on the Document Hub catalog page. This allows for selecting from all templates under the Hub, not just those in a specific folder.
Other roles must access Bulk Management from the folder page. Note that Server Admins and Catalog Admins can access from folder pages as well.
Depending on the location:
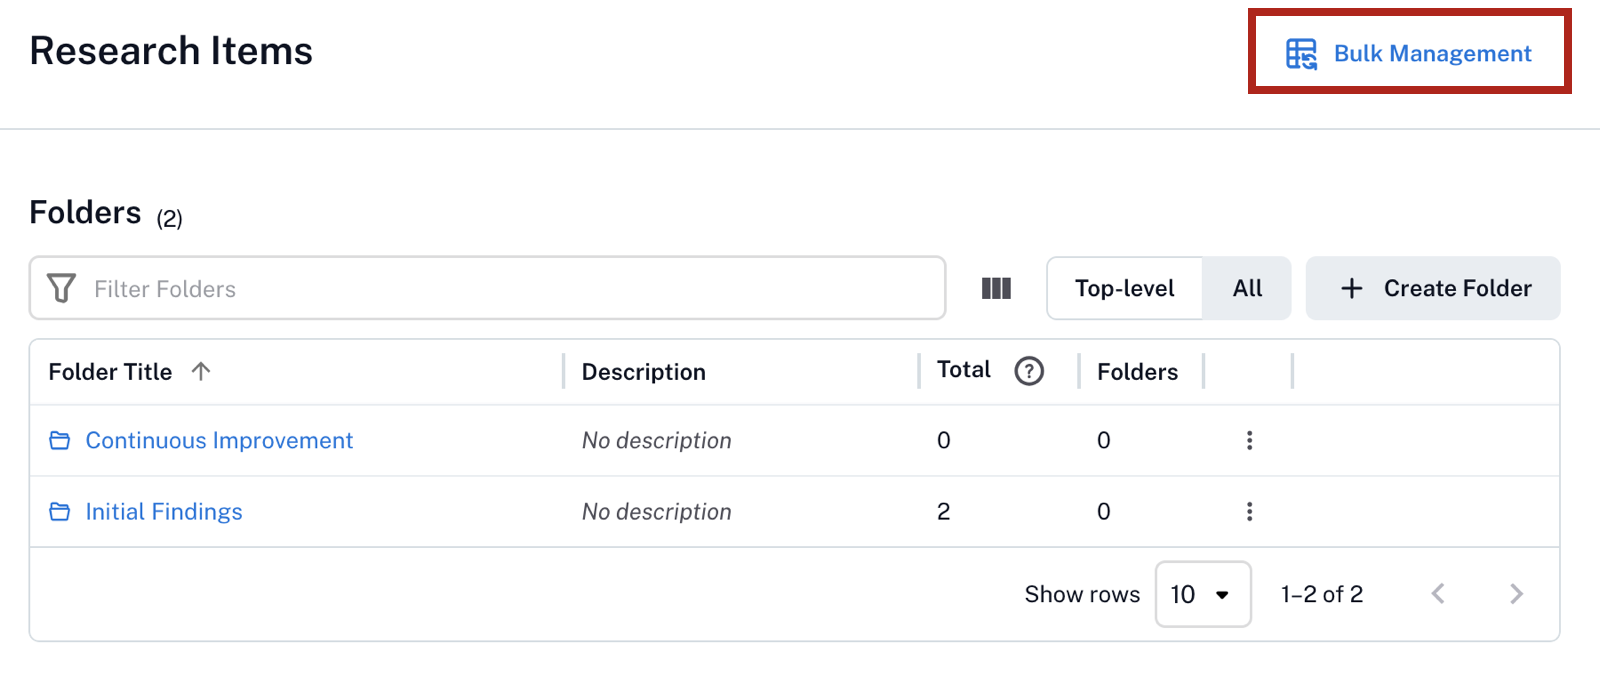
On the Document Hub page, click Bulk Management in the top-right corner.
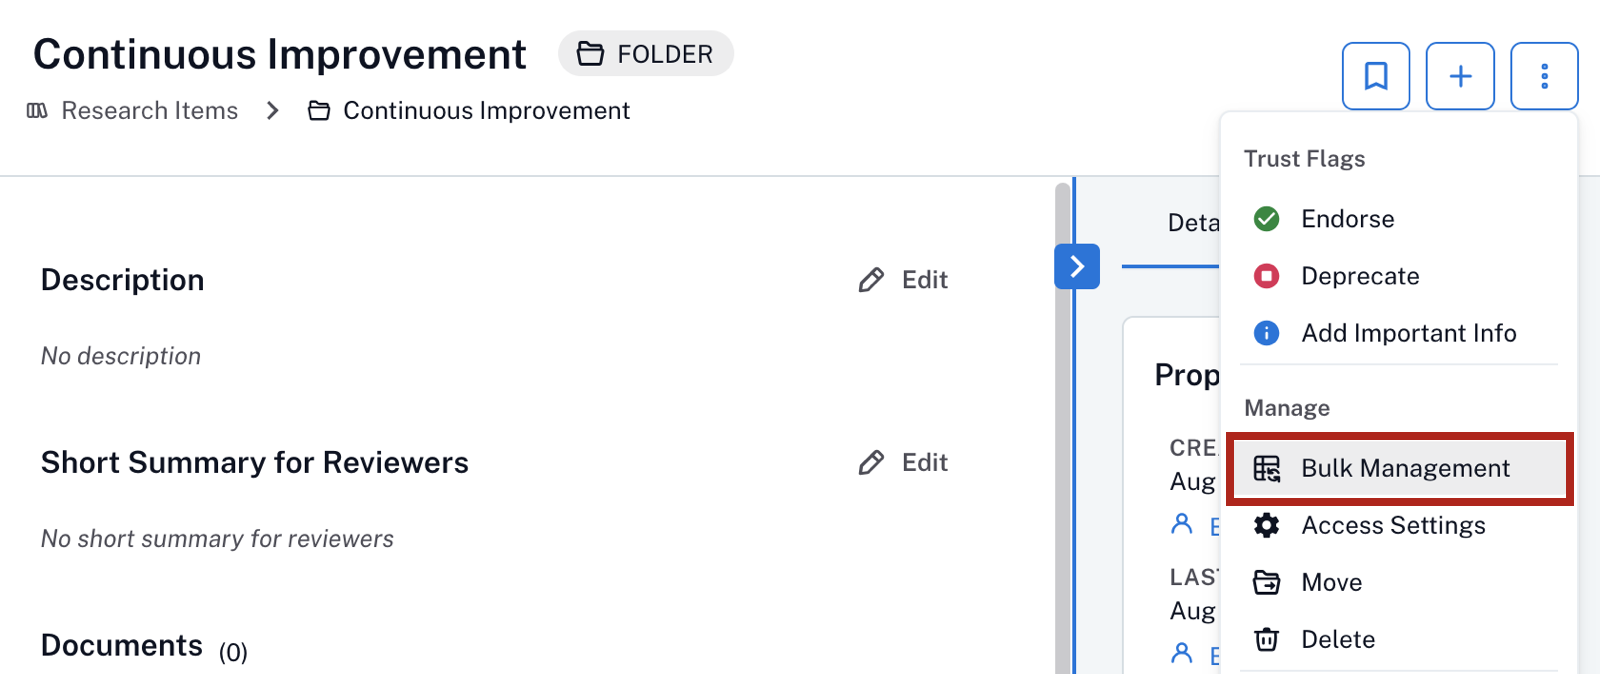
On a Folder page, click the three-dots icon in the top-right corner, then select Bulk Management from the list of options.
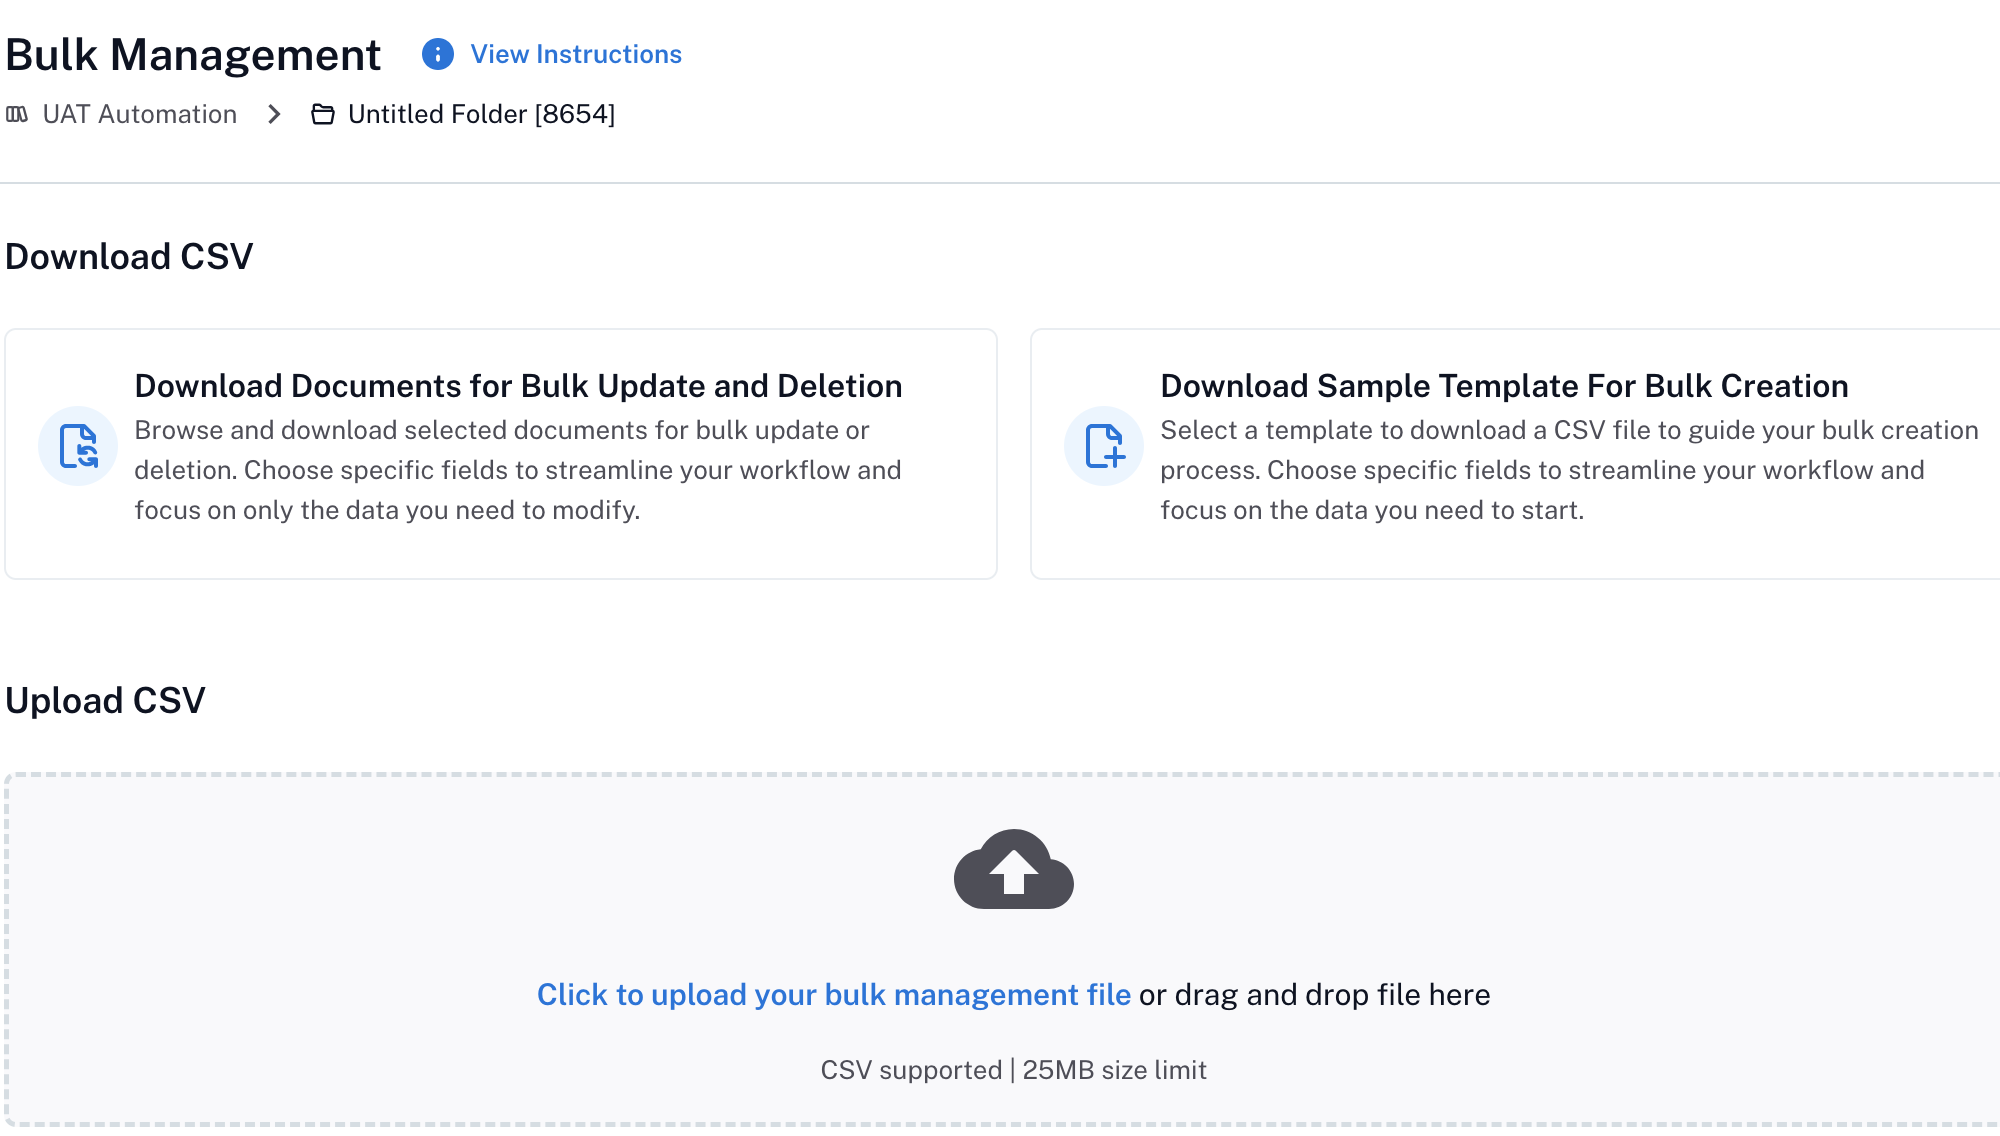
The Bulk Management page for the hub or folder opens.
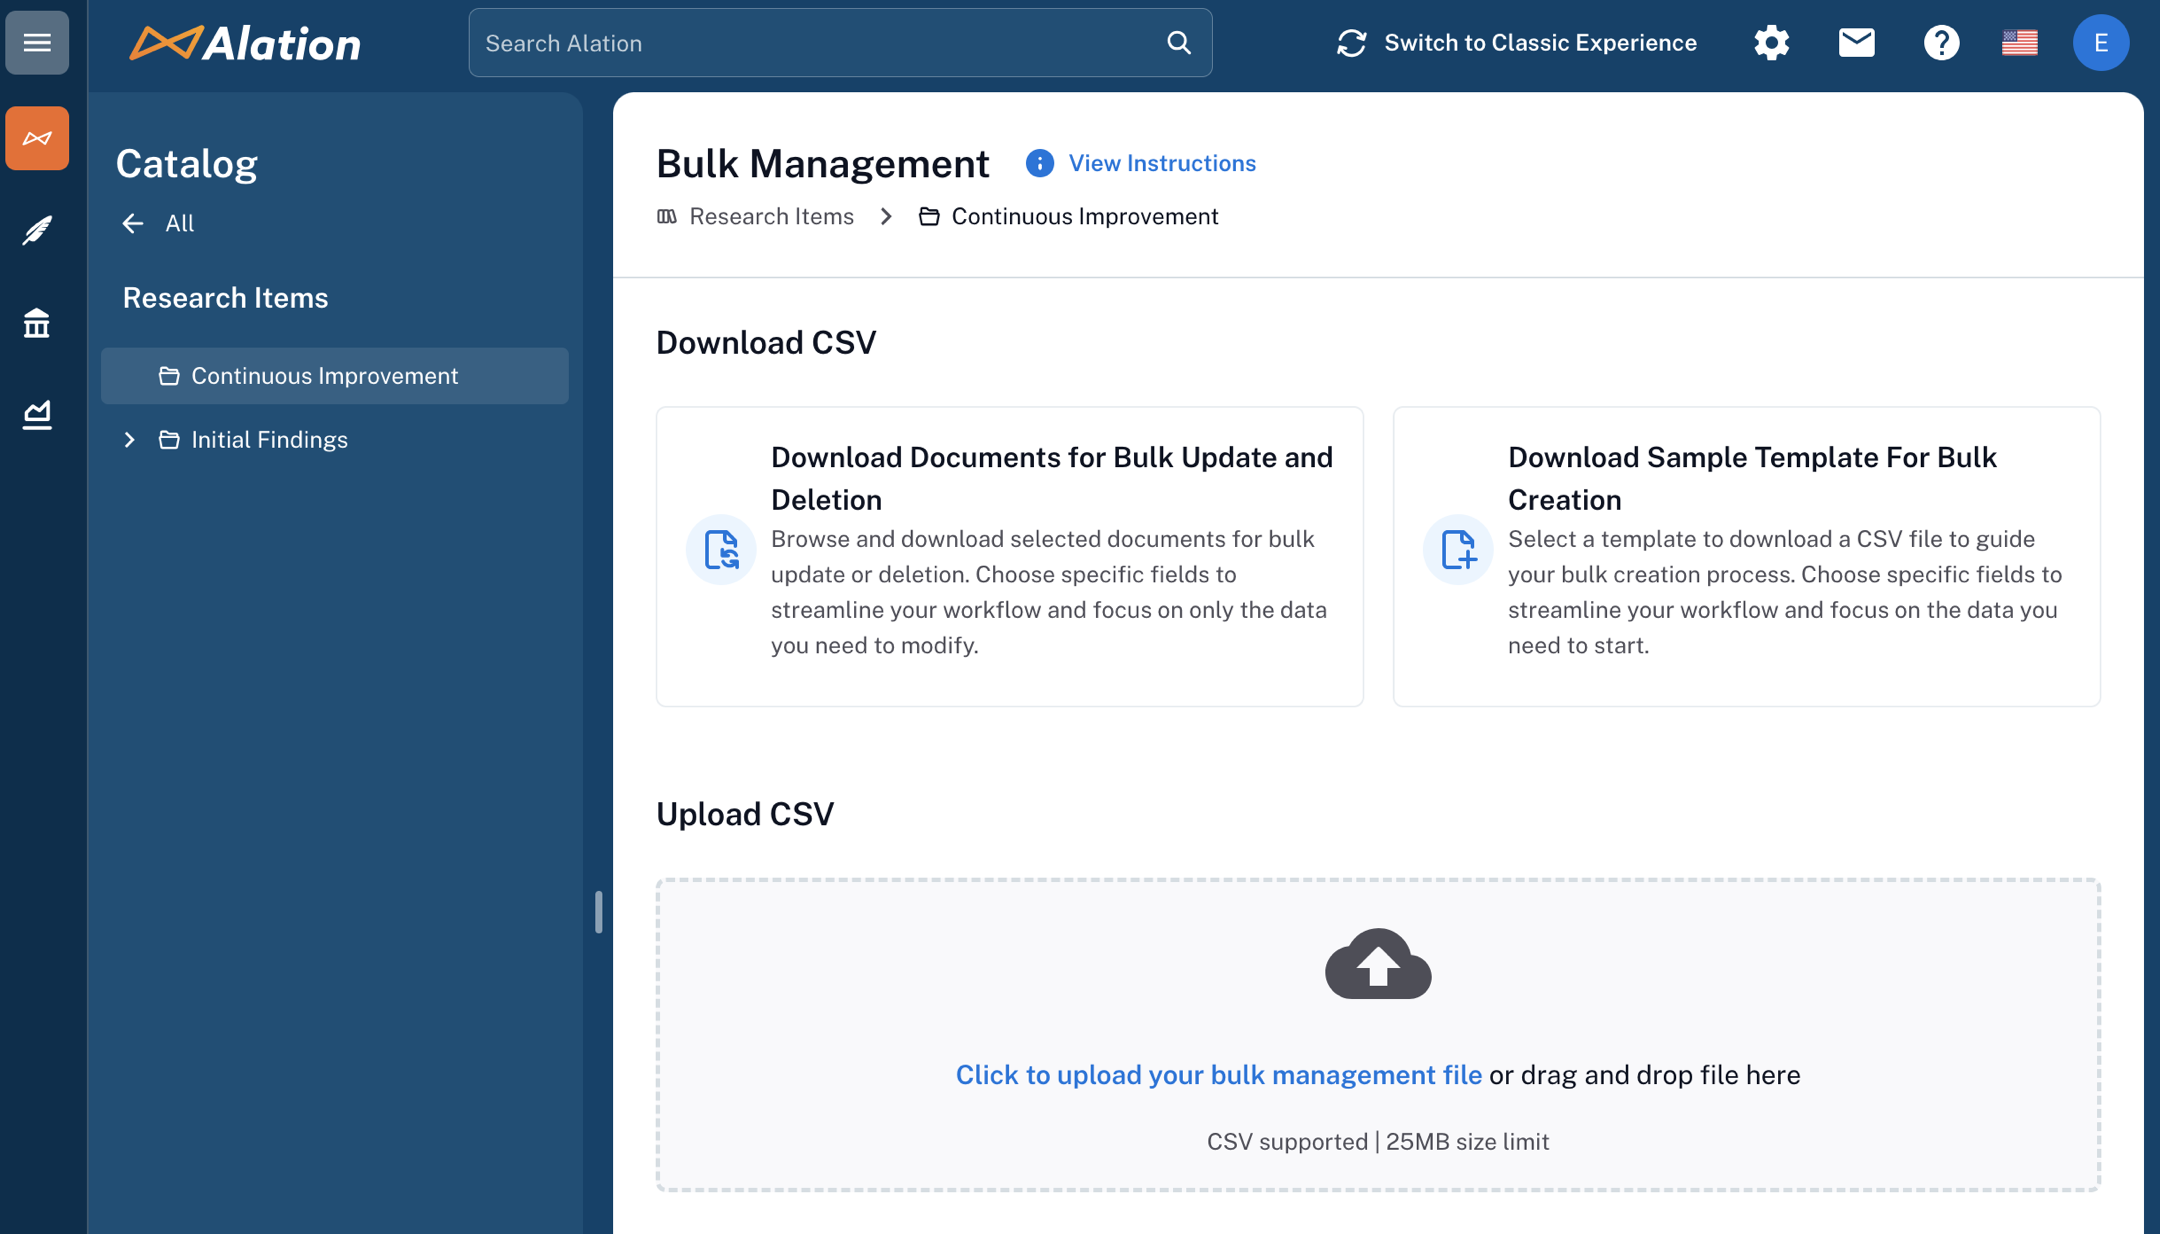
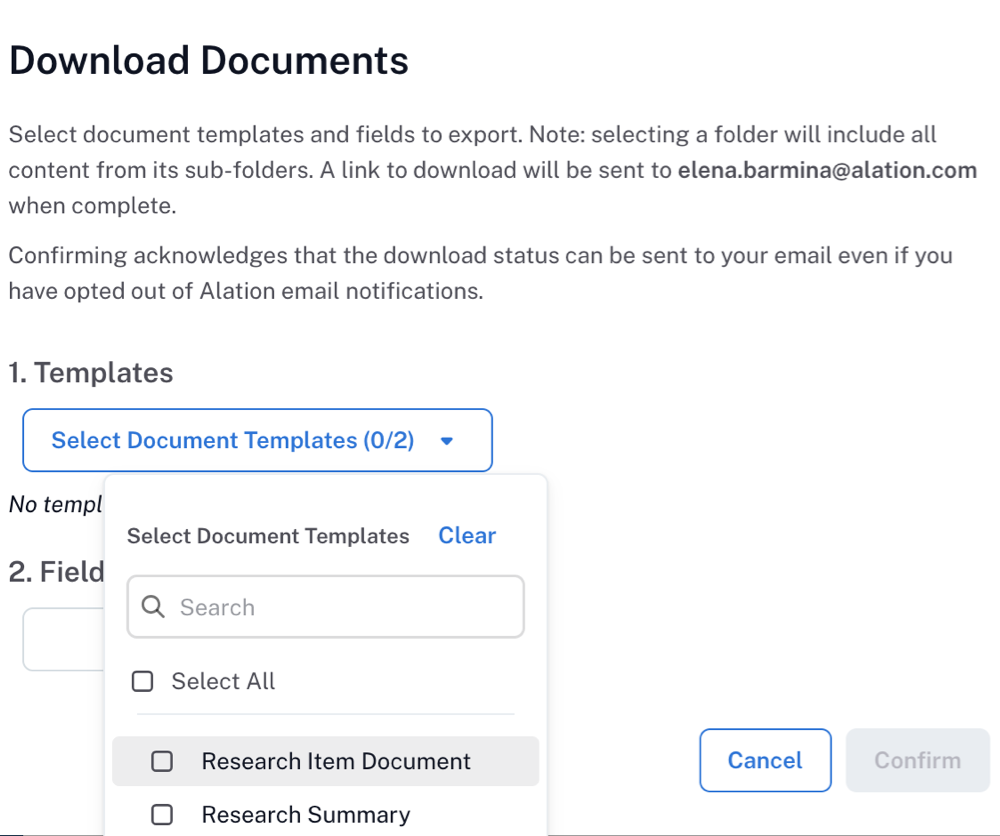
On the Bulk Management page, click Download Sample Template for Bulk Creation. The Download Sample Template dialog opens.
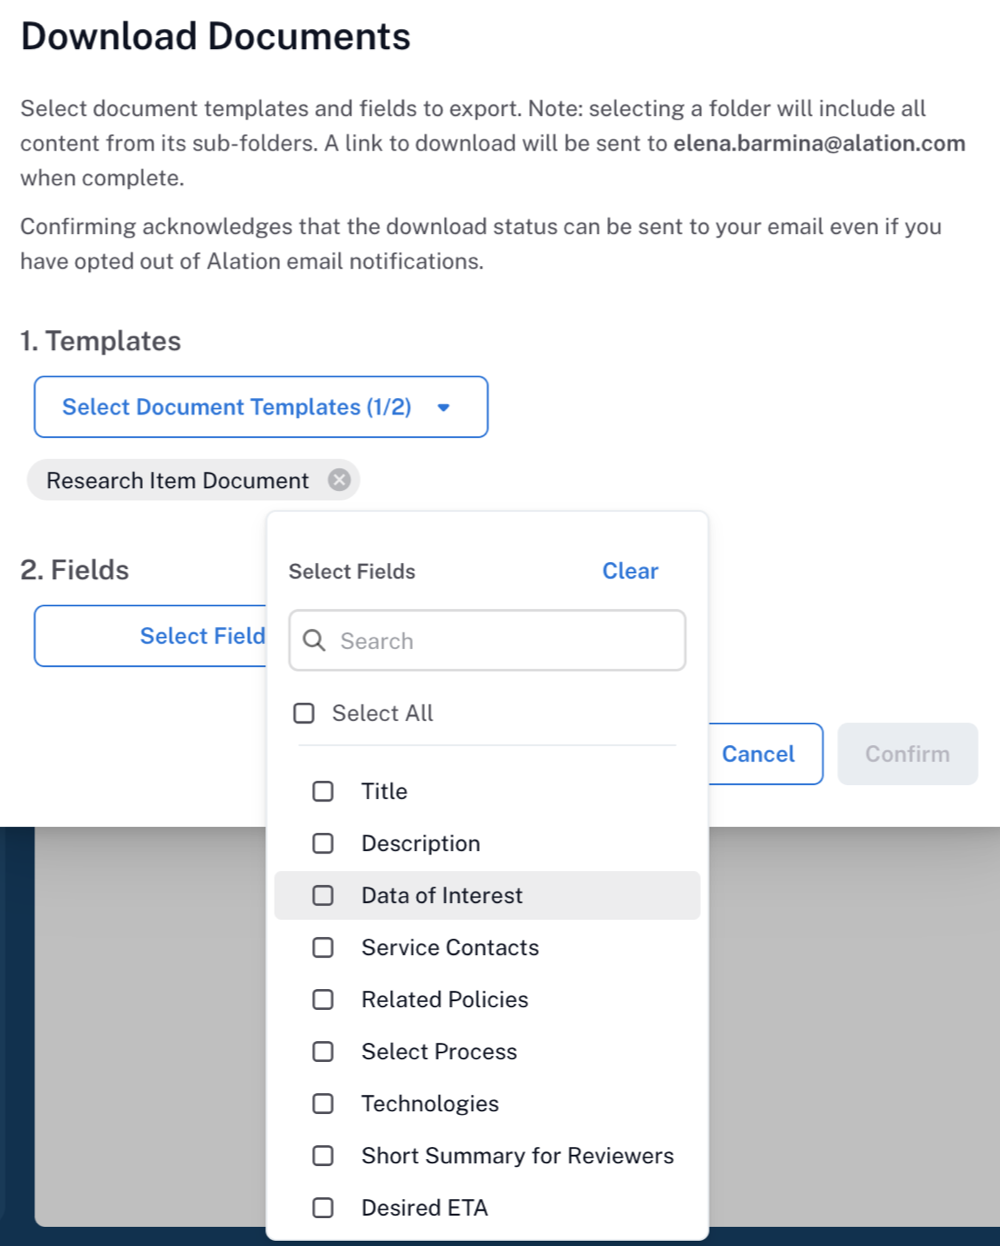
In 1. Template, click Select Document Template and choose a document template from the available list.
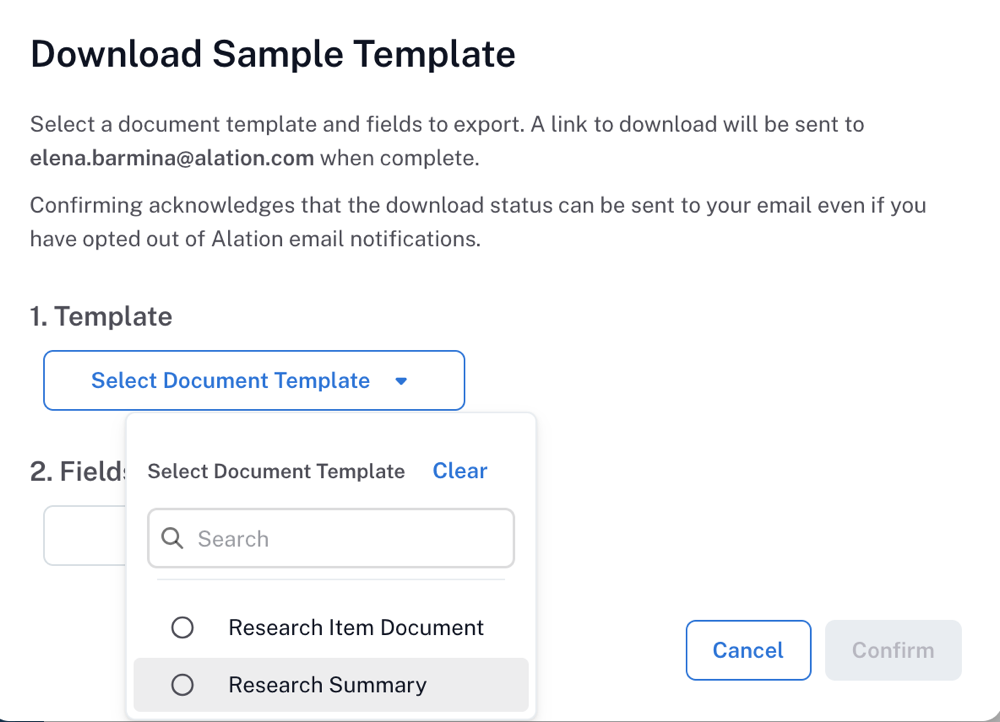
In 2. Fields, click Select Fields, and choose which fields from the selected template you want to curate when creating documents.
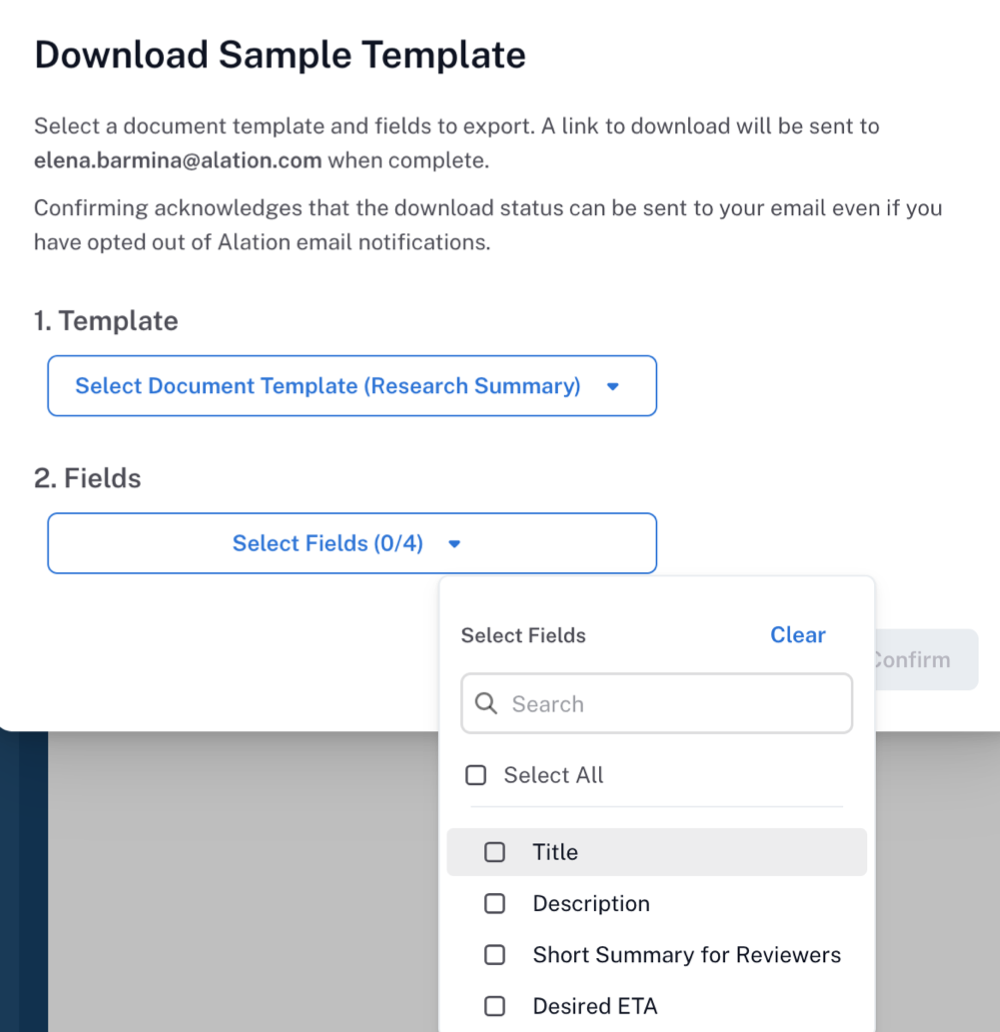
Click Confirm. A CSV file is downloaded to your computer: check your Downloads folder.
Open the CSV template in your preferred editor. The downloaded template includes:
The fields you selected
Auxiliary fields that are automatically added by the system and that help identify objects. Some of these fields should be treated as read-only.
Enter your content. For guidance on the expected format for all fields, see Source File Structure for Bulk Create.
Once your source file is ready, upload it to Alation.
Specify a Parent Document
Available from version 2026.5.1.0
Starting in version 2026.5.1.0, the bulk creation CSV template includes an optional al_bulkmgmt_parent_document column. This column allows you to create documents as subdocuments under an existing parent document, enabling multi-level document hierarchies (for example, Report > Report Object > Report Field) through bulk operations.
If you leave the al_bulkmgmt_parent_document column blank, the document is created at the folder level, which is the default behavior.
Note
This feature is fully backward compatible. If you have an existing bulk creation CSV template that doesn’t include the al_bulkmgmt_parent_document column, you can continue using it without any changes. Download a new template to take advantage of parent document hierarchy support.
Supported Input Formats
You can specify a parent document in the following formats:
Format |
Example |
Behavior |
|---|---|---|
Empty (blank) |
(leave cell empty) |
Creates a folder-level document. This is the default behavior. |
ID only |
|
Looks up the parent document by its ID. The document must exist in the same Document Hub and folder. |
ID and title |
|
Looks up the parent document by ID. The title is used for display purposes only. |
Title only |
|
Resolves the parent document by title within the specified parent folder. The title must match exactly one document. |
Validation Rules
The following validation rules apply to the al_bulkmgmt_parent_document column:
The parent document must exist and must not be deleted.
The parent document must belong to the same Document Hub as the document being created.
The parent document must reside in the same folder specified in the
al_bulkmgmt_parent_foldercolumn.When using title-only resolution, the title must be unambiguous (match exactly one document in the folder). If multiple documents share the same title, use the ID or ID-and-title format instead.
If validation fails for a row, Alation does not create the document for that row. You can download the error report to review which rows failed and why.
Example: Ambiguous Parent Document Title
Available from version 2026.5.1.0
When you specify a parent document by title only, the title must resolve to exactly one document in the target folder. If multiple documents in the same folder share the same title, Alation cannot determine which document to use as the parent. In this case, the row fails with an error.
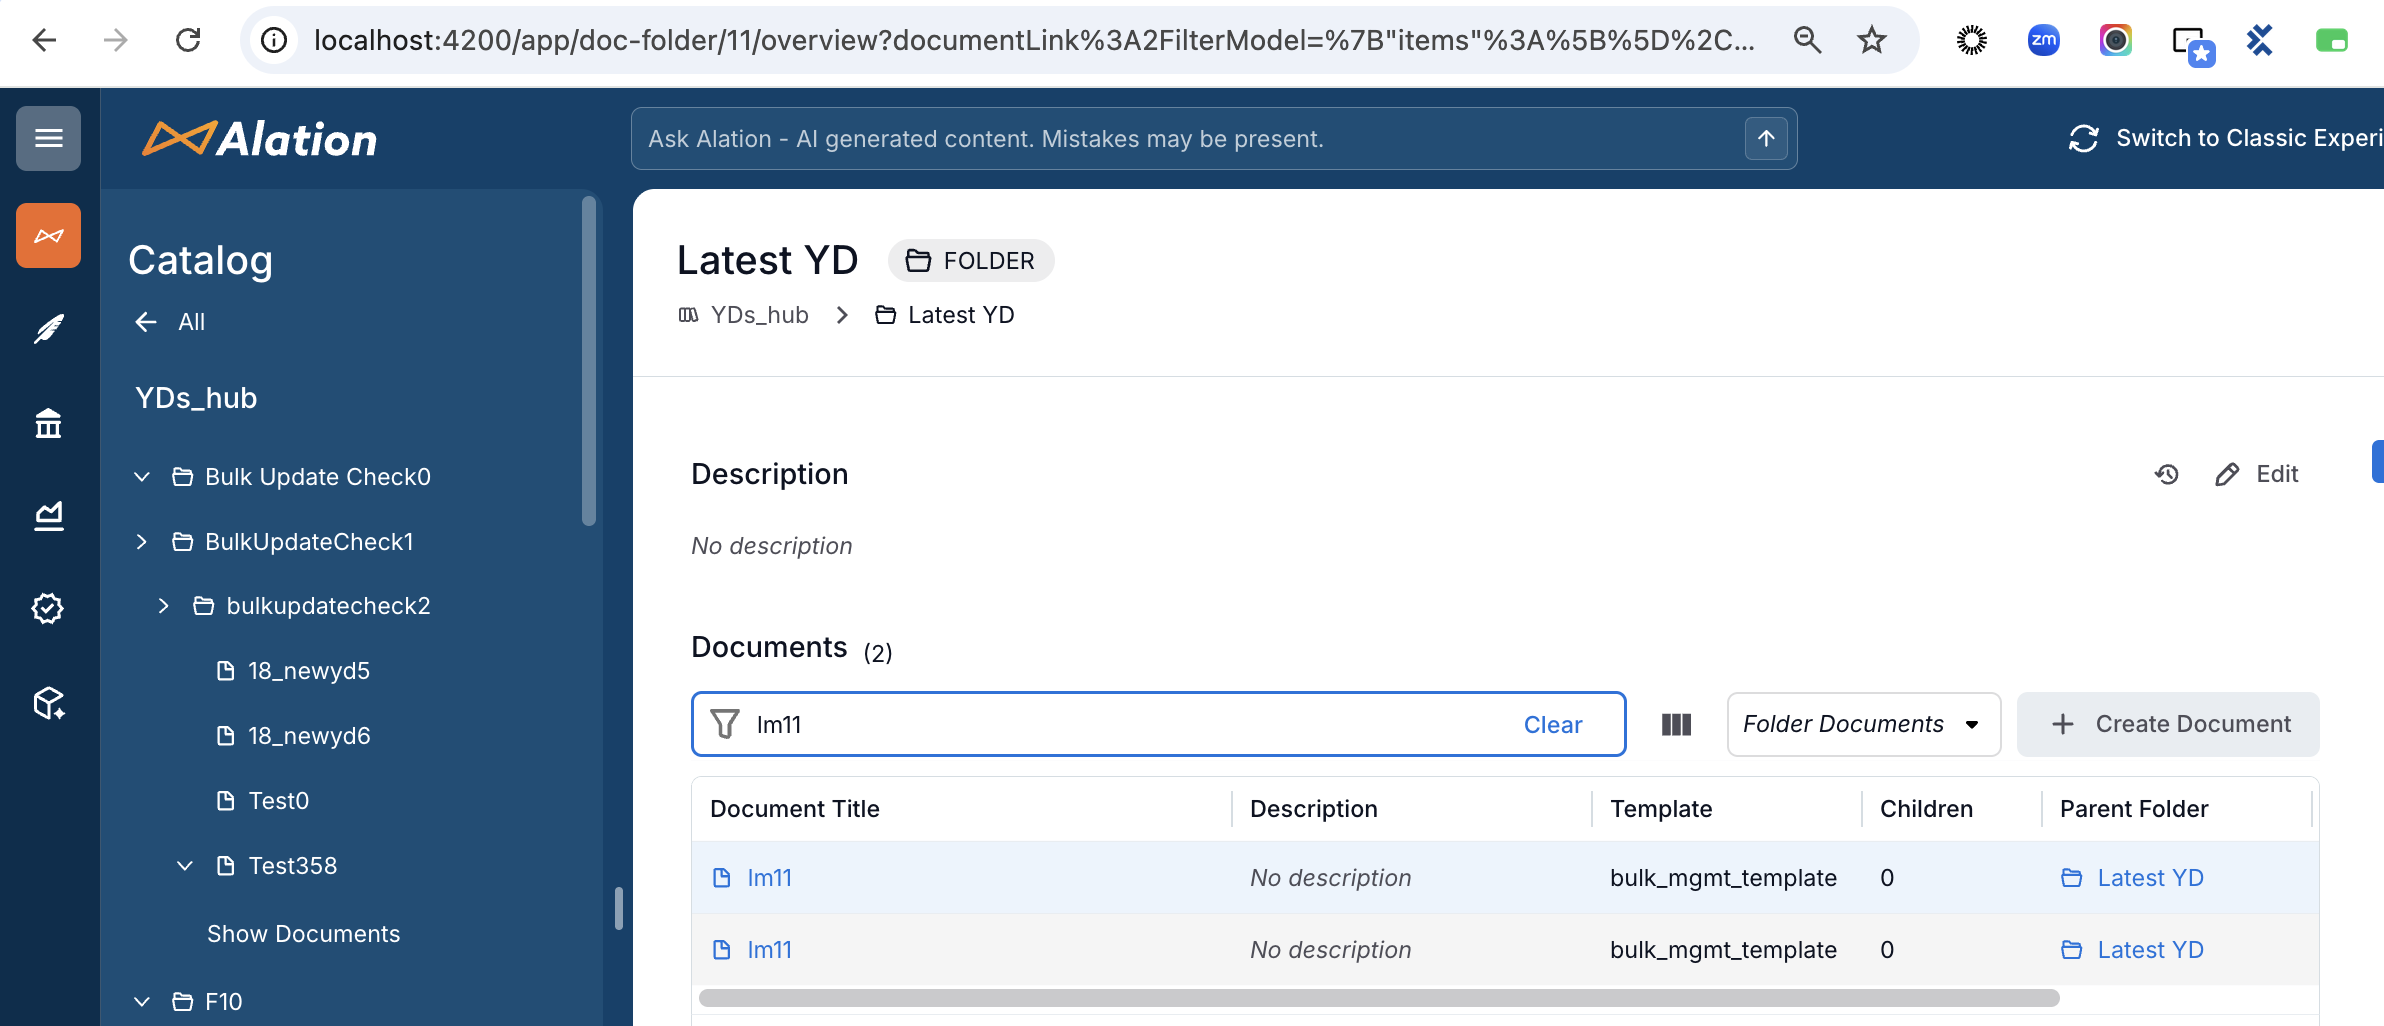
In the following example, the folder “Latest YD” contains two documents with the title lm11:
Consider the following CSV where the parent document is specified by title lm11, but the folder contains more than one document with that title:

After uploading this CSV, the preview shows the error for the affected row. The second row (with parent document D3, which is unambiguous) processes without error:
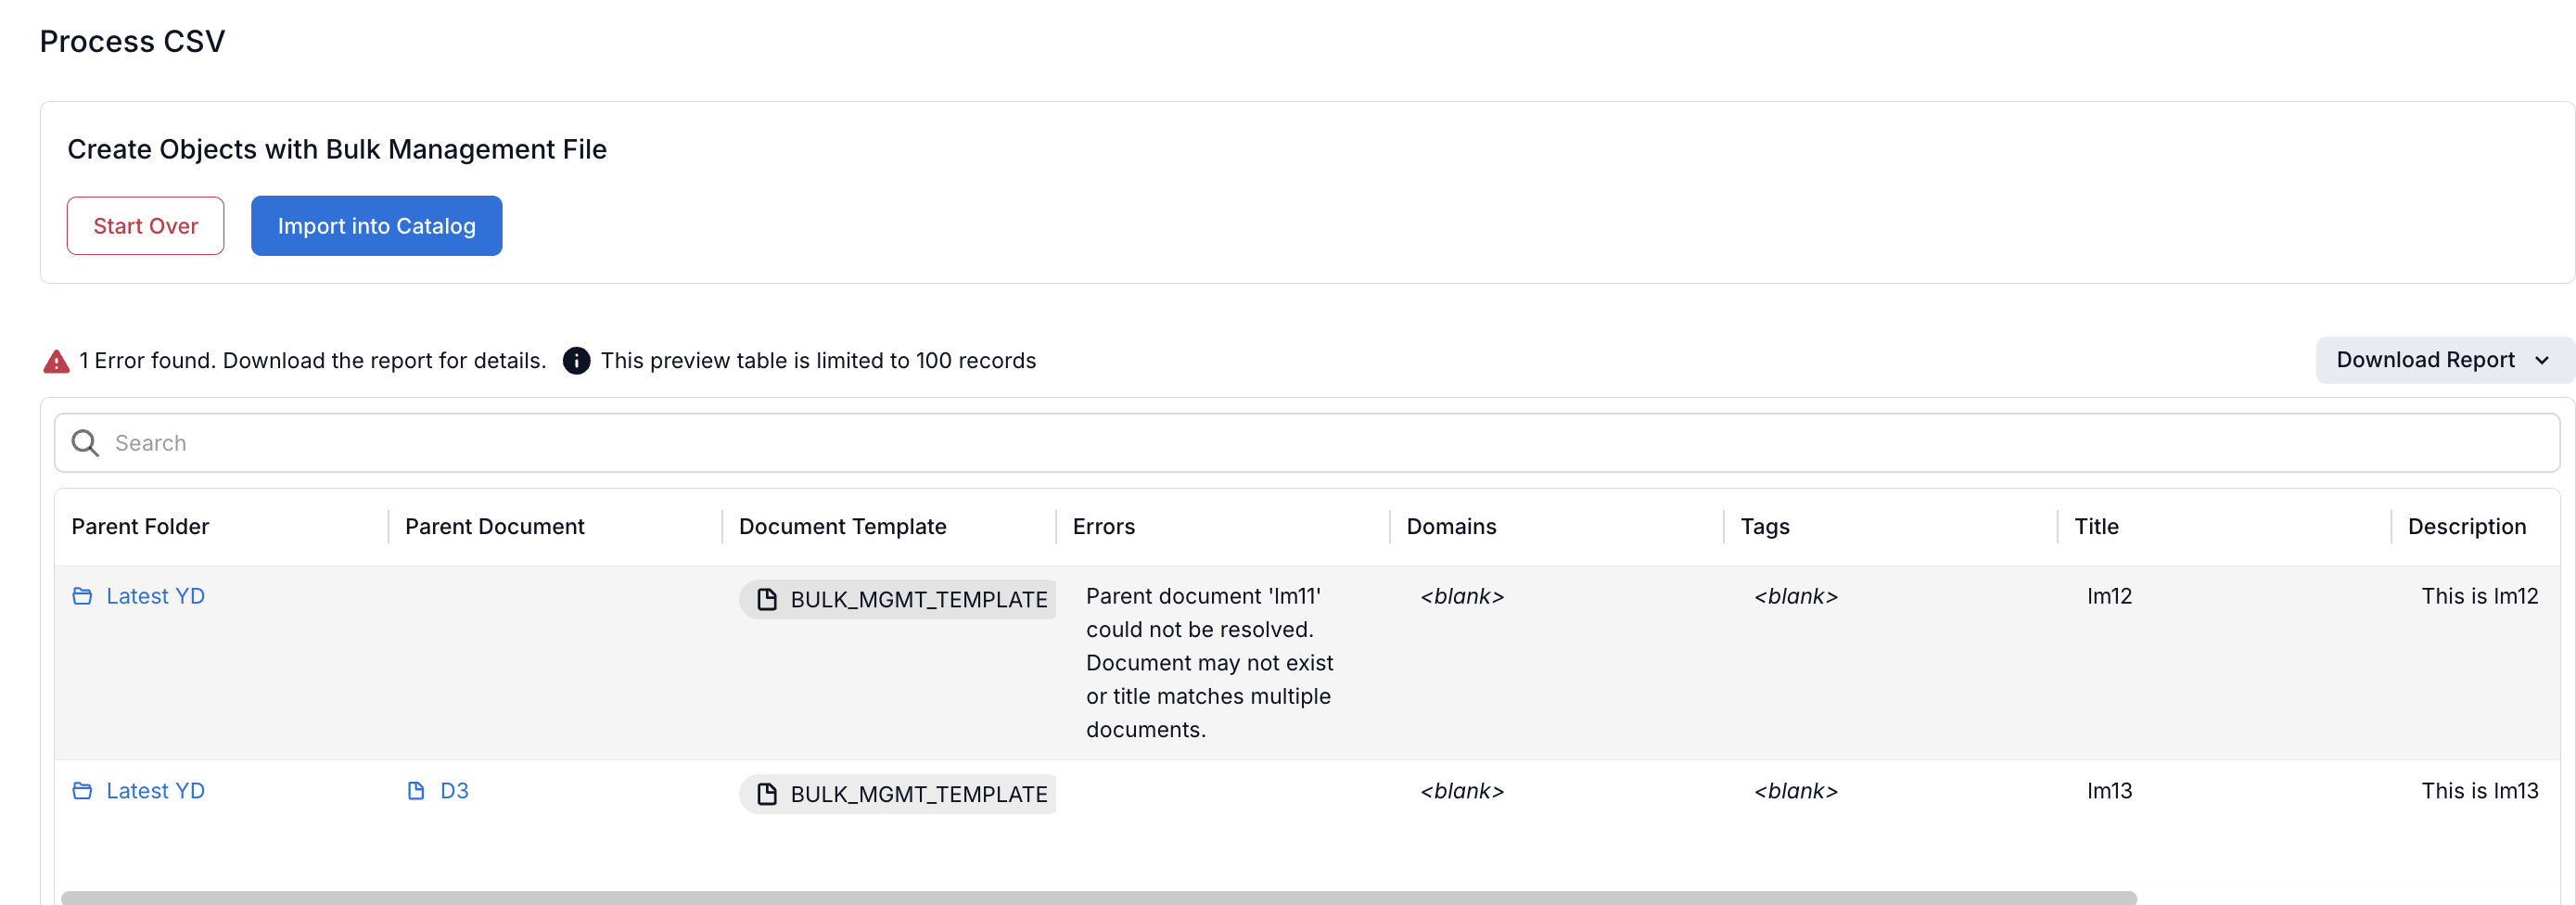
The commit report confirms the failure. The row with the ambiguous parent document title has a failed commit status and the error: Parent document ‘lm11’ could not be resolved. Document may not exist or title matches multiple documents. The unambiguous row succeeds:
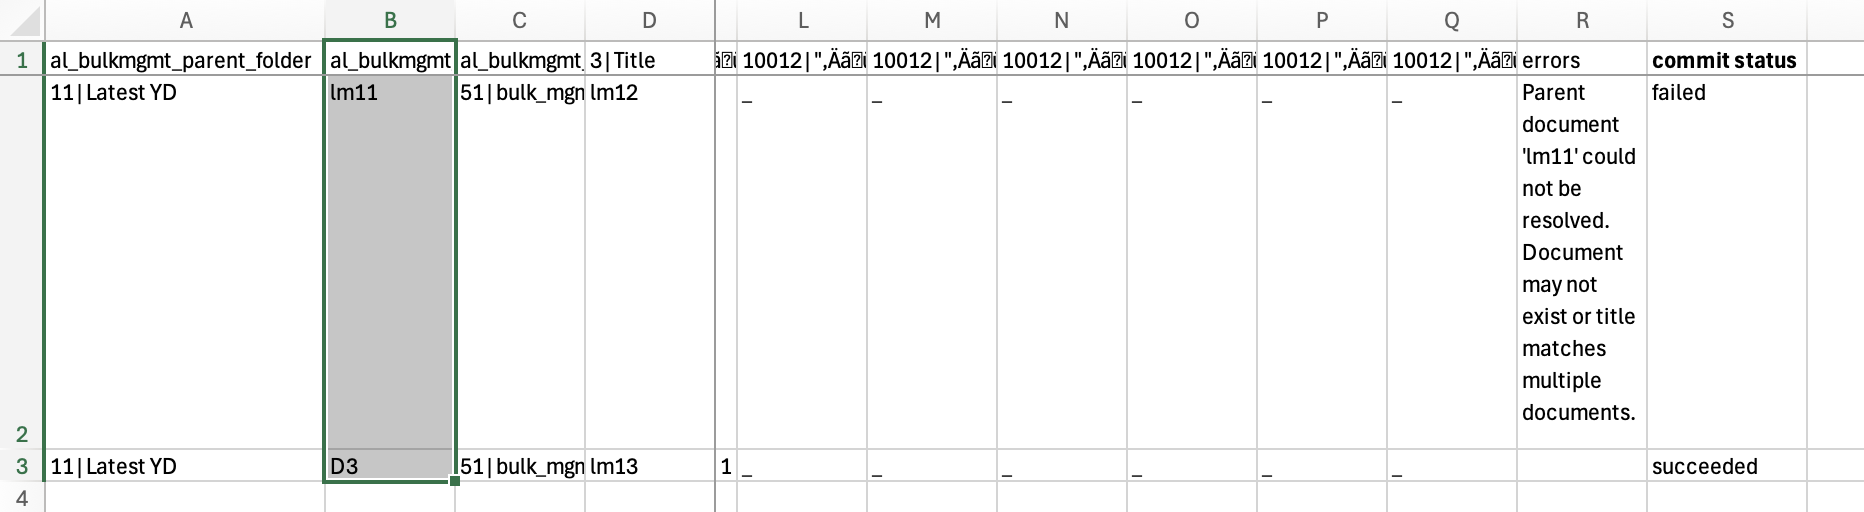
To resolve this error, use the ID or ID-and-title format (for example, 140|lm11) instead of the title alone. This removes ambiguity and ensures the correct parent document is matched. See How to Find Object IDs for guidance on locating document IDs.
Note
Setting a parent document during creation applies only to the bulk creation flow. In the bulk update flow (available from version 2026.6.0.0), the al_bulkmgmt_parent_document column appears as read-only for reference purposes only. See Source File Structure for Bulk Update/Delete for details.
Bulk Update and Delete Documents
The Bulk Management feature allows you to update field values for documents in bulk and delete documents in bulk.
To update and/or delete documents:
Open the catalog page of the Document Hub or the folder where you want to update or delete documents.
Server Admins and Catalog Admins can access Bulk Management directly on the Document Hub catalog page. This allows for selecting from all templates under the Hub, not just those in a specific folder.
Other roles must access Bulk Management from the folder page. Note that Server Admins and Catalog Admins can access from folder pages as well.
Depending on the location:
On the Document Hub page, click Bulk Management in the top-right corner.
On a Folder page, click the three-dots icon in the top-right corner, then select Bulk Management from the list of options.
The Bulk Management page for the hub or folder opens.
On the Bulk Management page, click Download Documents for Bulk Update and Deletion. The Download Documents dialog opens.
In 1. Template, click Select Document Template and choose a template from the available list.
If you opened the dialog from the Document Hub page, you must select one or more folders. In 2. Folders, select the folders you’ll be working with. If you opened it from a Folder page, Alation assumes you are working with that folder, so you don’t need to select it.
Note
The export only includes documents whose parent folder is one of the selected folders. Documents that appear in a folder through navigation links are not included in the export. To bulk-update a navigation-linked document, export it from the document’s actual parent folder.
In 2. Fields (when accessed from a Folder page) or 3. Fields (when accessed from the Document Hub page), click Select Fields, and choose the fields from the selected template that you want to curate.
Click Confirm.
An asynchronous export begins.
You’ll receive an email at the address specified in your Alation user profile.
The email subject and message will look similar to the following:
Subject: Your CSV file for Folders is ready

Hi <your name>,

Your CSV file for Folders:
    - <Folder Name>
has been generated and can be downloaded from the following link:
https://<base_URL>/download/bulk_management/glossary_v3_11_8_2025-08-20T23-45-09-093561.csv/
The download link will be available until 08/24/2025 12:54 p.m.
When you receive the file, download it and open it in a preferred editor. The template includes:
The fields you selected
Auxiliary read-only fields that help identify objects
All documents based on the selected template whose parent folder is one of the selected folders
Note
Documents that only appear in the selected folder(s) via navigation links are excluded from the export. The export scope is determined by the document’s parent folder, not by navigation link membership.
Enter content for each field. For guidance on the expected format for all fields, see Source File Structure for Bulk Update/Delete.
Once your source file is ready, upload it to Alation.
Upload Bulk Management Source File to Alation
Once your source CSV file is ready, follow these steps to upload it to Alation and apply updates to the catalog:
Have the source file saved on your local machine.
Open the catalog page of the Document Hub or the folder where you want to upload the changes.
Server Admins and Catalog Admins can access Bulk Management directly on the Document Hub catalog page. This allows for selecting from all templates under the Hub, not just those in a specific folder.
Other roles must access Bulk Management from the folder page. Note that Server Admins and Catalog Admins can access from folder pages as well.
Depending on the location:
On the Document Hub page, click Bulk Management in the top-right corner.
On a Folder page, click the three-dots icon in the top-right corner, then select Bulk Management from the list of options.
The Bulk Management page for the hub or folder opens.
In the Upload block at the bottom of the page, click Click to upload your bulk management file or drag and drop file here to select the file or drag and drop the file into the upload area.
Alation begins analyzing the file and preparing a preview. You’ll see the message: Analyzing file and preparing a preview of the updates. This may take time. You may safely exit page.

Click Check Status to refresh the page and view progress. Preview generation is asynchronous, so you may safely leave the page and return later to check progress.
You have the option to stop the preview generation. To stop preview generation, click Stop Process and confirm it in the confirmation dialog. This cancels the preview generation. You will return to the Bulk Management page and can start again from file selection.
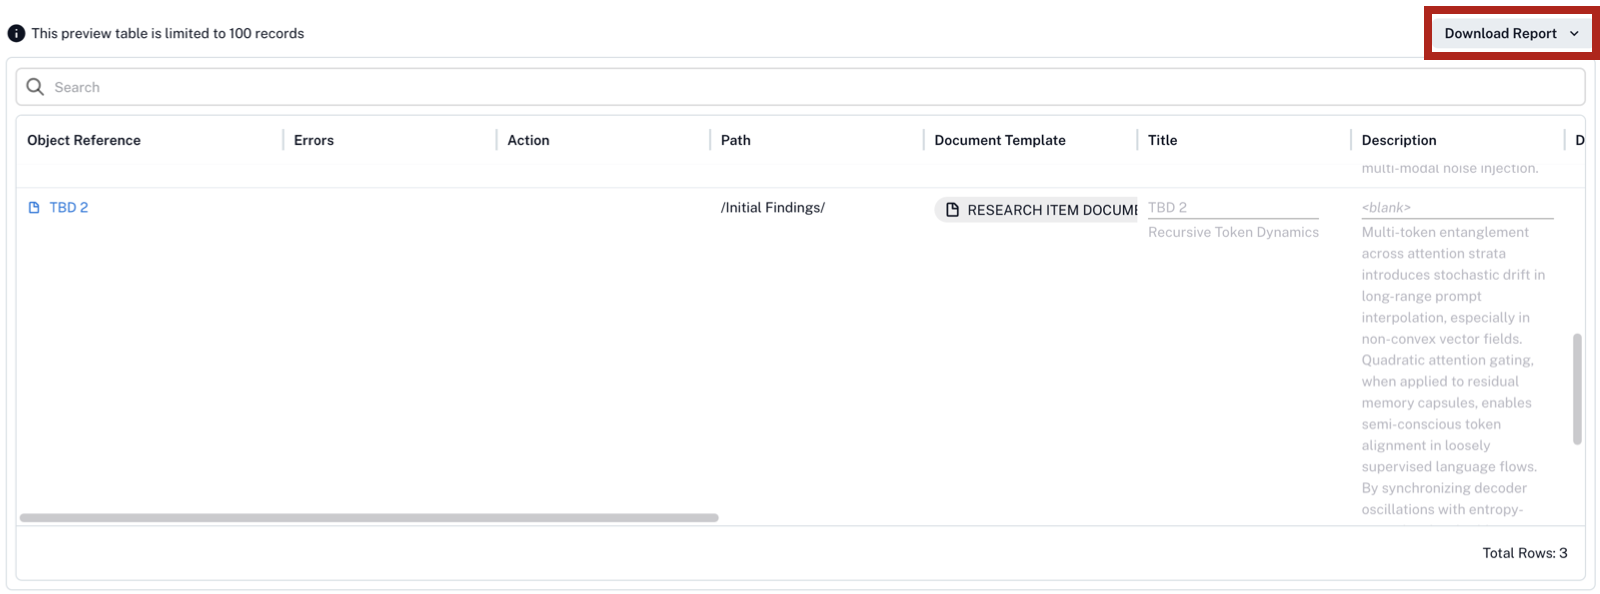
When the preview is ready, you’ll see a diff view comparing current values against the values from your CSV file. You will also receive an email with the subject Preview of dictionary upload is ready to inform you about the preview status in case you navigated away from the page.
Note
If errors occur (for example, due to insufficient permissions for certain fields or objects), affected rows will not be parsed during the preview generation, and those fields will not be updated. To review error details, click Download Report in the top-right corner of the preview area. The error report downloads in CSV format.
Initially, all values appear in grey in the preview. Select one of the following options:
Keep Existing + Fill Empty: Keeps current values. Populates only empty fields with data from your CSV.
Update Existing + Skip Blanks: Replaces existing values with new values. Blank CSV cells are ignored.
Update Existing + Clear Blanks: Replaces existing values with new values. Blank CSV cells clear the corresponding fields.
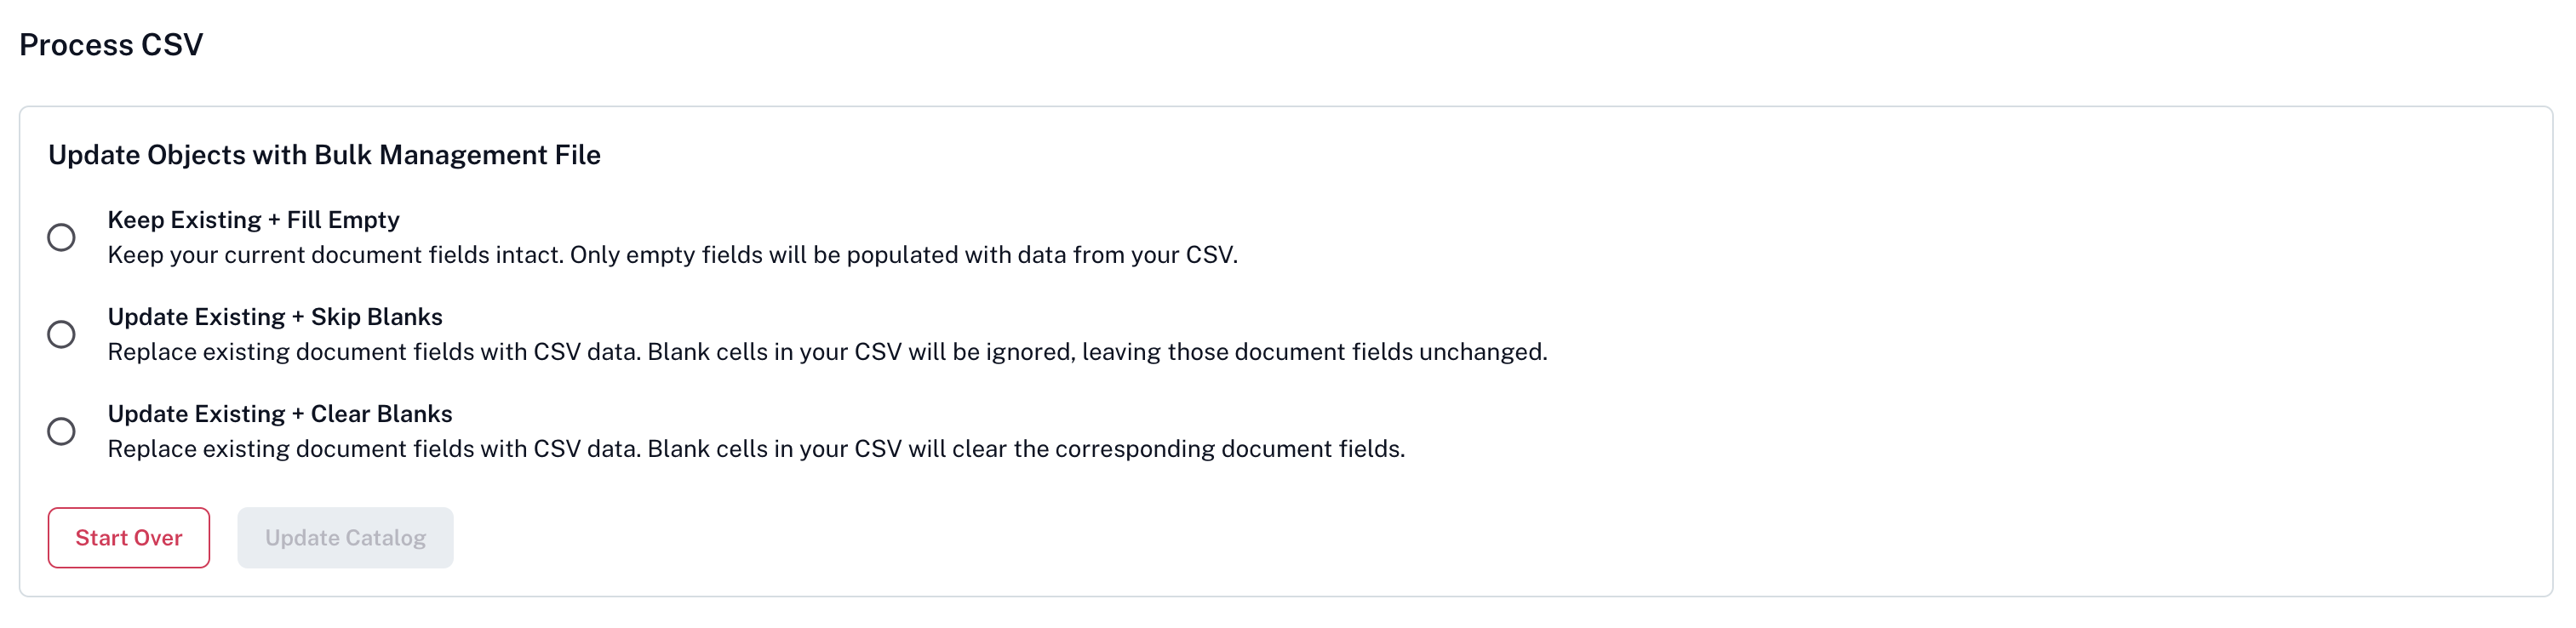
After selecting an option, the preview shows the new values in black. Review the preview carefully. When ready, click Update Catalog and confirm in the dialog.
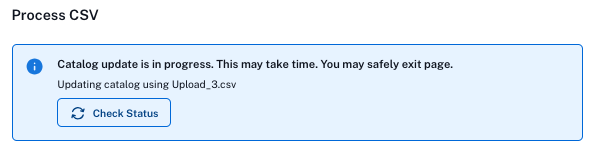
A message appears: Catalog update is in progress. The update runs asynchronously. You may leave the page and return later. To refresh manually, click Check Status.
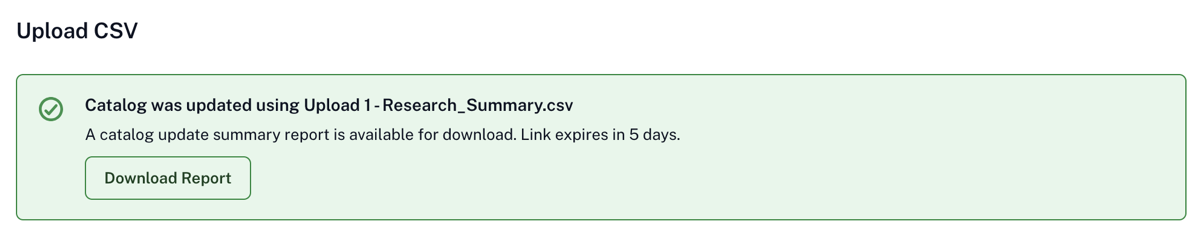
When complete, a green message banner confirms the upload is finished. Click Download Report on the banner to download a CSV report of the upload. All changes defined in the source file are now applied to the catalog. You can validate them by opening the pages of the corresponding objects.
Bulk Management Source File Structure
Important
Pay attention when editing CSV files for bulk operations in third-party tools such as Excel or Google Sheets. These tools can unintentionally change the header line (the first line of the file), including its content or formatting.
Set the export delimiter to a comma when you save the CSV file.
Keep the column header line exactly as it appears in the CSV file you downloaded from Alation.
For example, if a custom field value in a column such as Description exceeds Excel’s per-cell character limit (32,767 characters), Excel can alter the file formatting and the CSV upload fails. Verify the header line is unchanged, the file is comma-delimited, and overall formatting is unaltered before uploading.
Source File Structure for Bulk Create
When you download a CSV template for bulk creation, the file includes:
A header row (row 1): Contains the names of fields, including automatically included system fields and the fields you selected when downloading the CSV template. The format for custom fields depends on the field type. Field formats are consistent across both workflows (Create and Update/Delete). For details on custom field formats, see Built-in and Custom Field Formats.
Don’t edit the names of fields in the header row.
A description row (row 2): Contains short prompts for each field, indicating the field type.
Data rows: Used for editing content.
Field |
Can Edit? |
Explanation |
Example |
|---|---|---|---|
|
Yes |
Parent folder for the document, in the format |
|
|
Yes (optional) |
Parent document for the new document, in the format |
|
|
Yes |
The name of the selected template, in the format |
|
|
Yes |
Domains associated with the parent folders and documents, in the format |
|
|
Yes |
Tags associated with the documents, in the format |
|
Source File Structure for Bulk Update/Delete
When you download a CSV template for bulk updating, the file includes:
A header row (row 1): Contains the names of fields, including automatically included system fields and the fields you selected when downloading the CSV template. The format for custom fields depends on the field type. Field formats are consistent across both workflows (Create and Update/Delete). For details on custom field formats, see Built-in and Custom Field Formats.
Don’t edit the names of fields in the header row.
A description row (row 2): Contains short prompts for each field, indicating the field type.
Data rows: Used for editing or deleting content.
Don’t edit read-only fields unless you intend to delete a document.
To delete, type
Deletein the corresponding field.
Starting in version 2026.6.0.0, the downloaded CSV includes two additional read-only columns: al_bulkmgmt_parent_folder and al_bulkmgmt_parent_document. These columns show the parent folder and parent document hierarchy for each document, providing context about document placement within the Document Hub. These columns are informational only — any changes you make to them are ignored during re-upload. Alation continues to use al_bulkmgmt_item_key as the source of truth for identifying documents during bulk updates.
Note
Updating a document’s parent folder or parent document through the bulk update flow is not supported. To move documents, use the Move feature in Document Hubs.
Field |
Can Edit? |
Explanation |
Example |
|---|---|---|---|
|
Yes |
Delete marker. To delete a document, type |
|
|
No |
Unique identifier of the document in the format |
|
|
No |
Timestamp of the most recent update for the folder or document. Provided for reference only. |
|
|
No |
Path to the document within its parent folder. Prefilled in the template. |
|
|
No |
Read-only. Shows the canonical parent folder for the document in the format |
|
|
No |
Read-only. Shows the parent document in the format |
|
|
Yes |
The selected document template, in the format |
|
|
Yes |
Domains associated with the parent folder or documents, in the format |
|
|
Yes |
Tags associated with the parent folder or documents, in the format |
|
Built-in and Custom Field Formats
When working with bulk creation or bulk update/delete templates, the format for built-in and custom fields depends on the field type. The formats are consistent across both types of templates.
For some formats, you may need to use internal object identifiers (ID’s). For more information on finding out IDs from Alation, see How to Find Object IDs.
Format:
YYYY/MM/DDExample:
Desired ETA
Field Type: Date
2025/09/01
Format:
["Value1","Value2","Value3"]Reset value: Use
[]to clear the field.Example:
Technologies
Field Type: Multipicker
["Go", "Java", "Ruby"]
Object Set fields can reference multiple catalog object types.
Format: depends on the object type in the set. When included, the CSV template contains a field for each of the permitted object types. Find a detailed reference in Formats Cheat Sheet for Bulk Management.
Multiple values should be separated with semicolons:
12|1.public.query;23|1.public.glossaries
The example below shows an Object Set field named Multiple Otypes that allows multiple object types as values.
Multiple Otypes:attribute |
Multiple Otypes:business_policy |
Multiple Otypes:data |
Multiple Otypes:glossary_term |
Multiple Otypes:glossary_v3 |
Multiple Otypes:schema |
Multiple Otypes:table |
|---|---|---|---|---|---|---|
Field Type: Object set (Column) |
Field Type: Object set (Policy) |
Field Type: Object set (Data) |
Field Type: Object set (Document) |
Field Type: Object set (Folder) |
Field Type: Object set (Schema) |
Field Type: Object set (Table) |
|
|
|
|
|
|
|
The People Set field type allows two object types:
user(Alation user)
groupprofile(Alation group)
When included, the CSV template contains two fields, one for each object type:
Format:
The
userobject type: Alation username (bill.travis@alationmail.com) or the user object ID and email separated with a pipe:<ID>|<email>(524|sally@alationmail.com)The
groupobject type: Group name (qa group) or the group object ID and name separated with a pipe:<ID>|<group name>(22|curators)Multiple values should be separated by semicolons (
bill.travis@alationmail.com;andy.smith@alationmail.com;terry.rauch@alationmail.com)Example: The example below shows a People Set field that allows both the group and user object types.
Service Contact:groupprofile
Service Contact:user
Field Type: Object set (Group)
Field Type: Object set (User)
qa group
524|sally@alationmail.com
Format: Field name and value
Example:
Select Process
Field Type: Picker
Review
Format:
<field name:permitted object type>Permitted object types and the format are the same as for Object Set.
Format: Text
Example:
Description
Field Type: Rich Text Field
This is a very short description
Note
You can use HTML tags to format input into Rich Text fields.
<p>test</p><p>test <strong>more! </strong>At mention: <a data-oid=\"48\" data-otype=\"table\" class=\"fr-deletable \" href=\"/app/table/48\">Financial Transaction</a>. A list:</p><ol><li>One</li><li>Two</li><li>Three</li></ol>
Formats Cheat Sheet for Bulk Management
Custom Field Type |
Header Row |
Example Header |
Value format |
Example Value |
|---|---|---|---|---|
Date |
<field_name> |
|
Date in the format of |
|
Multi-Select Picker |
<field_name> |
|
Comma-separated list of values in double quotes, in square brackets |
|
Object Set: data source |
<field_name>:data |
|
Data source ID |
|
Object Set: schema |
<field_name>:schema |
|
|
|
Object Set: table |
<field_name>:table |
|
|
|
Object Set: column |
<field_name>:attribute |
|
|
|
Object Set: data policy |
<field_name>:policy |
|
|
|
Object Set: business policy |
<field_name>:business_policy |
|
|
|
Object Set: folder |
<field_name>:glossary_v3 |
|
|
|
Object Set: document |
<field_name>:glossary_term |
|
|
|
People Set |
<field_name>:user <field_name>:groupprofile |
|
Alation username Alation group name |
|
Picker |
<field_name> |
|
The relevant Picker value |
|
Reference: data source |
<field_name>:data |
|
Data source ID |
|
Reference: schema |
<field_name>:schema |
|
|
|
Reference: table |
<field_name>:table |
|
|
|
Reference: column |
<field_name>:attribute |
|
|
|
Reference: data policy |
<field_name>:policy |
|
|
|
Reference: business policy |
<field_name>:business_policy |
|
|
|
Reference: folder |
<field_name>:glossary_v3 |
|
|
|
Reference: document |
<field_name>:glossary_term |
|
|
|
Rich Text |
<field_name> |
|
<field content> |
|
How to Interpret Underscores in Downloaded CSV Templates
In a downloaded Bulk Management template, you may see underscore symbols (_) in some fields. An underscore can indicate one of the following:
Insufficient permissions: The user who downloaded the template cannot view the field.
Example: You do not have the minimum required View permission for that field, or you lack access to the specific document.
Field not applicable: The field does not exist in the template of the object described in that row.
Example: The parent folder’s template does not include the same fields as the documents you are updating.
Do not update or modify fields that contain underscores in the template.
How to Find Object IDs
In downloaded templates, some field values appear in the format <object_ID>|<value> (for example, 524|sally.smith@alationmail.com). This format speeds up processing and helps distinguish between objects with duplicate names.
Using object IDs is optional, but it’s recommended in cases where ambiguity or duplicate values exist.
To find an object ID, open the object’s catalog page. The ID appears in the URL.
User example:
https://<base_URL>/user/524/→ ID is524Group example:
https://<base_URL>/group/22/→ ID is22Folder example:
https://<base_URL>/app/doc-folder/11/overview→ ID is11Document example:
https://<base_URL>/app/document/140/overview→ ID is140
Bulk Management Known Issues
Duplicate Field Names Cause Upload Failures
Alation allows multiple custom fields with the same name if they are assigned distinct field types. For example, you might have a built-in Description field and a user-created custom rich text field also named Description. Within the system, fields are uniquely identified by internal IDs that are not exposed in the user interface. For example, the built-in Description field has ID: 4, while the custom Description field might be identified as ID: 10008.
When uploading a CSV using the Bulk Management capabilities, the upload fails with a repeated header error or an unknown error if your catalog has duplicate fields. If you encounter this issue, you will need to disambiguate the fields using IDs and then re-upload the file.
Solution
To resolve this issue, you can enable field IDs in the Bulk Management templates or identify the unique field IDs for the conflicting fields via the API and explicitly include them in the header row of your template file. The second approach requires API access and the Catalog Admin or Server Admin role.
To enable field IDs, see Configure the Format for Built-In and Custom Field Headers.
On how to use the API to retrieve a field ID, see the solution for the data dictionary.
The ts_updated Field Isn’t Updated for Documents
When updating Documents via Bulk Management, the ts_updated field in the internal database is not refreshed. As a result, the ts_updated value won’t reflect the most recent modification date.
There’s currently no workaround. If accurate timestamps are required, use the in-product field editing capabilities instead of Bulk Management.
Providing IDs in CSV Headers Requires the Pipe Character
When specifying only an ID for a technical field, you must append a pipe symbol (|) after the ID, for example: 234|. Without adding the pipe, the system does not correctly interpret the ID.
Multi-Select Picker Fields Cause Upload Failures in Bulk Create and Bulk Update
Applicable to version 2026.4.1.0
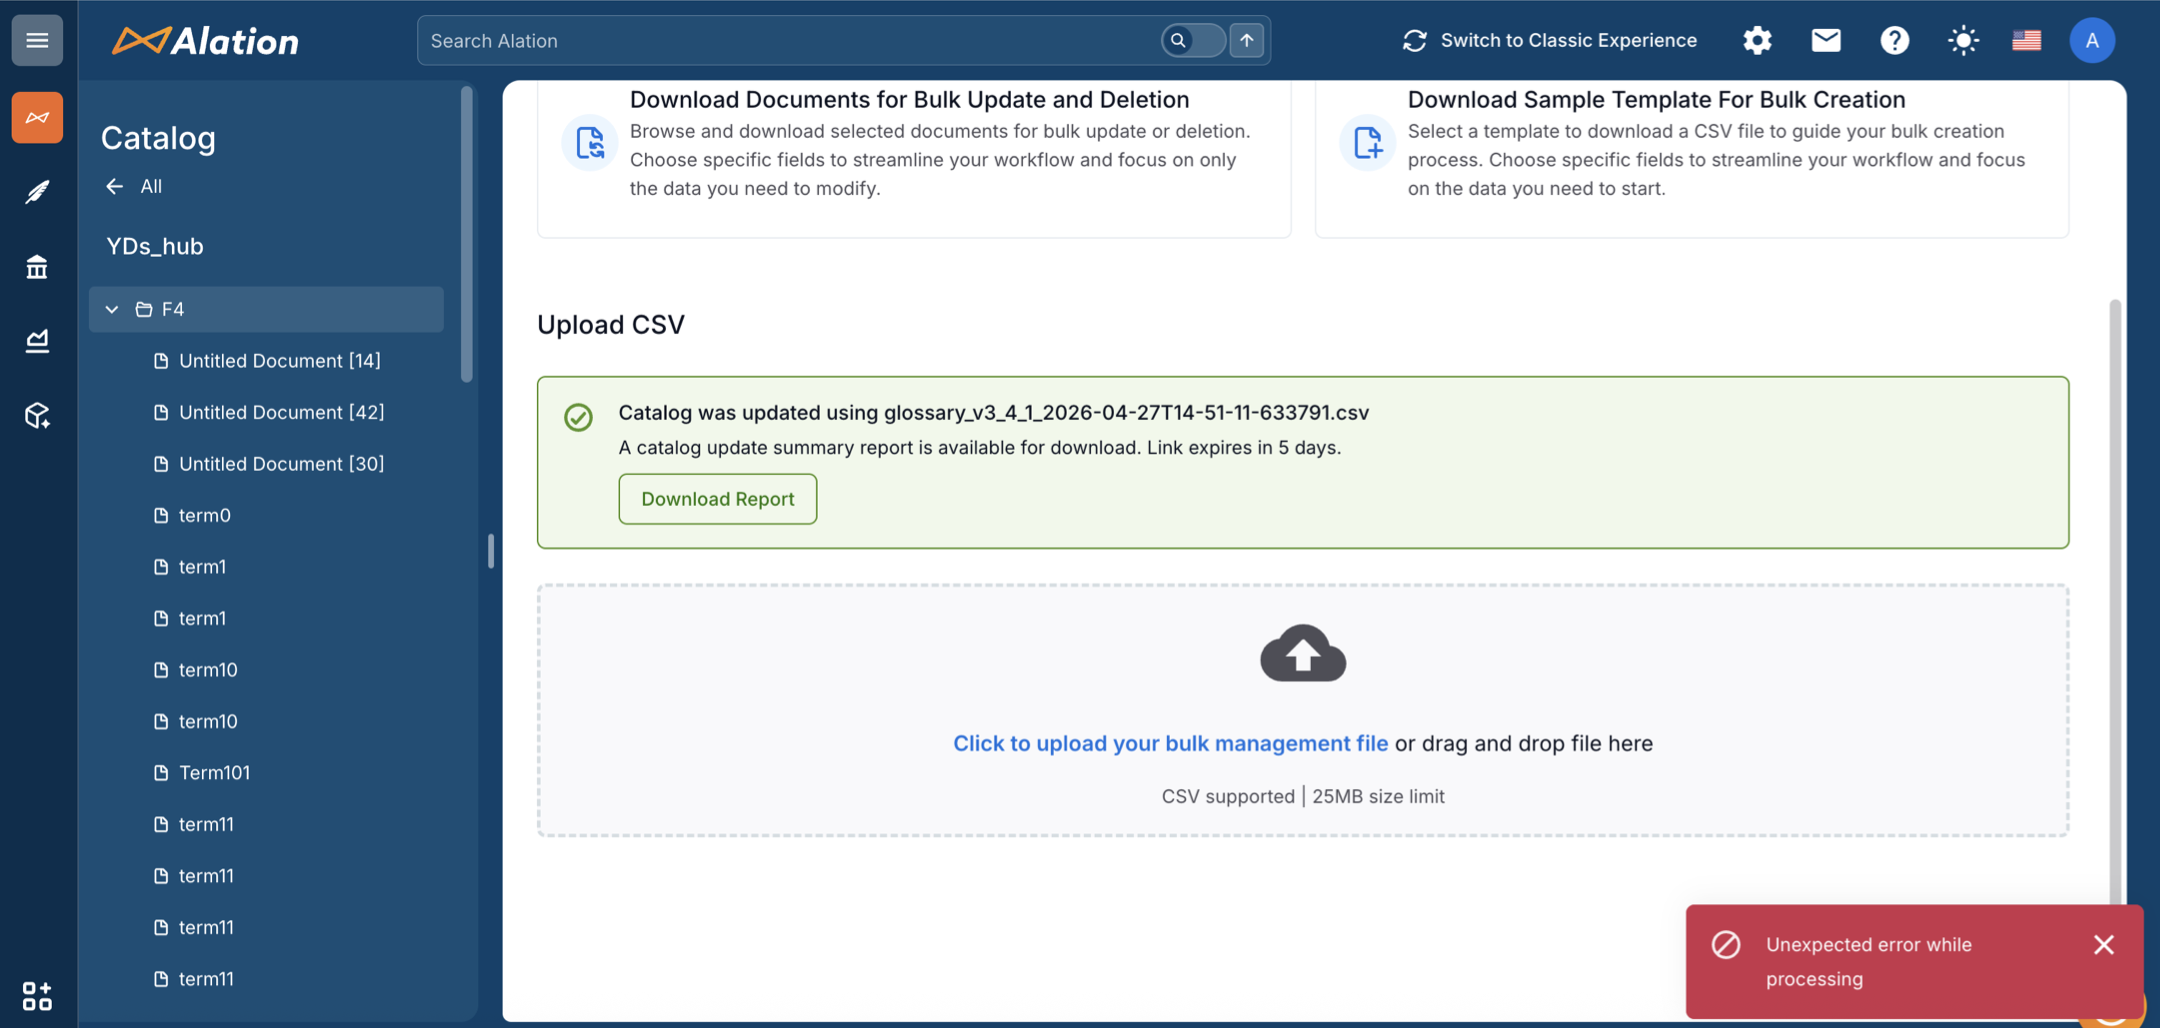
When a CSV file includes a Multi-Select Picker field (for example, Roles), both bulk creation and bulk update operations fail during file processing. Instead of loading a preview, Alation displays an Unexpected error while processing message.
The following screenshot shows the error that appears in the Alation UI after uploading a CSV that contains a Multi-Select Picker column:
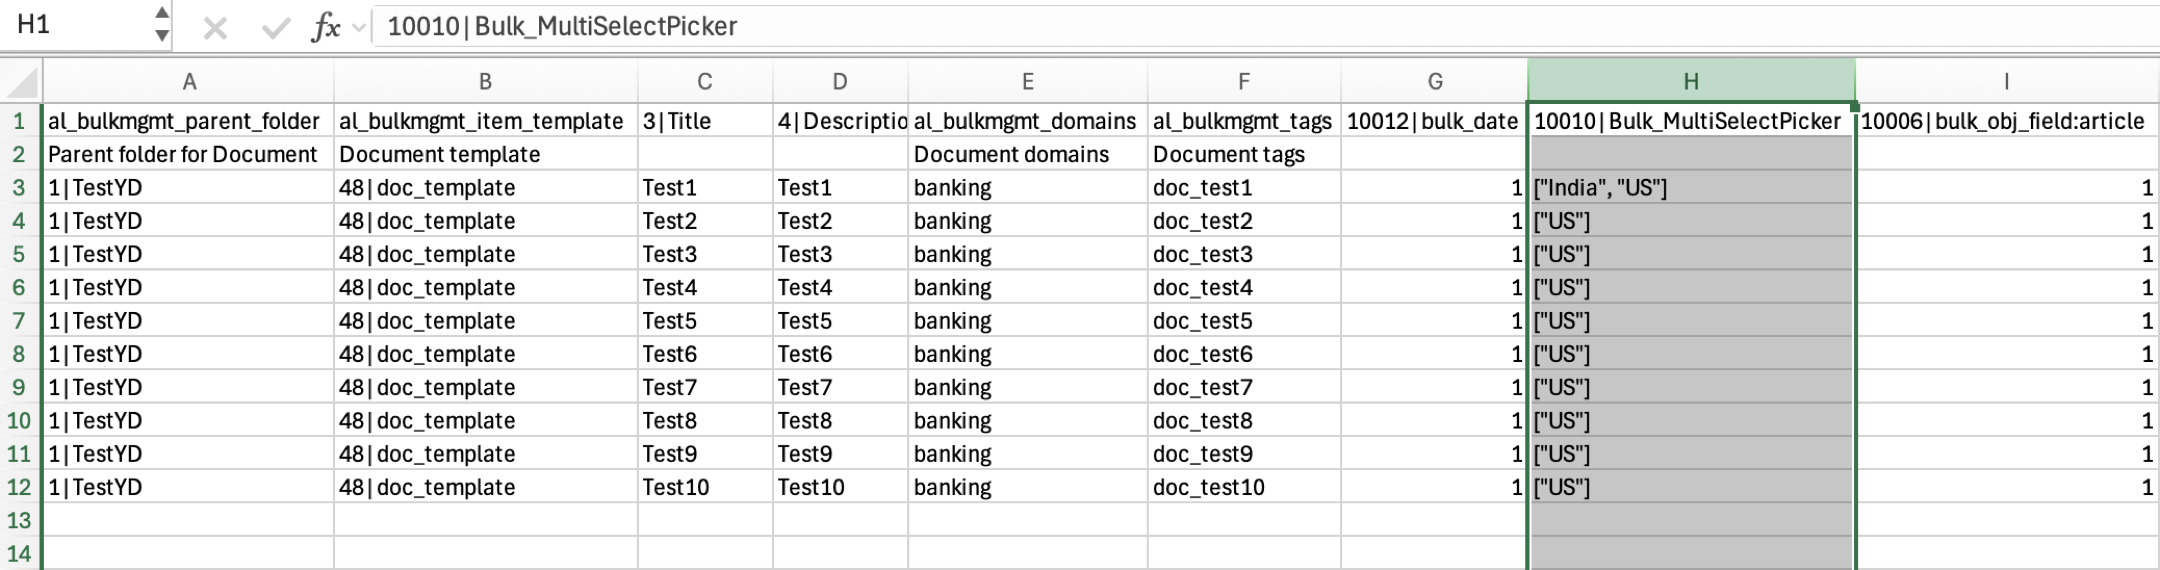
The following screenshot shows an example of a bulk creation CSV template with a Multi-Select Picker field that reproduces this issue:
Important
This issue is a regression introduced in the Build Number 2026.4.1.0. A fix has been completed and will be included in the May month release with version 26.5.0.0, tentatively scheduled for mid-May 2026.
Workaround
To work around this issue, remove the Multi-Select Picker field column from your CSV file before uploading:
Open the CSV file in your preferred editor.
Delete the column that contains the Multi-Select Picker field (for example, the Roles column).
Save the file and upload it to Alation.
After the upload completes, manually update the Multi-Select Picker field values on each document’s catalog page.
For bulk update operations, use the Data Dictionary feature as a temporary workaround to update Multi-Select Picker field values across multiple documents.