Configure the Data Contract
Alation Cloud Service Applies to Alation Cloud Service instances of Alation
A data contract is a formal quality agreement that you configure on a data product to define and enforce expectations about the underlying data. When you configure a data contract, you specify the structural and quality checks that Alation runs against the data assets included in your data product. These checks monitor for schema changes, verify data freshness, and validate data quality rules. Consumers of your data product can see the contract status on the data product’s page as they open it from the Marketplace, ensuring that the data meets the standards you have committed to.
You must be a Data Product Admin to configure a data contract. Consumers with view access to the data product can see the contract status on the Marketplace page if you have enabled the contract’s Marketplace visibility.
Note
Data quality checks and timeliness SLAs within a data contract require the Data Quality App to be enabled on your Alation instance. If the Data Quality App is not available, you can still configure schema checks, but the timeliness SLA and data quality steps in the setup wizard are locked.
In this topic:
Understand the Data Contract Structure
A data contract is organized into four aspects, each of which corresponds to a tab on the Data Contract page of your data product settings:
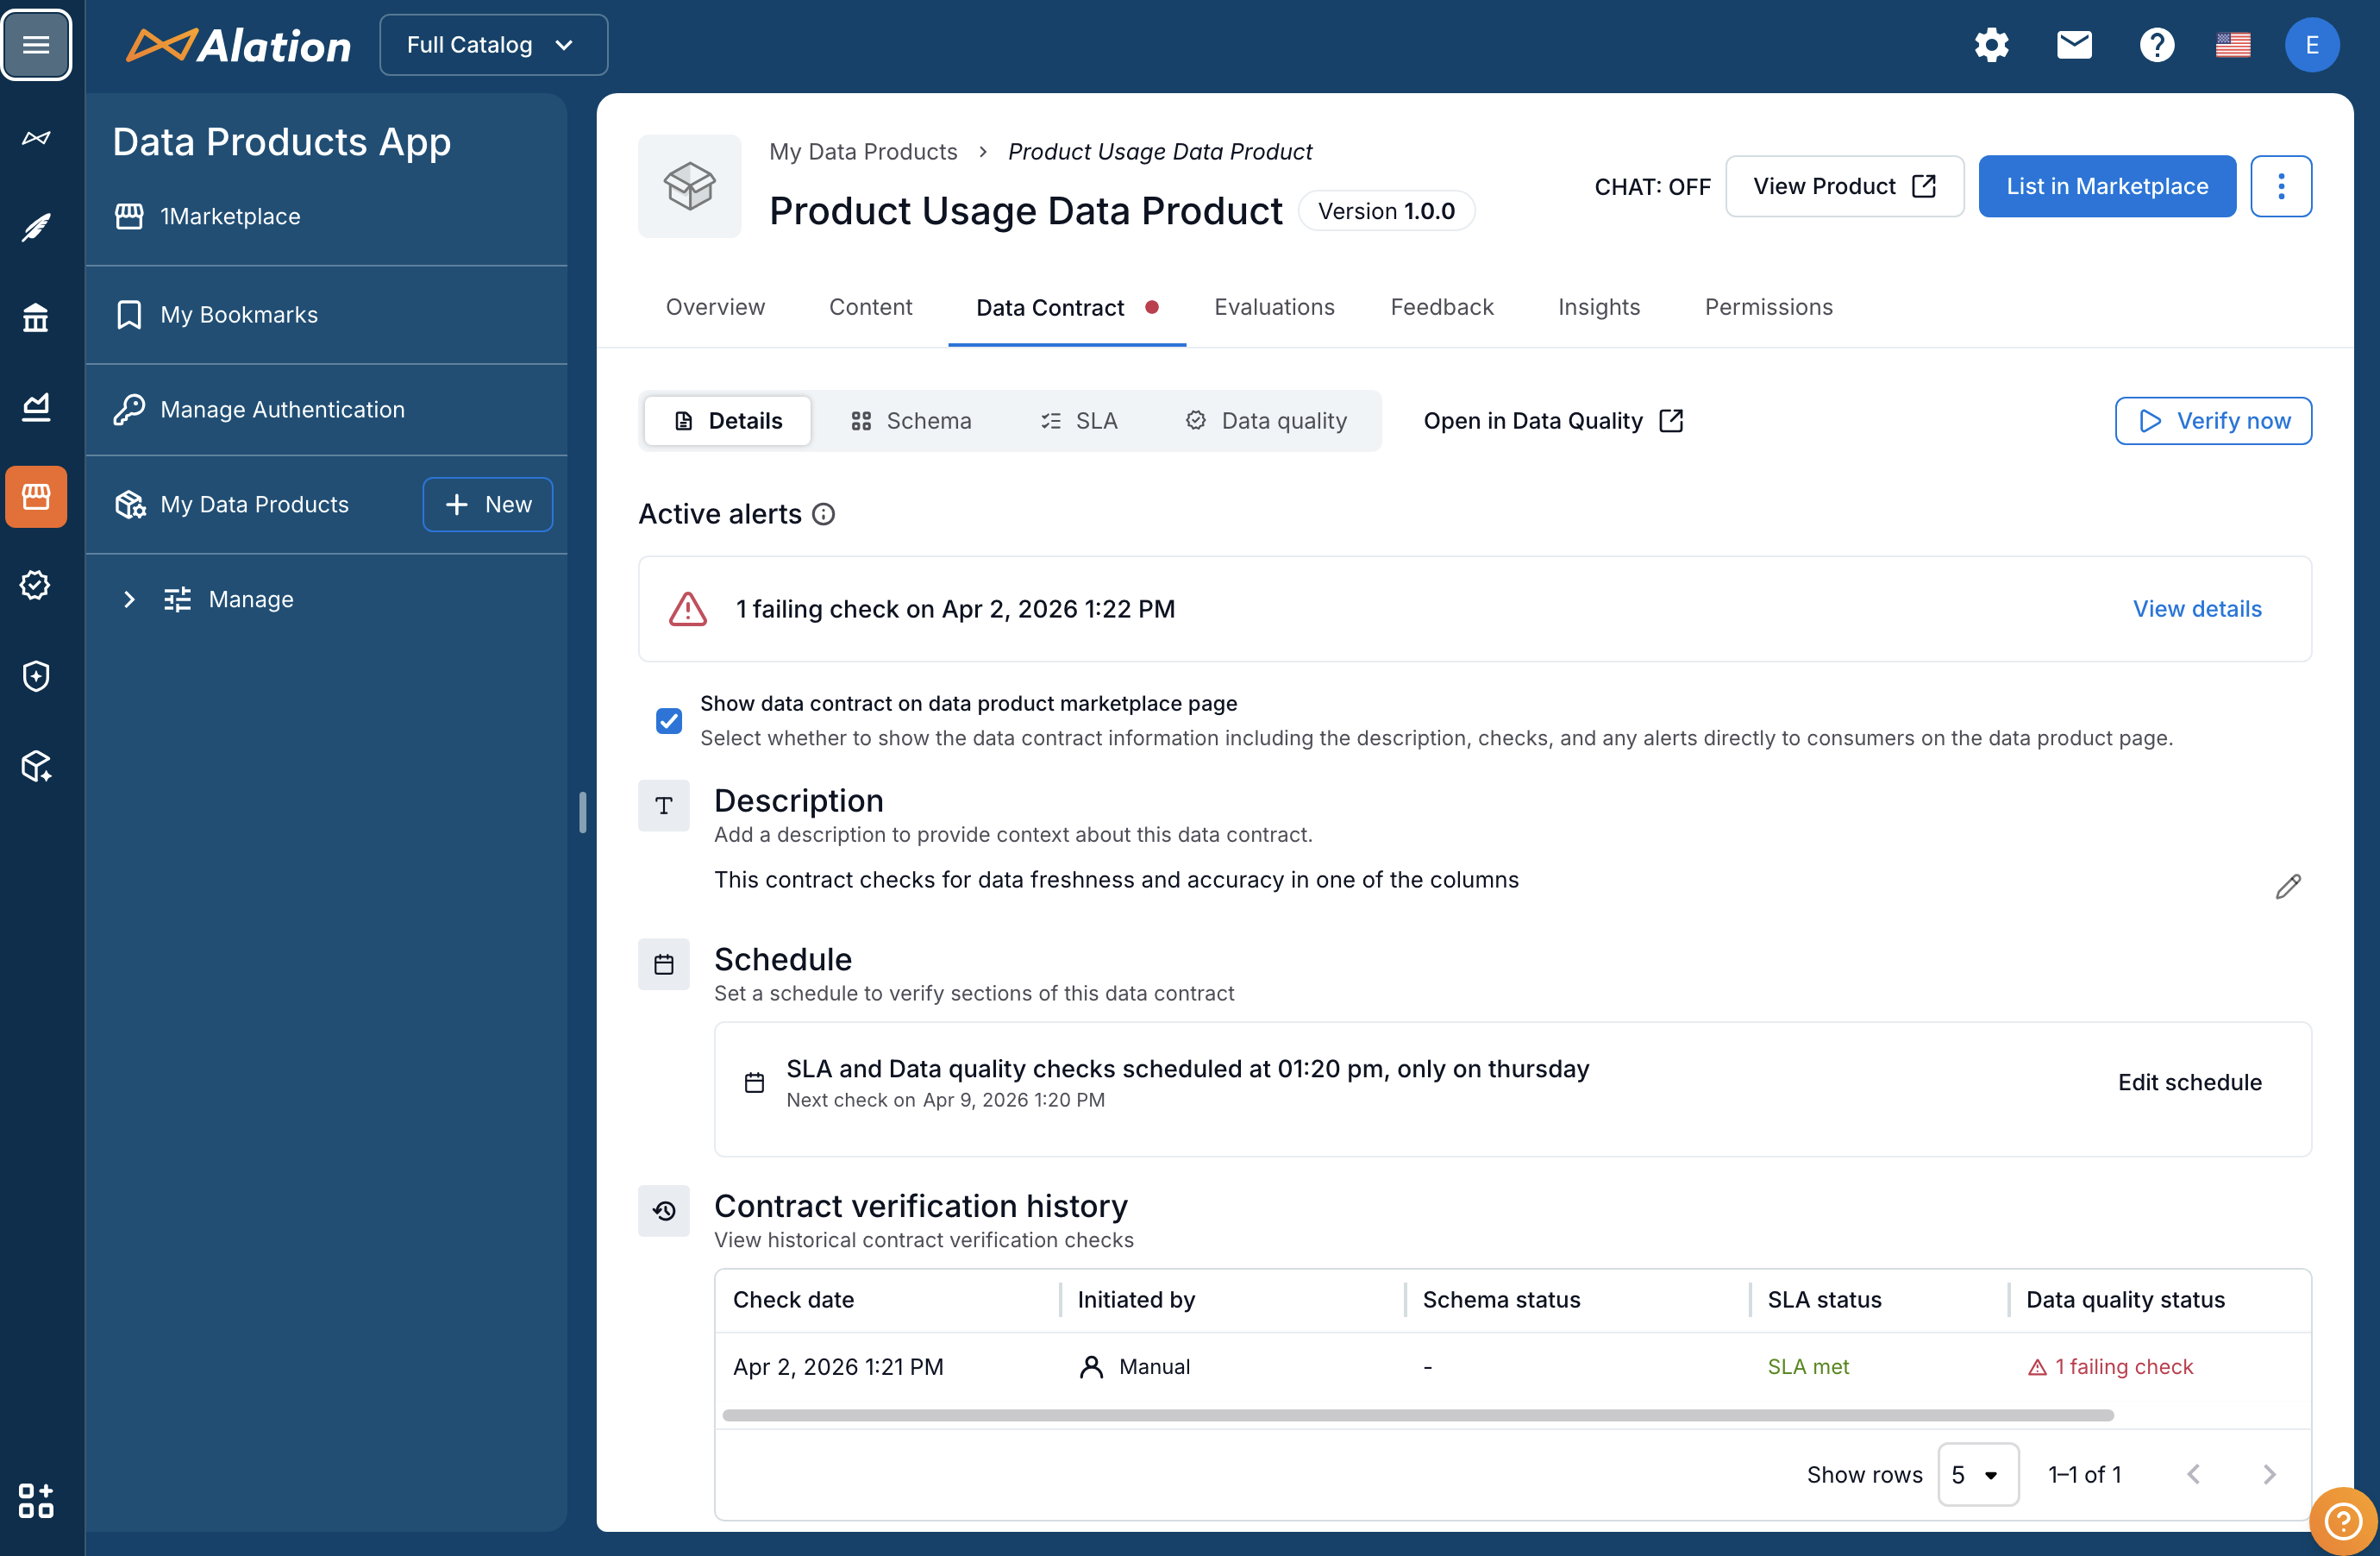
Details: Holds general information about the contract, including its description, the verification schedule you have configured, active alerts, and a full history of check runs. From this tab you can also control whether the contract status is visible to consumers on the Marketplace.
Schema: Shows the schema drift check configuration — which tables are being monitored for structural changes — along with a schema change timeline showing drift activity over the last 30 days, and the schedule of the underlying metadata extraction on the data source that drives those checks.
SLA: Shows any timeliness checks you have configured. These checks verify that data in date and timestamp columns is refreshed within the intervals you define.
Data Quality: Shows all data quality checks associated with the contract, along with their current status, last run time, and check definitions. From this tab you can add new quality checks, edit existing ones, and navigate directly to the corresponding monitor in the Data Quality App.
Note
Not all tabs will show data in every configuration. The SLA and Data Quality tabs only display content when the Data Quality App is enabled and you have configured checks of those types.
Each data product version can have one data contract.
Prerequisites
Before you configure a data contract, ensure the following conditions are met.
Your data product must include record sets (tables). Each table must be cataloged in Alation. This ensures it has a valid
documentationURLin the Alation catalog. This URL links the data product’s tables to the respective catalog objects and enables schema drift detection. Tables that do not have a valid documentation URL pointing to a cataloged Alation table are skipped during contract verification.For schema checks to run on schedule, metadata extraction must be scheduled for each data source that contains tables used in the data product. Schema checks run automatically when metadata extraction completes for a data source. If metadata extraction is not scheduled, schema checks do not run automatically.
Data Quality App must be enabled on your Alation instance to use timeliness SLAs and data quality checks. If Data Quality is not enabled, you can only configure schema checks, but the timeliness SLA and data quality checks are locked.
Limitations
Be aware of the following limitations when working with data contracts.
Column renames are not detected as schema changes. When a column is renamed, Alation creates a new column identifier. The contract reports this as a column removal alert only. The renamed column is not recognized as a new addition.
Data type comparison is string-based and case-insensitive. Different naming conventions between the data product specification and the schema, for example,
INTEGERversusint, may produce false-positive type change alerts.You cannot set an independent schedule for schema checks. They run automatically when metadata extraction completes for the relevant data source. The configurable data contract schedule only applies to timeliness SLAs and data quality checks.
Access the Data Contract Tab
To access the data contract configuration for a data product:
In the left navigation, click the Data Products App icon to expand the menu.
Click My Data Products.
In the Data Products table, locate the data product you want to configure. Open its settings in one of the following ways:
Click the name of the data product.
Click the three-dot icon in the rightmost column and select Manage Data Product.
On the data product settings page, click the Data Contract tab.
If you have not yet created a data contract for this data product, the tab shows a Create Data Contract button. If a contract already exists, the tab shows the current configuration organized into the Details, Schema, SLA, and Data Quality sub-tabs.
Create a Data Contract
When you create a data contract for the first time, Alation opens a wizard that guides you through the configuration in steps. Each step corresponds to a type of check you can include in the contract. No step is mandatory: you can skip any step that does not apply to your data product and return to configure it later.
To start the wizard, click Create Data Contract on the Data Contract tab.
The wizard has four steps:
Configure schema checks: Set up monitoring for structural changes in the tables included in your data product.
Review timeliness SLAs: Configure data freshness checks on date and timestamp columns.
Review data quality checks: Configure additional data quality rules using the Alation Data Quality App.
Finalize contract details: Review the complete configuration before saving.
The sections below describe each step in detail.
Configure Schema Checks
Schema checks monitor the data assets in your data product for structural changes. When a schema check runs, Alation compares the current structure of the monitored tables against a previously recorded baseline. If Alation detects that a table or column has been removed, that a column data type has changed, or that a schema or table has become unavailable in the catalog, it generates an alert on the data contract. Schema checks only apply to the tables you have included in the data product — changes to other tables in the same data source are not monitored.
Important
Schema checks run on the same schedule as metadata extraction on the underlying data source. Alation does not run a separate extraction for schema checks; instead, it evaluates structural changes as part of the standard metadata extraction cycle. Because schema checks are layered, if a schema is unavailable, table and column checks for that schema are skipped. Similarly, if a table is unavailable, column checks for that table are skipped.
On the Configure Schema Checks step of the wizard, you select which tables to monitor. By default, all tables in the data product are included.
All Tables option: Any tables added to the data product in the future are automatically included in schema checks.
Select Tables option: If you want to monitor only specific tables, select the Select Tables radio button. This displays a list of all tables currently included in the data product. Select the checkboxes for the tables you want to monitor.
Click Next to go to the next step of the wizard.
If you don’t want to configure schema checks at this time, click Next without making any selections. You can configure schema checks later from the Schema sub-tab of the data contract.
Review Timeliness SLAs
Timeliness SLAs are data freshness checks that verify whether the data in specific columns has been updated within a defined interval. For example, you can configure a check that confirms the data in a timestamp column is no older than seven days. If the check runs and finds that the most recent value in that column is older than your threshold, the check fails and the contract reflects that the freshness SLA has been breached.
Timeliness SLAs only apply to columns with date or datetime data types.
When you transition to the Review Timeliness SLAs step, Alation analyzes the assets in your data product and generates AI-assisted suggestions for freshness checks based on the date and timestamp columns it finds. If none of the assets in your data product include date or datetime columns, no suggestions are generated and you can proceed to the next step.
Note
If you do not need timeliness SLAs, click Next without creating any checks.
To configure a timeliness SLA from a suggestion:
In the suggestions list, click Add Check for the table you want to configure. The SLA configurator opens.
The Category field is pre-populated with the value Timeliness that corresponds to the timeliness data quality check.
Note
Do not change this value, as it determines the type of data quality check being configured.
Under Target > Table, confirm the pre-selected table.
From the Apply check to a column list, select the columns you want to check by selecting their checkboxes. Only columns with date or datetime data types appear in this list.
From the Metric list, select the freshness metric. The default is Freshness.
Choose from preset templates such as Data fresh within 1 day, Data fresh within 7 days, or Data fresh within 30 days. Selecting a template automatically populates the threshold value.
You can optionally set a row-level filter to limit the rows that the check evaluates. Use the filter list under Filters (Optional), to set a filter. For more information on row-level filtering in quality checks, see Row-Level Filtering.
Under Threshold, set the maximum age for the data in the selected column before the check fails.
Review the check description in the preview area, which summarizes what the check will verify. To edit the description, click the pencil icon next to it, edit the text, and save.
Optionally, provide a SQL query in the Sample Failed Rows field. This query defines how Alation retrieves example rows that fail the check when it runs, which is useful for diagnosing why a check is failing.
To run a column profile directly from the configurator, click Run Profile in the profiling section. This uses the profiling configuration of the underlying data source.
Click Create Check.
Once you have configured the timeliness checks you need, click Next to proceed to the data quality checks step.
Review Data Quality Checks
Data quality checks allow you to define and enforce specific validation rules on the columns and tables in your data product. These checks are powered by the Alation Data Quality App and are equivalent to the checks available within that application. Configuring a quality check in a data contract automatically creates a corresponding monitor in the Data Quality App. See Data Quality App for more information on supported quality checks.
On the Review Data Quality Checks step, Alation uses AI-assisted analysis to generate recommended quality checks based on the assets in your data product. These suggestions give you a starting point for your configuration.
To configure a quality check:
Click Add Check for the table you want to configure. This opens the Select Check Category dialog.
Select the check category, for example, Validity, Completeness, or another category available in the Data Quality App.
Optionally, narrow the scope of the check by applying table-level filters. Click Add Table Level Filters to expand the filter panel. Select a column and an operator to define the subset of rows the check will apply to. Filters restrict the rows that the check evaluates, which is useful when you only want to validate data that meets certain conditions.
Click Create Check to open the check configurator.
Select the columns you want to check. The metrics available depend on the data type of the column you select, so select the column before choosing a metric.
Select the metric that defines what you are checking, such as Valid Email Format, a custom SQL query, or one of the available templates.
Optionally, set a row-level filter to limit the rows that the check evaluates.
Set the threshold that determines whether the check passes or fails.
Click Create Check to save the check.
Repeat these steps for each additional quality check you want to add. When you have finished, click Next to proceed to the final step.
Finalize Contract Details
The final step of the wizard presents a summary of everything you have configured: schema checks, timeliness SLAs, and data quality checks. Review the configuration to confirm it reflects your intent.
In this step you also configure the contract details:
Contract name: Enter a name for the data contract. The field defaults to “Data Contract for [data product name]” and is required.
Description: Optionally add a description to provide context about the contract, its purpose, or the checks it includes.
Show data contract on data product marketplace page: Select this checkbox to make the contract status and check summary visible to consumers on the Marketplace page of your data product.
If the configuration is complete, click Finish to create the data contract.
If you want to finish the configuration at a later time, click Save for Later to exit the wizard. The wizard preserves the information you have entered and returns you to the same point in the configuration the next time you open it.
Important
Once you click Finish, the data contract is created and applied to the data product. Alation creates a data quality monitor for this data contract that evaluates the configured quality checks against the data in the data product. The monitor can be managed within Alation’s Data Quality Monitor App.
Manage an Existing Data Contract
Once a data contract exists on your data product, you manage its configuration from the Data Contract tab. The tab is divided into the four sub-tabs described in Understand the Data Contract Structure.
Edit Schema Check Assets
To change which tables are covered by the schema check:
On the Schema sub-tab, locate the schema check configuration.
Click Edit Checked Assets.
In the dialog that opens, select All Available Tables to apply the schema check to every table in the data product, or select Select Tables and choose the specific tables you want to monitor.
Click Save.
Edit SLAs
To add a new SLA to the data contract:
On the SLAs sub-tab, click New SLA.
In the dialog that opens, configure the SLA parameters, such as the expected data availability time and the threshold for timeliness.
Click Create Check to add the SLA to the data contract.
To modify the timeliness SLAs configured for the data contract:
On the SLAs sub-tab, locate the SLA you want to edit.
Click the three-dot icon in the rightmost column of the SLA row and select Edit SLA.
In the dialog that opens, adjust the SLA parameters as needed, such as the expected data availability time or the threshold for timeliness.
Click Update Check to apply your changes.
Edit Quality Checks
To add a new quality check to an existing data contract:
On the Data quality sub-tab, click New Check.
Follow the same configuration steps described in Review Data Quality Checks.
To edit or remove an existing quality check:
On the Data quality sub-tab, in the Manage Checks and Metrics table, locate the check you want to modify.
Click the three-dot icon in the corresponding row.
Select one of the following options:
Edit check: Modify the check configuration.
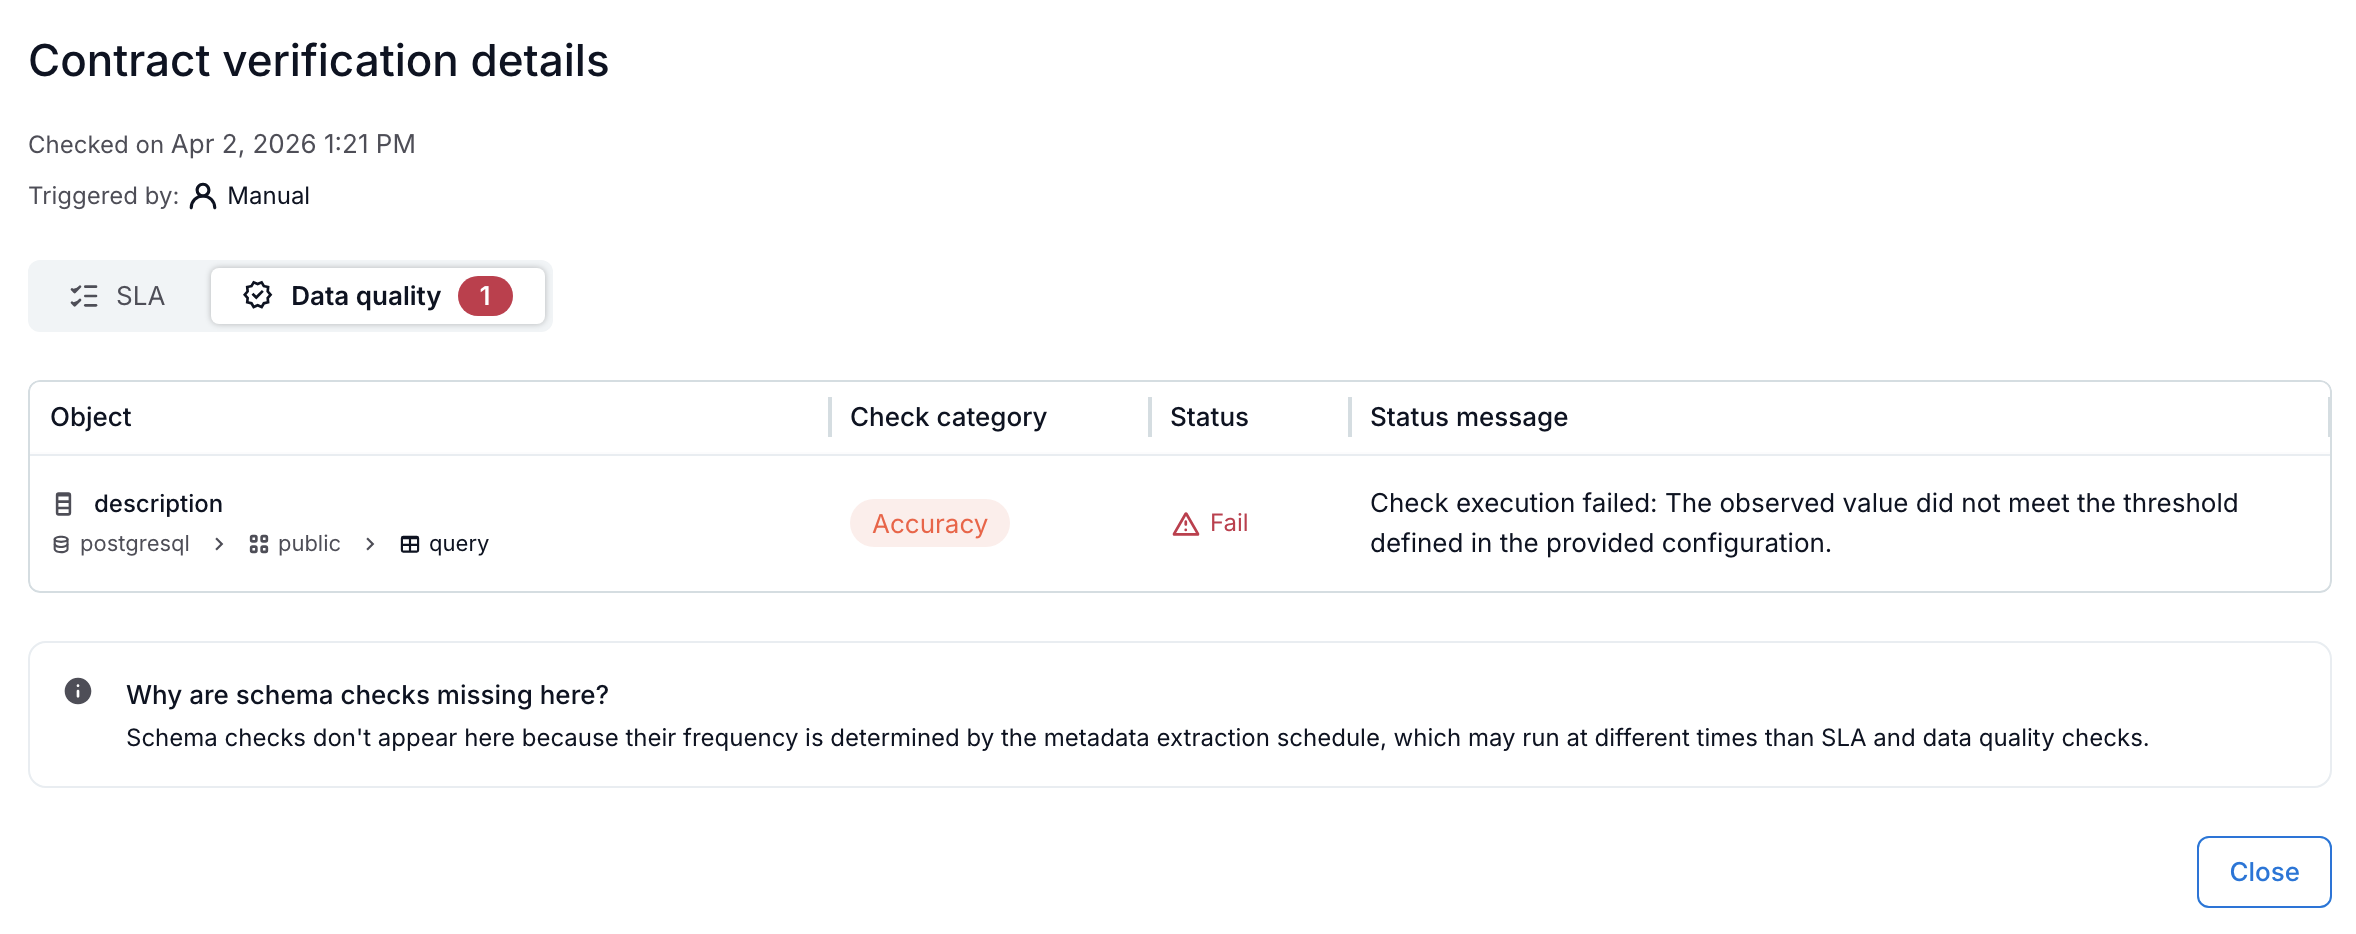
View status details: Review the current status and run history of the check. The dialog shows historical pass, fail, and error results with timestamps and status messages.
Remove check: Permanently remove the check from the data contract.
You can navigate directly from the Data quality sub-tab to the corresponding monitor in the Data Quality App by clicking Open in Data Quality next to the sub-tab heading.
Important
Each quality check you add to a data product creates a corresponding monitor in the Data Quality App. If you delete a monitor directly from the Data Quality App, the associated check in the data contract loses its connection to that monitor and produces errors. Always remove quality checks through the data contract interface rather than by deleting monitors from the Data Quality App directly.
Control Marketplace Visibility
You can control whether the data contract status is visible to consumers of your data product after the contract has been created.
On the Details sub-tab, locate the Show Data Contract on Data Product Marketplace Page toggle.
Enable the toggle to make the contract status visible to Marketplace consumers, or disable it to hide the contract information from the Marketplace view.
When enabled, consumers see a summary of the contract on the data product’s page that they open from the Marketplace, including the status of schema checks, timeliness SLAs, and data quality checks, as well as the last verification timestamp. The summary reflects the most recent check run for each check type.
Schedule Contract Verification
Data contract SLA and quality checks run on schedules that you configure separately from schema checks.
To configure or update the verification schedule:
On the Details sub-tab, click Edit Schedule.
In the Edit Verification Schedule dialog, set the cadence, time, and day of the week for the check runs. You can configure a daily, weekly, or monthly schedule.
Click Save.
Note
Schema checks are tied to the metadata extraction schedule of the underlying data source, not to this verification schedule. You can review that schedule from both the Details sub-tab and the Schema sub-tab by clicking View Schedule in the schema check schedule section. The dialog that opens shows the data source name, the time of the last metadata extraction, and the time of the next scheduled extraction. Clicking the data source name takes you directly to the catalog page of that data source.
Run a Manual Verification
You can start a contract verification at any time without waiting for the scheduled run.
On the Data Contract tab, click Verify Now in the upper right.
The verification runs in the background against all timeliness SLA and data quality rules configured in the contract.
Once complete, the results appear in the Contract verification history table on the Details sub-tab and any active alerts are updated.
Note
Verify Now starts only timeliness SLA and data quality checks. It does not start schema checks. Schema checks run automatically when metadata extraction completes for the underlying data source and cannot be started manually from the data contract.
Review Contract Verification History
The Details sub-tab includes a Contract verification history section that shows a log of all check runs for the data contract, covering both schema checks and data quality checks. For each run, the history shows the type of check that ran, its status, and when it ran. To view the full log of a specific run, click View Details in the corresponding row.
Because schema checks and data quality checks run on different schedules (schema checks are initiated by metadata extraction, while data quality checks follow the contract’s verification schedule),they may appear in separate rows in the verification history. A note is displayed in the run details when one type of check is not included in a particular run.
The Data Quality sub-tab also displays a summary of the current state of your quality checks, including the overall data quality score based on the most recent check run, the total number of checks configured, and a breakdown of table-level and column-level checks. Data quality checks can return the following statuses: - Pass: The data meets the defined rules - Fail: The data does not meet the defined rules - Error: The check could not run, for example due to a connectivity issue
Data Contract Alerts
You will be alerted if any of the checks in the data contract fail.
Schema Alerts
At the schema level, Alation alerts you when a schema has been deleted or is no longer available in the catalog. At the table level, Alation alerts you when a table has been deleted or excluded from the catalog. At the column level, Alation alerts you when a column defined in the data product specification no longer exists in the catalog table, or when a column’s data type in the catalog differs from what the specification defines — for example, when VARCHAR has changed to TEXT.
When a schema becomes unavailable, table and column checks for that schema are skipped. When a table becomes unavailable, column checks for that table are skipped. This layered behavior means a single schema-level change may suppress a larger number of lower-level alerts.
You can review schema change activity over time on the Schema sub-tab, which includes a heat map showing drift activity over the last 30 days. Each date tile indicates whether schema changes were detected on that day. Click a tile to expand the details and see which data assets were affected and what changed.
Note
Column renames are not detected as renames. When a column is renamed in the catalog, Alation creates a new column identifier and reports the change as a column removal only. The renamed column is not recognized as a new addition.
Quality Alerts
Quality alerts notify you when data quality checks fail or encounter errors. These alerts are triggered based on the results of the data quality checks configured in your data contract. When a check fails, Alation generates an alert indicating that the data does not meet the defined rules. If a check encounters an error and cannot run, an alert is generated to indicate that the check could not be completed, for example due to a connectivity issue.
If at least one alert fails, you see a red indicator on the Data Contract tab. The screenshot below shows a failed check indicated by the red alert on the tab.
To view the alert details, click View Details in the corresponding alert banner. The next screenshot shows details of a failed quality check in a data contract.
Enable Schema Checks for Data Products Created in YAML
Some data products could have been created directly through a YAML specification. When a data product is created via the UI, and tables and columns are added from the Alation catalog, the system automatically includes the documentationURL property within the dataAccess property of the data product. This property is crucial as it allows Alation to resolve the data source information required for data contracts, enabling the data source to be automatically detected when you activate the schema check. (Use the URL https://<base_URL>/static/swagger/specs/data_products/product_schema.yaml for the detailed data product schema, substituting <base_URL> with your actual base URL.
If your data product was created using the YAML specification it may be missing the required documentationURL property. If this property is missing, Alation cannot resolve the data source because documentationURL is required for data contracts to work.
When you attempt to create a schema check on such a data product, the following error message appears in the UI, despite previously adding objects from the catalog: No data sources are associated with this data product. Add cataloged tables to enable scheduled schema checks.
This message indicates that the necessary documentationURL property is absent.
Resolution: Add the documentationURL Property
To enable schema checks, you must update the data product’s YAML specification to include the documentationURL property. You should add this property to at least one table if all tables belong to the same data source.
Open the Manage My Data Products page.
Locate the data product and click it to open its settings.
Open the Content tab.
On the right side, click Edit with Co-pilot.
On the top of the editor, click Edit YAML.
Locate the
recordSetsproperty.Check the content under the
dataAccessproperty. ThedocumentationURLmust point to the table page in the Alation catalog.Add documentationUrls to the
recordSetsin your data product. Ensure the configuration appears in YAML as follows:recordSets: HC_CLMS: name: HC_CLMS displayName: HC_CLMS description: '' dataAccess: - type: sql documentationUrl: https://my_data_catalog.alationcloud.com/table/485/ qualifiedName: database: ALATION_EDW schema: HEALTHCARE table: HC_CLMS
Save the changes.
Try configuring the schema check again.