Integrate Agent with Secrets Manager Using IAM Roles Anywhere
Alation Cloud Service Applies to Alation Cloud Service instances of Alation
Available on the Deluxe, Enterprise, and Enterprise+ plans only
Use the information in this topic to configure an Alation Agent to read secrets from AWS Secrets Manager using AWS IAM Roles Anywhere with X.509 certificate-based authentication. This method uses a client certificate and private key to obtain temporary AWS credentials, eliminating the need for static AWS access keys. With the Alation Agent, AWS Secrets Manager, and your on-premise data source all running within your network, your data source credentials never leave your environment, and they are not stored in Alation or the Alation Agent.
This method is appropriate when:
Your Alation Agent is running on a non-AWS machine (on-premise or another cloud provider).
You want to use certificate-based authentication instead of static access keys.
Your organization has a Certificate Authority (CA) infrastructure or can generate certificates with OpenSSL.
After completing the shared steps on this page (Steps 1 through 4), choose one of the following approaches to configure the Alation Agent machine:
Filesystem-Based Setup: Store the private key as a PEM file on the Agent machine’s filesystem. This is the simpler approach and suitable for most deployments.
SoftHSM Setup (Encrypted Key Storage): Store the private key encrypted in a SoftHSM2 PKCS#11 token database. This provides stronger key protection without requiring hardware and is appropriate when your organization’s security policy does not allow raw private keys on disk.
Note
To see other options for integrating with AWS Secrets Manager, see Integrate with AWS Secrets Manager.
Prerequisites
You must be using Alation Agent version 1.7.2.4360 or later.
You must install Authentication Service Add-on version 5.14.0.2469 or later on the Alation Agent.
You must have a supporting OCF connector installed on the Agent. To find out if a specific connector supports this feature, see the documentation for the specific connector in the Open Connector Framework (OCF) Overview section.
Note
You can use the Native Data Sources API to migrate a data source from an OCF connector that’s not on an Alation Agent to an OCF connector that is on an Alation Agent.
You must have the Server Admin role to set up the integration in Alation.
You must have a Certificate Authority (CA) certificate and a client certificate signed by that CA. See Step 1: Set Up Certificates for details.
SSH access to the Alation Agent machine.
Overview
IAM Roles Anywhere enables workloads running outside of AWS to obtain temporary AWS credentials using X.509 certificates. The Alation Auth Service uses this mechanism to access AWS Secrets Manager without storing long-lived AWS access keys.
Authentication flow:
The Auth Service presents a client certificate and signs a request with its private key.
AWS IAM Roles Anywhere validates the certificate against a registered Certificate Authority (CA).
If trusted, AWS issues temporary credentials scoped to the configured IAM role.
The Auth Service uses these credentials to read secrets from AWS Secrets Manager.
Step 1: Set Up Certificates
Certificate Requirements
Your certificates must meet the following requirements:
Certificate |
Requirement |
|---|---|
CA certificate |
Must have |
CA certificate |
Must have |
CA certificate |
Must be X.509 Version 3 |
Client certificate |
Must be signed by the CA certificate |
Client certificate |
Must have |
If your organization has an existing PKI/CA infrastructure, request certificates that meet the above requirements and skip to Step 2: Create an IAM Role in AWS.
Generate Certificates with OpenSSL (Optional)
If you do not have an existing CA, you can generate self-signed certificates for testing or production use.
Generate the CA private key and certificate.
# Generate CA private key
openssl genrsa -out ca.key 4096

# Generate CA certificate (valid for 10 years)
cat > /tmp/ca.cnf <<'CONF'
[req]
distinguished_name = dn
x509_extensions = v3_ca
prompt = no
[dn]
CN = <YourOrg>CA
O = <YourOrg>
[v3_ca]
basicConstraints = critical, CA:TRUE
keyUsage = critical, keyCertSign, cRLSign
CONF

openssl req -x509 -new -nodes -key ca.key \
  -sha256 -days 3650 \
  -config /tmp/ca.cnf \
  -out ca.crt

rm -f /tmp/ca.cnf
Replace
<YourOrg>with your organization’s name.Note
This is the certificate (
ca.crt) you will use as the trust anchor certificate in AWS IAM Roles Anywhere.Generate the client private key and certificate.
# Generate client private key
openssl genrsa -out client_private.key 2048

# Generate a Certificate Signing Request (CSR)
openssl req -new -key client_private.key \
  -subj "/CN=alation-authserver/O=<YourOrgName>" \
  -out client.csr

# Sign the CSR with your CA (valid for 1 year)
openssl x509 -req -in client.csr \
  -CA ca.crt -CAkey ca.key -CAcreateserial \
  -sha256 -days 365 \
  -extfile <(echo "keyUsage=critical,digitalSignature") \
  -out client.crt
Verify the certificates.
# Verify CA certificate has correct extensions
openssl x509 -in ca.crt -text -noout | grep -A1 "Basic Constraints"
# Expected: CA:TRUE

# Verify client certificate has correct extensions
openssl x509 -in client.crt -text -noout | grep -A1 "Key Usage"
# Expected: Digital Signature

# Verify the client certificate is signed by the CA
openssl verify -CAfile ca.crt client.crt
# Expected: client.crt: OK
Step 2: Create an IAM Role in AWS
This step is performed in the AWS Management Console
If you already have an IAM role with the necessary Secrets Manager permissions, you can reuse it and update its trust policy as part of this step. Otherwise, create a new role:
Open the AWS Management Console and navigate to IAM > Roles.
Click Create role.
Under Trusted entity type, select Custom trust policy.
Paste the following trust policy (or update the trust policy on your existing role):
{
  "Version": "2012-10-17",
  "Statement": [
    {
      "Effect": "Allow",
      "Principal": {
        "Service": "rolesanywhere.amazonaws.com"
      },
      "Action": [
        "sts:AssumeRole",
        "sts:TagSession",
        "sts:SetSourceIdentity"
      ],
      "Condition": {
        "ArnEquals": {
          "aws:SourceArn": [
            "arn:aws:rolesanywhere:<your-region>:<your-account-id>:trust-anchor/<trust-anchor-id>"
          ]
        },
        "StringEquals": {
          "aws:PrincipalTag/x509Issuer/CN": "<your-ca-cn>"
        }
      }
    }
  ]
}
Replace the following placeholders in the trust policy:
Placeholder
Description
Example
<your-region>The AWS region where the trust anchor is created
us-east-1<your-account-id>Your AWS account ID
248135293344<trust-anchor-id>The Trust Anchor ID (created in Step 3: Create a Trust Anchor in AWS)
bdd70097-97bd-...<your-ca-cn>The Common Name (CN) from your CA certificate’s Subject
MyOrgCA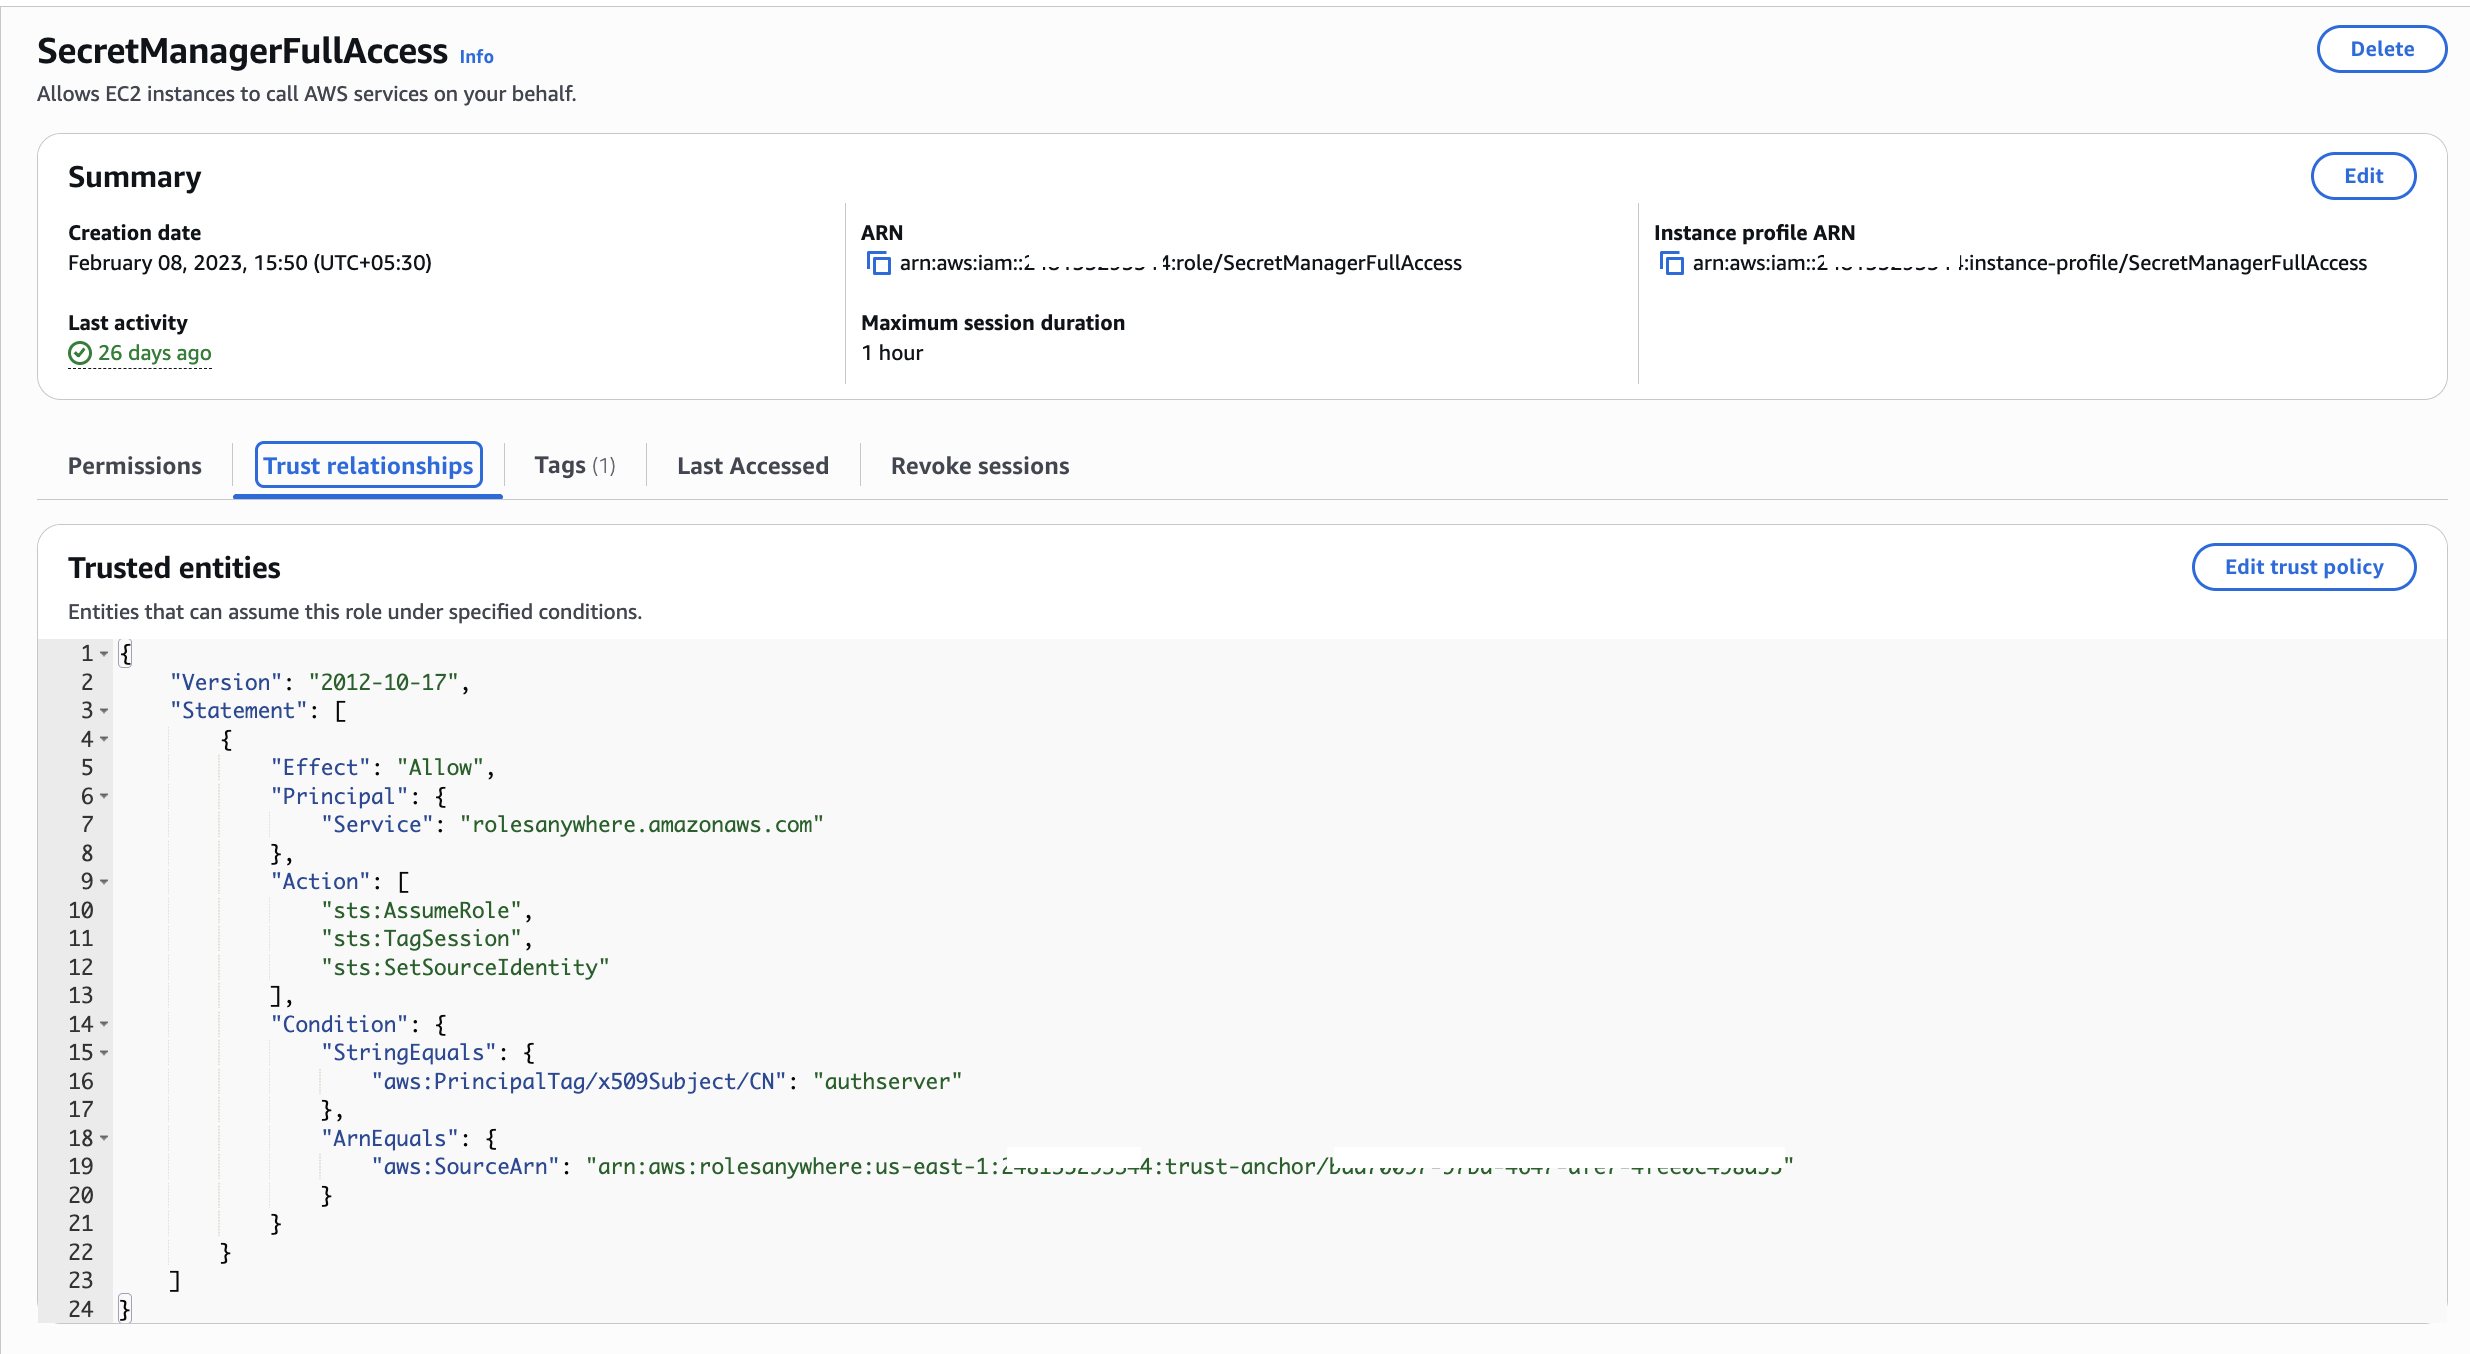
Note
Why these conditions are recommended:
Without conditions, any trust anchor in your account could assume this role. The conditions add two layers of protection:
aws:SourceArn — Ensures only the specific trust anchor you created can be used to assume this role. This prevents other trust anchors (potentially created by other teams or for other purposes) from accessing Secrets Manager through this role.
aws:PrincipalTag/x509Issuer/CN — Ensures only certificates issued by a CA with the expected Common Name can assume this role. Even if an attacker registers a different CA as a trust anchor, the CN must match.
Since the trust policy references the Trust Anchor ARN, and the trust anchor is created in Step 3: Create a Trust Anchor in AWS, you have two options:
Create the role first with only the
PrincipalandActionfields (noCondition), complete Step 3 to get the Trust Anchor ARN, then come back and update the trust policy to add theConditionblock.Create the trust anchor first (Step 3), note the ARN, then create the role (this step) with the full trust policy.
Click Next.
On the Add permissions page, attach a policy that grants least-privilege access to Secrets Manager. The recommended permissions are:
{
  "Version": "2012-10-17",
  "Statement": [
    {
      "Effect": "Allow",
      "Action": [
        "secretsmanager:GetSecretValue",
        "secretsmanager:DescribeSecret"
      ],
      "Resource": "arn:aws:secretsmanager:<your-region>:<your-account-id>:secret:*"
    }
  ]
}
Replace
<your-region>and<your-account-id>with your AWS account details. You can further restrict theResourcefield to specific secret ARNs if needed.Name the role (for example,
AlationSecretsManagerAccess) and click Create role.Note the Role ARN (for example,
arn:aws:iam::<your-account-id>:role/AlationSecretsManagerAccess). You will need this when setting up the Alation Agent machine.
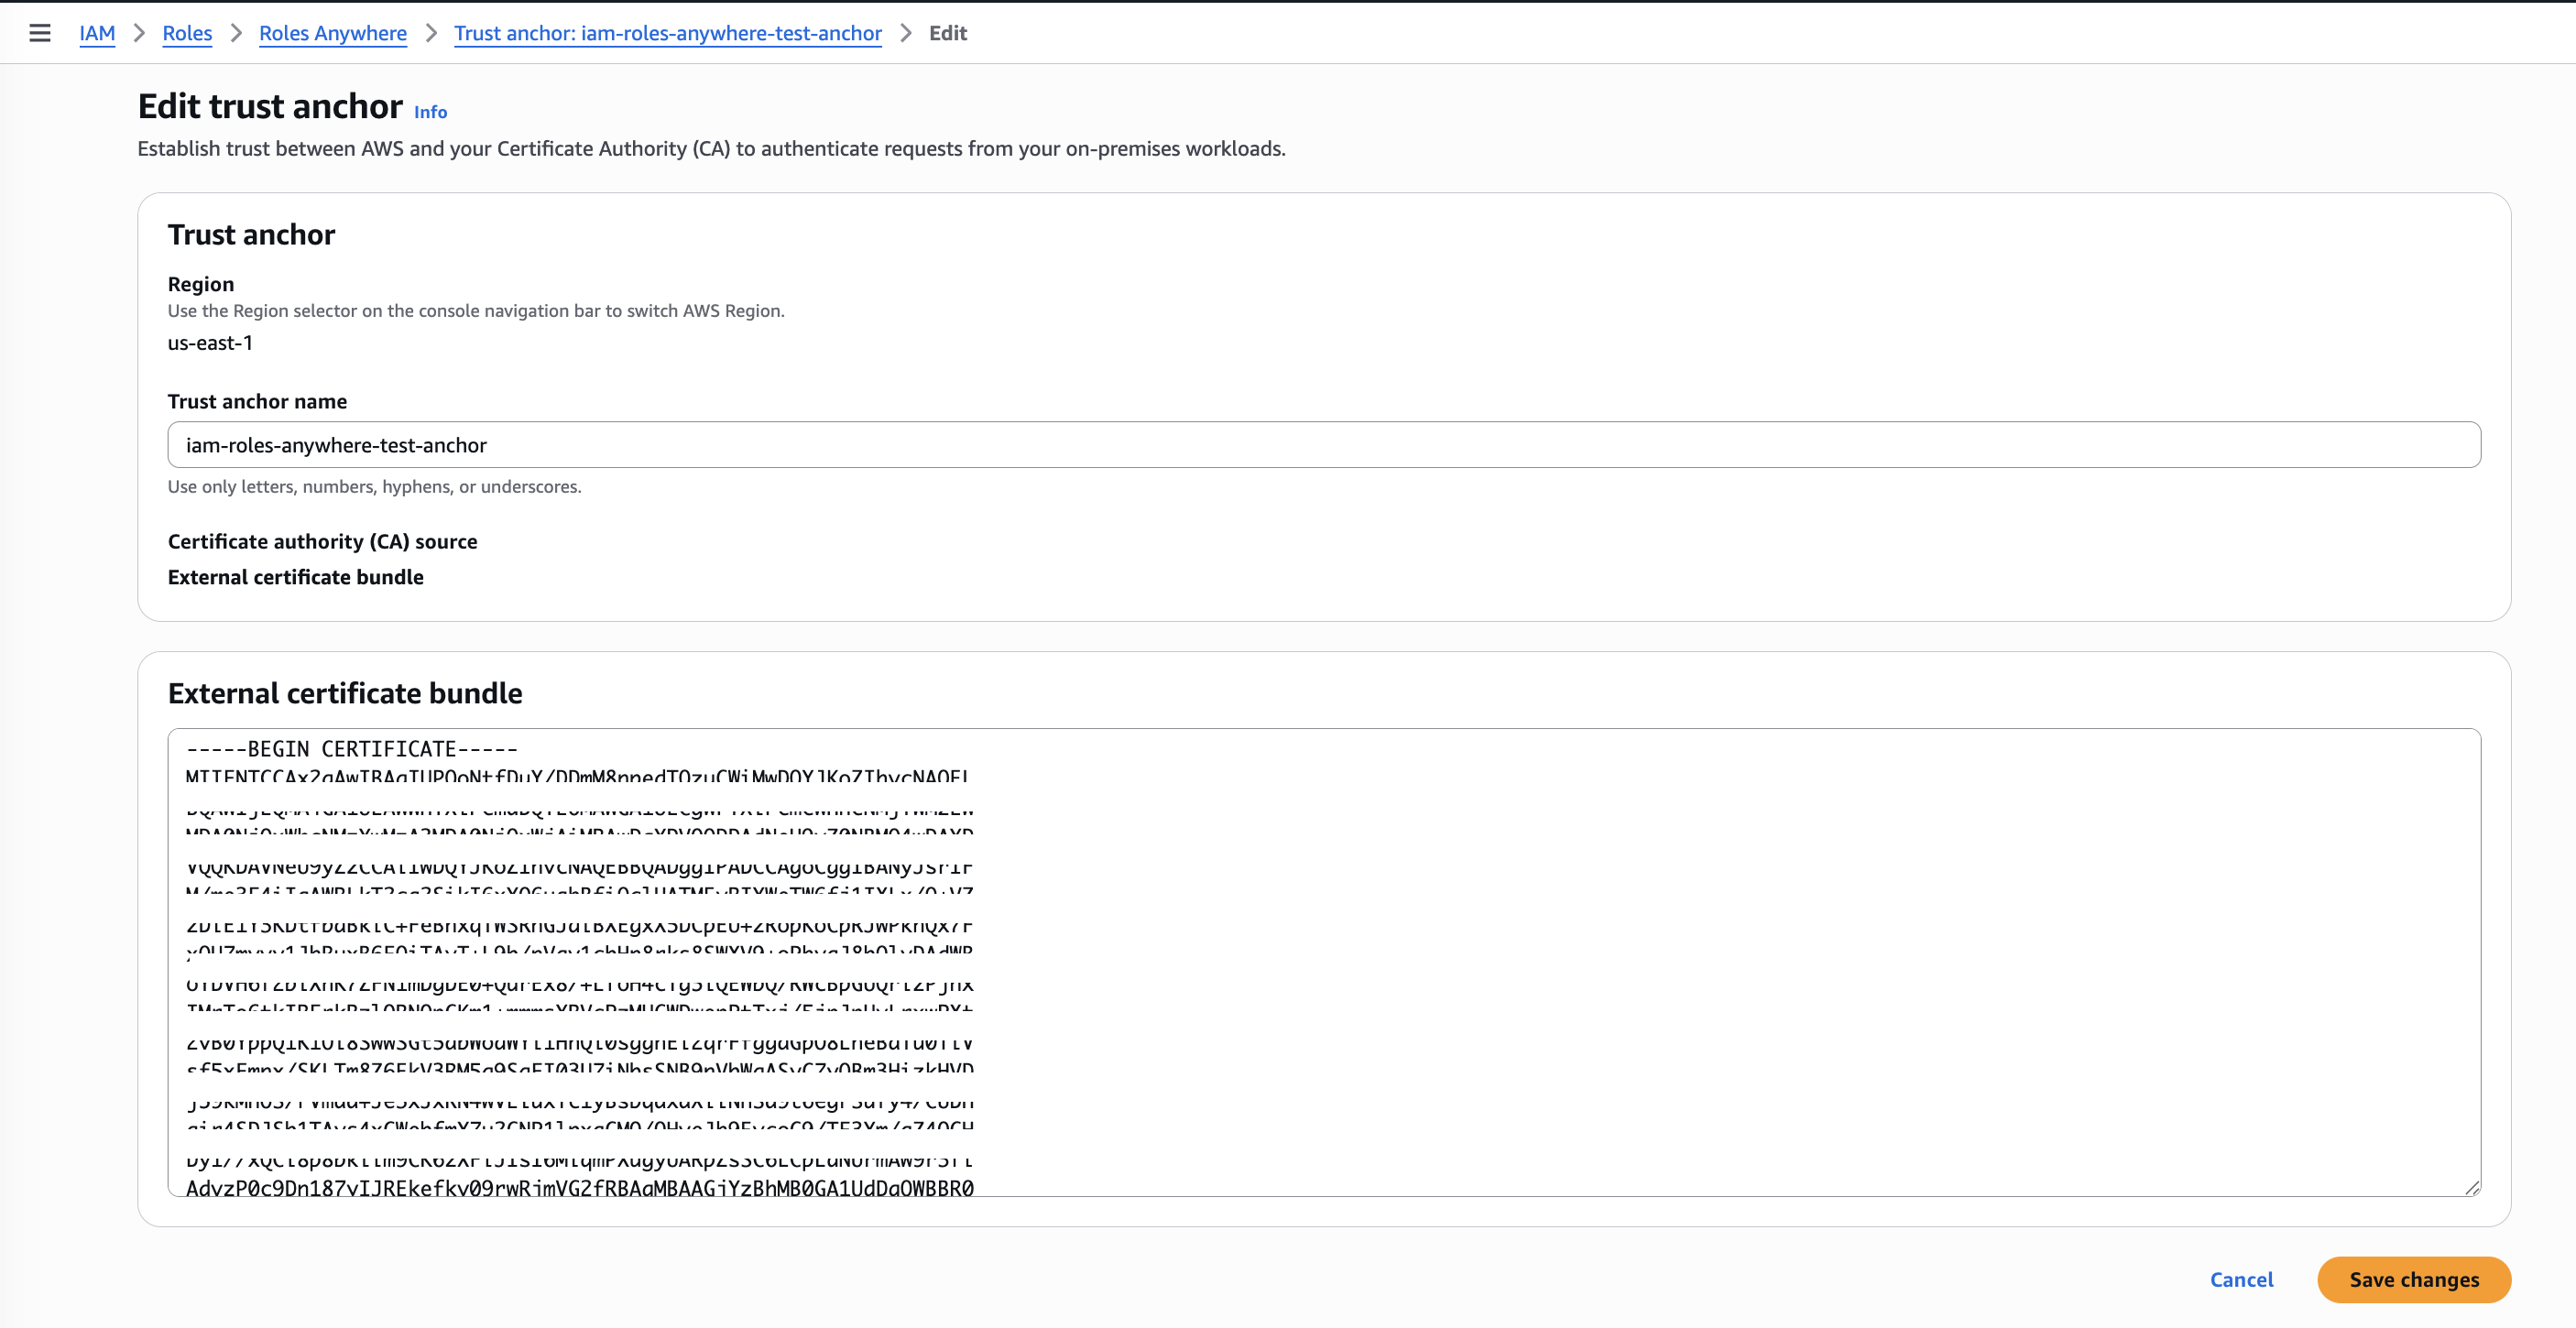
Step 3: Create a Trust Anchor in AWS
This step is performed in the AWS Management Console
Navigate to IAM > Roles Anywhere in the AWS Console (or search for “Roles Anywhere”).
If this is your first time, click Create a trust anchor. Otherwise, click Create trust anchor from the Trust Anchors section.
Enter a descriptive Name (for example,
AlationAgentCA).Under Certificate Authority source, choose one of the following options:
Option A: External Certificate Bundle — Use this option if you manage your own CA (including certificates generated via OpenSSL in Step 1: Set Up Certificates).
Select External certificate bundle.
Open your
ca.crtfile in a text editor and paste the entire contents into the text box, including the-----BEGIN CERTIFICATE-----and-----END CERTIFICATE-----lines.
Option B: AWS Private Certificate Authority — Use this option if your organization uses AWS Private CA to manage certificates.
Select AWS Private Certificate Authority.
From the dropdown, select the Private CA that issued your client certificate.
Note
If using AWS Private CA, ensure the Private CA is in the Active state and the client certificate was issued by that CA. The Private CA must be in the same AWS account.
Click Create trust anchor.
Note the Trust Anchor ARN from the details page. You will need this in Step 2: Create an IAM Role in AWS (if you deferred the trust policy condition) and when setting up the Alation Agent machine.
Step 4: Create a Roles Anywhere Profile in AWS
This step is performed in the AWS Management Console
In the IAM Roles Anywhere console, go to the Profiles section.
Click Create profile.
Configure the profile:
Name: Enter a descriptive name (for example,
AlationAuthServiceProfile).Roles: Select the IAM role you created in Step 2: Create an IAM Role in AWS.
Session policies (optional): You can add an inline policy here to further restrict permissions for this specific profile.
Click Create profile.
Note the Profile ARN from the details page. You will need this when setting up the Alation Agent machine.
Next Steps
After completing Steps 1 through 4 above, proceed to one of the following topics to configure the Alation Agent machine and create an authentication profile in Alation:
Filesystem-Based Setup: Store the private key as a PEM file on the Agent machine.
SoftHSM Setup (Encrypted Key Storage): Store the private key encrypted in a SoftHSM2 PKCS#11 token.