Create Support Cases in Alation
Alation Cloud Service Applies to Alation Cloud Service instances of Alation
You can create, view, and track Alation support cases without leaving the product. The in-product case experience brings case creation, case listings, and case status into Alation. You can create a case either from the Support Cases page in Help or from the Alamigo panel when a question cannot be resolved through self-service.
Important
This feature is available on Alation Cloud Service in the new user experience.
If you are a ACS user in classic experience, switch to the new user experience to use this in-product case creation.
If you are on a Customer Managed deployment, continue to use the Alation Help Center to raise and manage support cases. See Alation Support Portal.
In this topic:
Who Can Use This Feature
For release 2026.5.1.0, case creation access continues to be managed by Alation Support through Salesforce, as in previous releases. To request or change access for users in your organization, contact your Alation Account Team or Alation Support. Users who have been granted access can create new support cases and view all cases for the tenant. Users without access don’t see the create case option or the support cases list in the product.
From release 2026.6.0.0, case creation access will move in-product to the Alation Support Case Creator group. Server Admins will create and manage this group from Settings > User Management > Groups and add any Alation admin user (Server Admin, Catalog Admin, or Source Admin) to it.
Anyone in your organization can ask Alamigo for help. Alamigo is available to all Alation users to chat and troubleshoot issues. However, only users with case creation access for the tenant see the option to create a support case when Alamigo can’t resolve their question.
Create a Support Case Through Alamigo
Important
The Alamigo support case creation flow is available only if Alamigo is enabled on the Feature Configuration page in Admin Settings. If Alamigo is not enabled, see Create a Support Case from Help.
If Alamigo cannot resolve your question, you can open a support case from the Alamigo panel without leaving your current page.
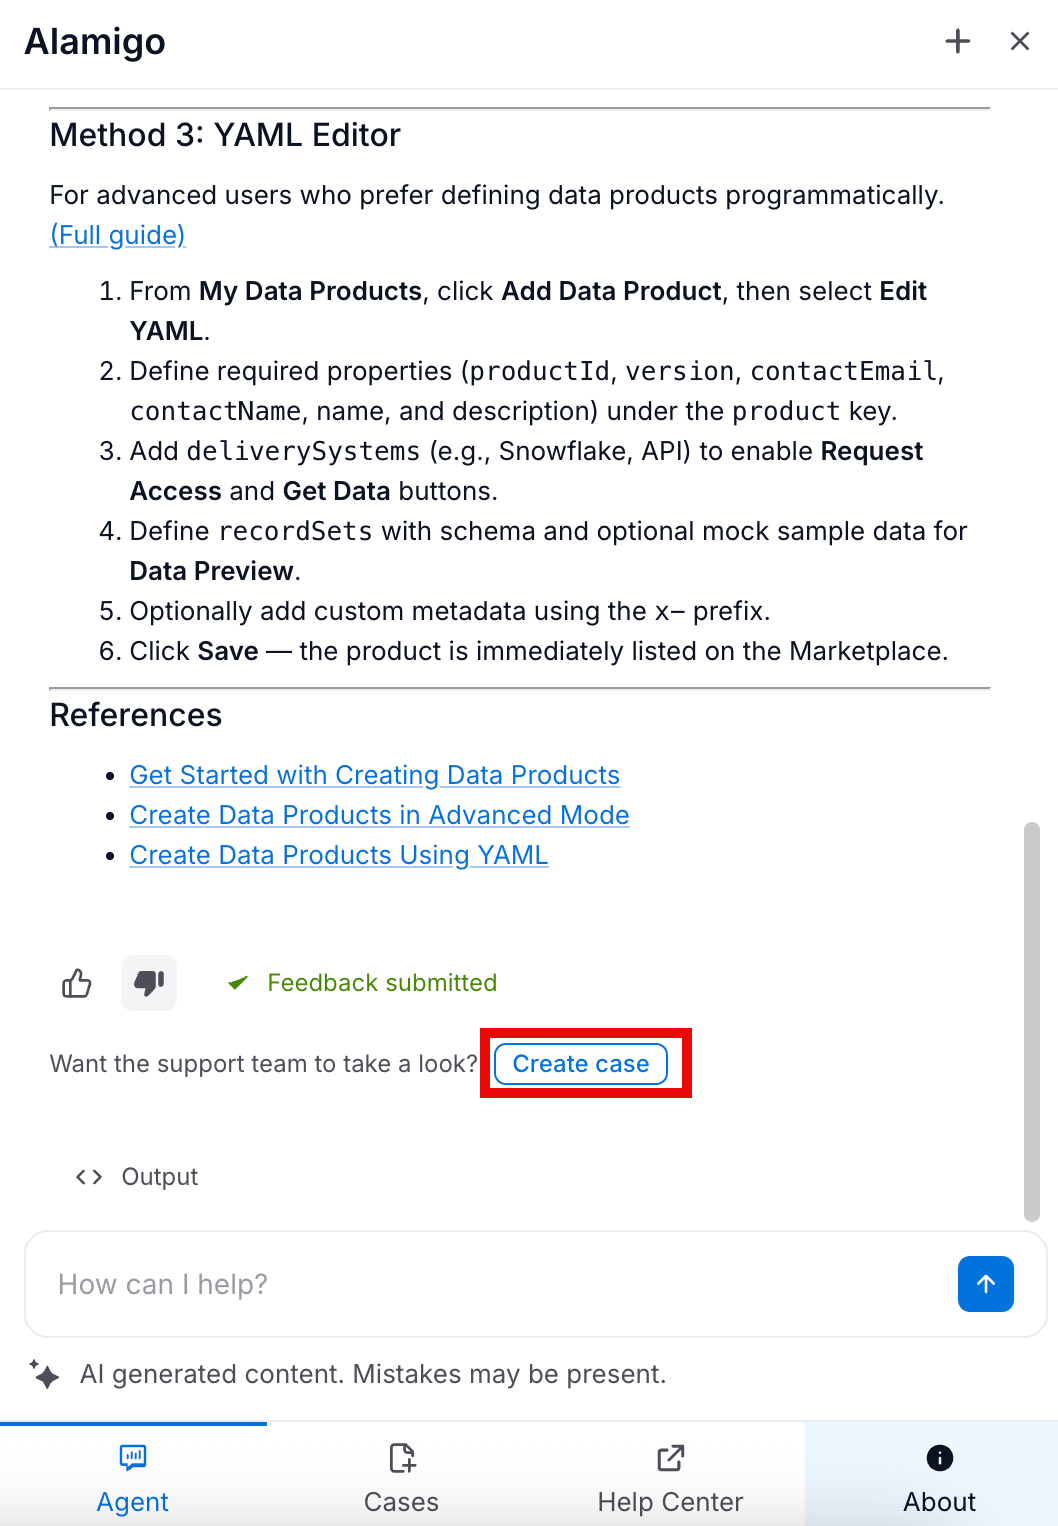
Open Alamigo. For details on launching Alamigo, see Alamigo.
Ask Alamigo about your issue. If Alamigo cannot resolve the question, it offers a path to escalate to support.
In the Alamigo panel, click the Create Case button in the chat window.
In the Create Support Case form, provide the case details. The form is grouped into the following sections:
Issue Details:
Subject and Description: Alation auto-populates these fields with the context of your Alamigo session, including the page you were on and the issue Alamigo identified. Review these values and edit them as needed.
Contact & Ownership:
Select the Primary Contact and Support Region.
Collaborators: Select other admin users who should be copied on email updates for this case.
Click Next to proceed to the next step of the form.
Environment Details (Read-only): Alation auto-captures the environment details from your Alation instance, including the Instance Type, Instance Version, Deployment Type, Instance URL, and Tenant ID. Click Next to proceed to the next step of the form.
Additional Details:
Severity: Alation pre-selects the severity based on your issue details and instance type. You can change it before submitting. Alation disables some options depending on your instance type.
Availability for a Support Call: Provide a preferred time slot for a follow-up call if required.
Steps to Reproduce: Provide detailed steps to reproduce the issue, if applicable.
Error Message: Alation auto-populates this field with the context of your Alamigo session. Edit the message before submitting if needed.
Attachments (Optional): Attach logs, screenshots, or other files that will help the support engineer troubleshoot the issue.
Click Next to proceed to the next step of the form.
Review the case details and click Submit Case.
After you submit, Alation creates the case and returns you to the case list.
Create a Support Case from Help
Important
This section is applicable only if you have not enabled Alamigo. If Alamigo is enabled, see Create a Support Case Through Alamigo.
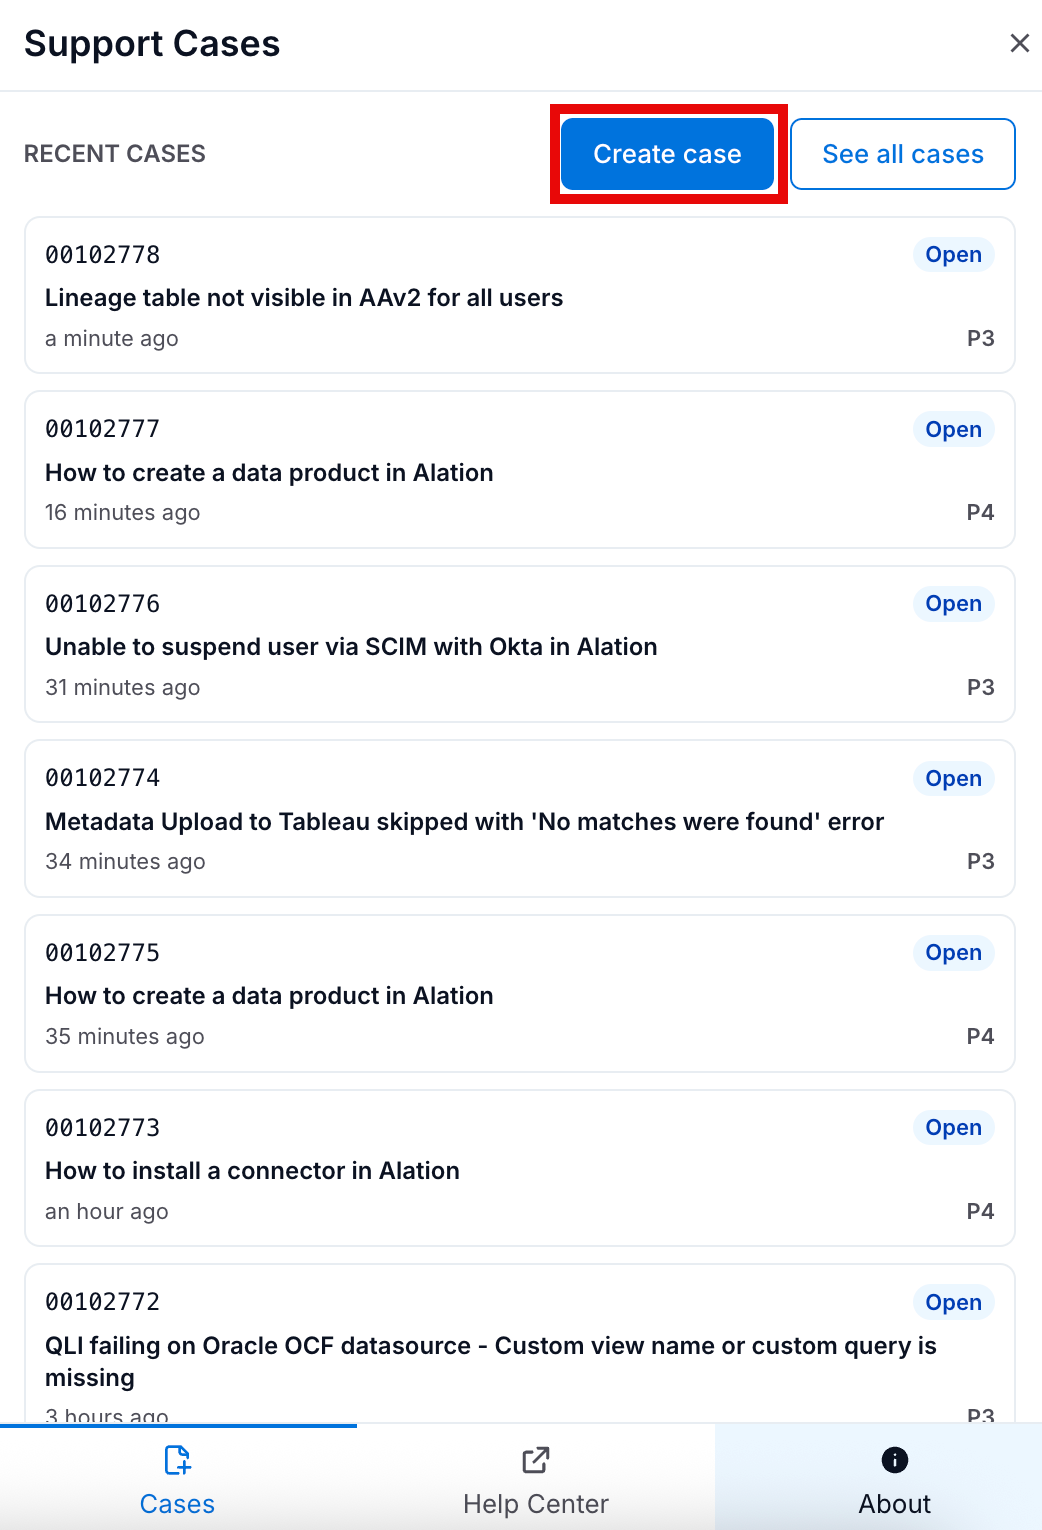
You can open a new support case directly from the Support Cases page.
In the Alation header, click the help icon to open the Support Cases panel.
Click the Create Case button at the top right of the page.
In the Create Support Case form, provide the case details. The form is grouped into the following sections:
Issue Details:
Subject: Provide a short summary of the issue you’re experiencing.
Description: Provide a detailed description of the issue, including any relevant context or steps to reproduce the problem.
Contact & Ownership:
Select the Primary Contact and Support Region.
Collaborators: Select other admin users who should be copied on email updates for this case.
Click Next to proceed to the next step of the form.
Environment Details (Read-only): Alation auto-captures the environment details from your Alation instance, including the Instance Type, Instance Version, Deployment Type, Instance URL, and Tenant ID. Click Next to proceed to the next step of the form.
Additional Details:
Severity: Alation pre-selects the severity based on your issue details and instance type. You can change it before submitting. Alation disables some options depending on your instance type.
Availability for a Support Call: Provide a preferred time slot for a follow-up call if required.
Steps to Reproduce: Provide detailed steps to reproduce the issue, if applicable.
Error Message: Provide the exact error message that you’re seeing, if any.
Attachments (Optional): Attach logs, screenshots, or other files that will help the support engineer troubleshoot the issue.
Click Next to proceed to the next step of the form.
Review the case details and click Submit Case.
After you submit, Alation creates the case and returns you to the case list.
View and Manage Your Cases
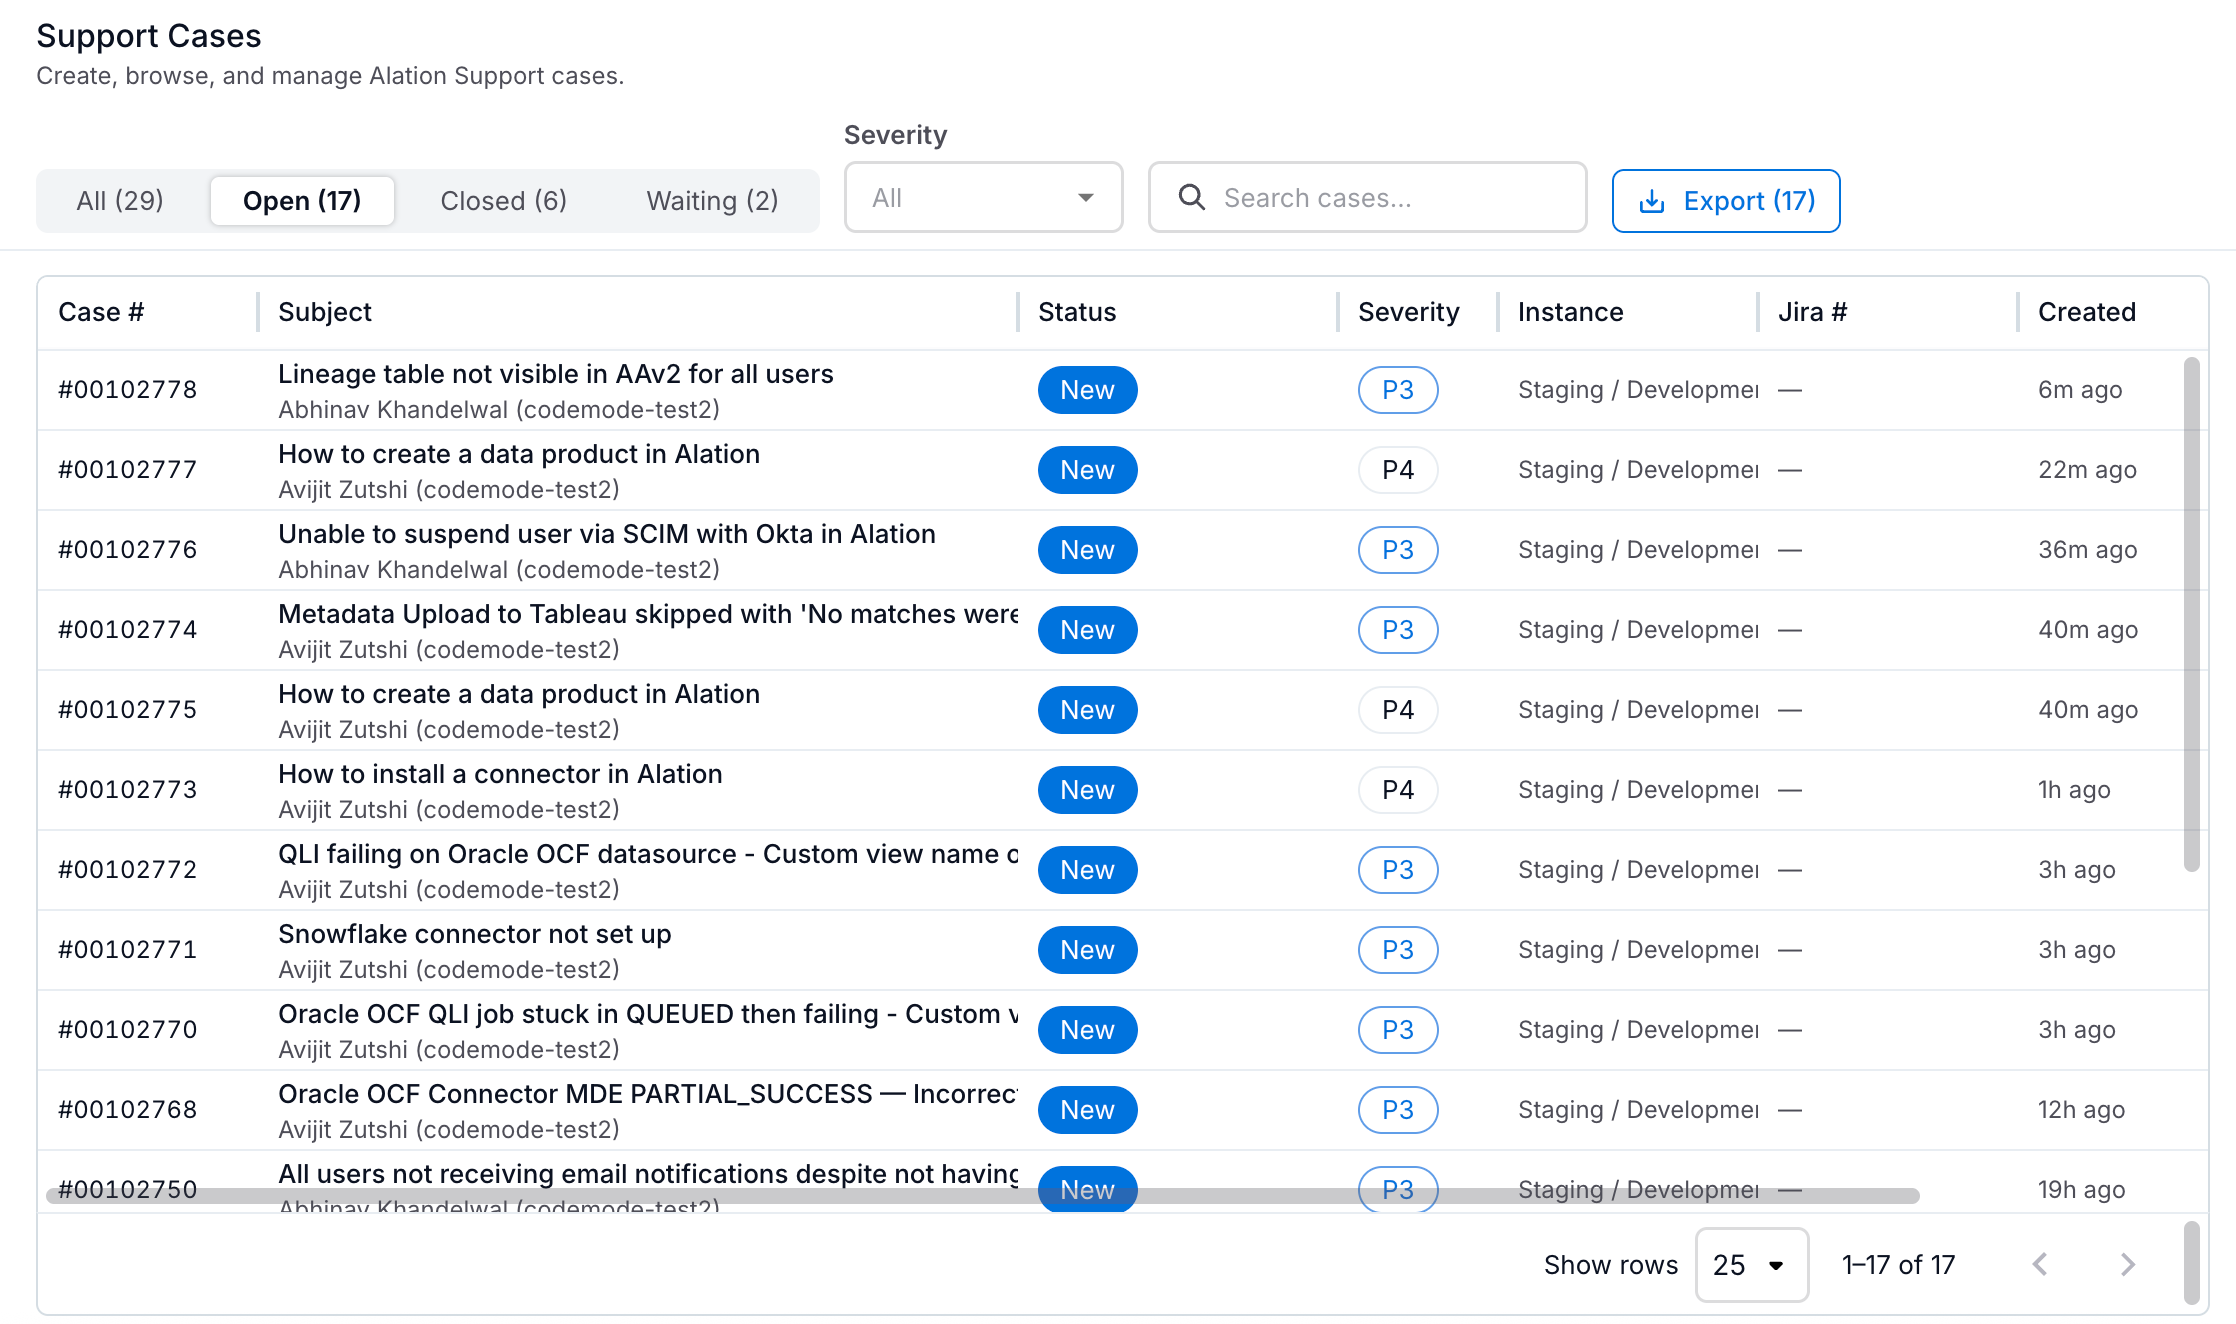
The Support Cases page lists all cases for your account, including cases opened by partner users on your behalf. To navigate to the Support Cases page:
If Alamigo is not enabled:
Click the help icon in the Alation header
In the Support Cases panel, click See All Cases
If Alamigo is enabled:
Click the help icon in the Alation header
In the Alamigo panel, select the Cases tab, and then click See All Cases
The case list groups cases into the following tabs:
Tab |
Description |
|---|---|
All |
Every case for your account in the current view. |
Open |
Cases that are currently being worked on or are awaiting action. |
Closed |
Cases that have been resolved. |
Waiting |
Cases that are waiting on input from your team. |
The number next to each tab name shows how many cases match that tab.
Each row in the case list shows the following columns:
Case # — The Salesforce case reference number and the name of the contact who raised the case.
Subject — The short summary entered when the case was created.
Status — The current state of the case, for example New or Reopened.
Severity — The case severity, from P1 (highest) to P4 (lowest).
Instance — The Alation instance the case was raised against, when available.
Jira# — The associated JIRA ticket, if any.
Created — The date the case was opened.
Last update — How long ago the case was last updated.
To narrow the list, use the controls above the table:
Enter a case number or keyword in the Search cases… field to find a specific case.
Select a severity from the Severity dropdown to show only cases at that severity.
Click Export to download the current list view as a CSV file.
View and Act on a Case
Click any row in the case list to open the case detail page. From this page, follow the full history of a case, respond to your support engineer, manage who is on the case, and close or reopen the case when you’re ready.
The case detail page is organized into two areas:
The case timeline on the left, which shows emails, posts, and comments in chronological order.
The case info panel on the right, which shows case metadata, people, and attachments.
Case Timeline
The timeline shows every interaction on the case, including:
Emails exchanged with the support team.
Posts that you or the support engineer added directly to the case.
Comments left on individual posts.
You can like any post or comment, and expand trimmed content to see the full message.
Post an Update on an Open Case
You can post a new update on any open case to share new information with your support engineer.
Open the case from the Support Cases page.
In the Reply to this case field at the top of the timeline, enter your update.
Click Submit to post your update.
Your post is added to the timeline and the support engineer is notified.
Note
Top-level updates are blocked on closed cases. To add information to a closed case, comment on an existing post or reopen the case.
Case Info Panel
The case info panel on the right shows:
Description and Steps to Reproduce as submitted with the case.
Created and Last update timestamps.
People, including the case Creator, Primary contact, and any collaborators.
Attachments that have been added to the case.
Manage Collaborators
You can add or remove collaborators on both open and closed cases.
In the People section of the case info panel, click Add collaborator.
Select the admin user you want to add.
To remove a collaborator, click the close icon next to their name in the People section of the case info panel.
Upload Attachments
You can attach logs, screenshots, or other files to help the support engineer troubleshoot.
In the case info panel, locate the attachments area.
Drag files into the area, or click the area to browse for a file.
Attachments can be added to both open and closed cases.
Close a Case
When the case no longer needs support attention, you can close it yourself.
Open the case from the Support Cases page.
Click the three-dot menu on the top right and click Close Case.
In the Close Case dialog, select a Closure Type:
Closure Type
When to use it
Duplicate Request
The case duplicates another case that you or a collaborator have already opened.
Not Needed
You no longer need support on this case, for example because the underlying need has changed.
Resolved
The issue has been resolved and no further support action is needed.
Enter a Comment that explains the reason for closing the case.
Click Close Case to confirm.
After you close a case, comments, attachments, and collaborator changes are still allowed.
Reopen a Closed Case
You can reopen your own case within 45 days of the original close date.
On the Support Cases page, click the Closed tab.
Open the case you want to reopen.
Click Reopen Case on the case detail page or Click the three-dot menu on the top right and click Reopen Case.
After you reopen a case, the status changes to Reopened and the case appears in the Open tab again.
Note
The 45-day reopen window is enforced by Salesforce. If a case was closed more than 45 days ago, the Reopen Case action is not available and you are prompted to open a new case instead.
Comment on an Update
You can add a comment to any post on a case, including posts on closed cases.
In the case timeline section, click Comment on the post you want to comment on.
Enter your comment and click Comment.
Comments are allowed on both open and closed cases.